Instruction Manual IS-SPX-1000 IS-SPX-1300 Inspired Signage XPress Players Inspired Signage L a s t R e v is e d : 1 / 0 7 / 2 0 1 5
AMX Limited Warranty and Disclaimer This Limited Warranty and Disclaimer extends only to products purchased directly from AMX or an AMX Authorized Partner which include AMX Dealers, Distributors, VIP’s or other AMX authorized entity.
Table of Contents Table of Contents IS-SPX-1000/1300 Inspired Signage XPress Players ...........................................1 Overview .................................................................................................................. 1 IS-SPX-1000 ............................................................................................................. 1 IS-SPX-1000 Specifications .............................................................................................
Table of Contents Web-Based Configuration Pages ......................................................................15 Overview ................................................................................................................ 15 Navigation Bar ........................................................................................................ 15 Information ............................................................................................................. 16 Status ..........
Table of Contents Advanced.................................................................................................................................. 41 Debugging................................................................................................................................ 42 Backup ...................................................................................................................................... 43 Appendix: Encoding Guides ......................................
IS-SPX-1000/1300 Inspired Signage XPress Players IS-SPX-1000/1300 Inspired Signage XPress Players Overview The IS-SPX-1000 (FG1231-01) and IS-SPX-1300 (FG1231-11) Inspired Signage Xpress Players offer a simple way to deliver digital signage solutions. The rich set of functionalities offered by the SPX Players simplifies the implementation, management and maintenance of a range of audio/visual communication solutions.
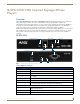
IS-SPX-1000/1300 Inspired Signage XPress Players IS-SPX-1000 Specifications (Cont.) Supported Video File Types (Cont.): Streaming media protocol: MMS, RTSP, RTP, SDP, HTTP; Uni- & multicast Front Panel Components: • Ethernet RJ45 Ethernet 10/100 Mbit/s (RJ-45), IEEE 802.3u, 802.3x. • USB 2.0 Connector Used with Flash drives and hard disks for additional external storage; interactivity events via touch screen, keyboard and mouse.
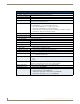
IS-SPX-1000/1300 Inspired Signage XPress Players IS-SPX-1300 The IS-SPX-1300 Inspired Signage Xpress Player (FG1231-11) offers the same functionality as the IS-SPX-1000, but offers a different set of supported video and audio codecs, and media container formats (see Specifications tables). RS232 Interface Status LED Ethernet RJ45 5V-DC Input Reset USB 2.0 Connector Analog Video Out (VGA) Digital Video Out (HDMI) Analog Audio Out FIG.
IS-SPX-1000/1300 Inspired Signage XPress Players IS-SPX-1300 Specifications (Cont.) Rear Panel Components: • DC Power Input: 5V DC, typ. 0.6A (3W). • HDMI: HDMI (incl. digital audio), DVI via adapter. • Analog Audio Out: Line level, stereo, mini-jack 3.5mm • Analog Video Out: VGA (DB15 HD connector). • RS232 Interface: RS232, up to 115200 baud, mini-jack 3.5mm.
IS-SPX-1000/1300 Inspired Signage XPress Players IS-SPX Players connect to the network through a standard RJ-45 connector. Each device has a unique MAC address that allows to identify the unit and thus the associated display. IS-SPX Players support 10/100BASE-T Ethernet via a standard RJ-45 connector. Each unit has a unique MAC address and supports all the required protocols to connect to network file systems and retrieve media elements.
IS-SPX-1000/1300 Inspired Signage XPress Players Formats, Codecs and Encoding Parameters To test if a video is compatible with the HMP, drag and drop it into a project in HMD with the appropriate HMP target set. HMD will either import the video or report why it is not compatible. File Formats The officially supported multimedia file formats across all devices are: File Formats Audio file formats AIFF, MP3, M4A (or MP4), WAV and WMA. Video file formats AVI, ASF, MOV, MP4, VOB and WMV.
IS-SPX-1000/1300 Inspired Signage XPress Players Unsupported This list is not exhaustive and any codec that is not written above, should be considered as part of this list: Unsupported Audio codecs • 24-bit PCM audio • AC3 • MPEG-4 SLS (HD-AAC) • Raw AAC files (use AAC within an MP4 or M4A file instead) • RealAudio Video codecs • Flash video - it's not possible to display flash videos (from sharing websites like YouTube), however you might be able to download those videos (as mp4, avi or another support
IS-SPX-1000/1300 Inspired Signage XPress Players Other Notes Video transparency is not supported. The specified video standards (e.g. 720p) are performance guides based on standard aspect ratio pixel equivalents; i.e. higher resolutions that 1280x720 could be displayed if the dimensions are adjusted proportionally. Interlaced video: IS-SPX Players have a built-in de-interlacing filter for MPEG2 and H264 videos. Bitrate limitations are defined in Levels (up to 11mbps).
Installation Installation Overview The installation of an IS-SPX Player starts by plugging in two cables: the power cable and the video cable (HDMI and/or VGA) to the display. As soon as it is connected to the power line, the device will boot in a few seconds and automatically select the resolution supported by the associated digital display. Content rendering will begin in less than 1 minute.
Installation 3. Power up the IS-SPX Player. 4. Wait with the reset button pressed for at least 8 seconds. 5. Release the reset button. 6. The IS-SPX Player will now boot in the factory default mode. Updating Firmware To check if a new version of the firmware is available for your IS-SPX Player: 1. With your preferred web browser, connect to the HTTP server of your unit by entering the IS-SPX Player’s IP address into the browser. 2.
Installation 2. Select the update time. 3. Press Apply to validate your changes. Getting Connected The IS-SPX Player has a special procedure for connection for the first time to a PC using the RJ-45 Ethernet interface. This step is required to remote publish content on an IS-SPX Player. This procedure requires an IS-SPX Player and one of the following configurations: PC with RJ-45 10/100/1000 Ethernet interface and an Ethernet cable.
Installation If the IS-SPX Player is accidentally configured with an incorrect IP address, you need to reset the unit to its factory default and restart the configuration procedure. Troubleshooting If you are unable to connect to your IS-SPX Player, check the following items: 1. Double check that you have correctly entered the correct IP address in your web browser. 2. Check the LED on your device.
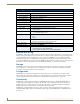
Installation FIG. 4 Local Area Connection Properties FIG.
Installation Installing the IS-SPX-MNT Mount Adapter The optional IS-SPX-MNT Mount Adapter Kit (FG1231-17) is intended to allow attachment of the IS-SPX Player to Vesa display wall mounts, thereby keeping it within easy reach for firmware uploads and other basic maintenance. IS-SPX Player IS-SPX-MNT Mount Adapter Pan head screws Mounting holes FIG. 6 Installation of the IS-SPX-MNT Mount Adapter (62-1231-03) To install the IS-SPX-MNT Mount Adapter: 1.
Web-Based Configuration Pages Web-Based Configuration Pages Overview To access the IS-SPX Player’s Web-Based Configuration pages, enter the IP address of the IS-SPX Player into your web browser. This advertisement may be viewed with any Zeroconf-enabled browser, such as NetLinx Studio, or via the Bonjour plug-in for Internet Explorer and Safari. Bonjour, Bonjour for Windows, the Bonjour logo, and the Bonjour symbol are copyright 2010 Apple, and are used under license.
Web-Based Configuration Pages Information The Information pages contain all of the basic schematics of the IS-SPX Player. This information cannot be edited. Status FIG. 9 Information - Status page The Status page lists the current basic information on the IS-SPX-1000, including the latest firmware version. Information - Status Page 16 Serial Number: This number is the serial number of the device. The revision number lists the daughter-board and motherboard type used in the device.
Web-Based Configuration Pages Snapshot The Snapshot page gives a snapshot view of the latest information being displayed by the IS-SPX Player. FIG. 10 Information - Snapshot page Information - Snapshot page Refresh Now: This button refreshes the template view currently being displayed by the display monitor. Display Info The Display Info page lists information on the IS-SPX Player’s current display settings and the current HDMI and VGA settings. FIG.
Web-Based Configuration Pages Information - Display Info page Display Settings: This section shows the current settings for the display being used, with specifications for resolution, vertical refresh, and the aspect ratio. HDMI Output: This section shows details on the current HDMI output from the IS-SPX-1000, including display size, aspect ratio, and support of underscan.
Web-Based Configuration Pages Logs The Logs page contains all current logs of IS-SPX Player use, in both text (.log) and zipped (.log.gz) formats. Click on a particular log to access it. FIG. 13 Information - Logs page Information - Logs page Accounting Logs: This section catalogs one current total accounting log and up to seven zipped logs. Current Logs: This section catalogs all of the separate sections of the current accounting log.
Web-Based Configuration Pages Administration The Administration pages allow you to change the IS-SPX Player’s operational parameters through a Web-based interface. Many of the pages allow changes to both basic and advanced features and specifications. Display Settings The Display Settings page enables users to custom tailor settings for different display manufacturers. Display The Display tab enables users to make changes to the presentation on the IS-SPX Player chosen output display. FIG.
Web-Based Configuration Pages Power Save The Power Save tab of the Display Settings page enables users to configure the power settings on the chosen output display for the IS-SPX Player. FIG. 15 Administration - Display Settings - Power Save Administration - Display Settings - Power Save Display Power Save Settings: Enable display power saving: Check to enable power saving options on the Signage monitor. The Use fixed schedule for display power check box becomes valid for selection.
Web-Based Configuration Pages Interactivity The Interactivity tab of the Display Settings page groups several options related to event-triggered interactivity. FIG. 16 Administration - Display Settings - Interactivity Administration - Display Settings - Interactivity Interactivity Settings: Enable events: Click this box to allow programmed events to be displayed. Maximum rendering latency: This dropdown menu controls the maximum rendering latency of the display in milliseconds.
Web-Based Configuration Pages Splash Screen The Splash Screen tab groups the options related to the splash screen images shown by the player during booting, shutting down or firmware update sequences. To change one of these images, simply upload the file(s) from a computer and press the "Apply" button. FIG.
Web-Based Configuration Pages Advanced While the Basic tab allows some changes to the chosen display, the Advanced tab allows more fine-tuning of the display output. This tab groups several options related to player video output signal mode configuration. FIG. 18 Administration - Display Settings - Advanced The Display Settings functions may be modified manually, or they may be set to the video display’s defaults. Press the Check button for the device to scan the current video display.
Web-Based Configuration Pages Network Settings Although the IS-SPX Player may be used on its own with a display and power source, it may also be installed as part of a network. The Network Settings page allows configuration with direct or remote networks. Connections The Connections tab enables users to configure the player network connections. FIG.
Web-Based Configuration Pages Fixed IP Configuration To manually configure an IS-SPX Player to connect to a specific network with a fixed IP address: 1. Get the information on the network to be reached. This includes a range of free IP addresses that can be allocated to the IS-SPX Player without network conflicts and the correct subnet mask. 2. On the Network Settings page Basic tab, check the Static radio button to enable the Static Network Settings fields. 3.
Web-Based Configuration Pages Administration - Network Settings - Advanced Network Watchdog: The Network Watchdog is activated if either the Minimum or Maximum conditions are set to a value other than 0 (0s by default). Both parameters can be configured using a time defined in seconds (e.g. 10s), minutes (e.g. 10m) or hours (e.g. 1h). When activated, the player will reboot if one of the conditions is no longer valid. Link-local (i.e. Zeroconf) addresses are not taken into account.
Web-Based Configuration Pages HTTPS The HTTPS tab on the Network Settings enables users to enable / disable the full verification of HTTPS certificates. FIG. 22 Administration - Network Settings - HTTPS Administration - Network Settings - HTTPS Check box: Check to enable full verification of HTTPS certificates. Apply: Press Apply to save the credentials. Proxy On this tab, users can configure the proxy settings to be used by the player. FIG.
Web-Based Configuration Pages SNMP On this tab, you can configure the SNMP settings to be used by the player. The player supports SNMP version 2c (with read-only access), does not generate SNMP traps and runs the Net-SNMP 5.4 (fully patched). FIG. 24 Administration - Network Settings - SNMP Administration - Network Settings - SNMP SNMP Settings: Read only community: Enter the name of the server’s folder. Closed By default, the access to SNMP is disabled (closed).
Web-Based Configuration Pages Administration - Media Sources Media Sources: Primary source: In the dropdown menu, select between Local Storage and Network Project. If Network Project is selected, enter the URL for the project folder. Click Apply to save all changes to this section. Fallback source: In the dropdown menu, select between Local Storage and Network Project. If Network Project is selected, enter the URL for the project folder. Click Apply to save all changes to this section.
Web-Based Configuration Pages Security Use the Security page to control administrative, content, and monitoring access to the IS-SPX Player. FIG. 26 Administration - Security page Administration - Security page Administrative Server: Controls access to all sections of the HTTP administration server. Content Server: Controls access to all content displayed by the IS-SPX-1000. Monitoring: Controls access to the Logs and Snapshot pages. Controlling User Rights and Permissions 1.
Web-Based Configuration Pages Date/Time The Date/Time page is used to set all player time clock related options. Time Zone Use the Time Zone tab to update or configure the timezone where the player is used. FIG. 27 Administration - Date/Time - Time Zone Administration - Date/Time - Time Zone Current Settings: This section displays the current date, time, and time zone registered with the IS-SPX Player.
Web-Based Configuration Pages Time Sources Use the Time Sources tab to change the current time registered by the IS-SPX Player, and to synchronize with outside servers. FIG. 28 Administration - Date/Time - Time Sources Administration - Date/Time - Time Sources Change Time: Manual Time Settings: The time registered with the IS-SPX-1000 may be changed manually, or it may be synchronized with an NTP server.
Web-Based Configuration Pages NTP Statistics The NTP Statistics page logs all contact with the NTP servers currently being accessed or monitored. FIG. 29 Administration - Date/Time - NTP Statistics Administration - Date/Time - NTP Statistics NTP Statistics: This section logs all contact with the NTP servers currently being accessed or monitored. If this option has been chosen. Click the Refresh button to update the statistics.
Web-Based Configuration Pages RS232/USB IO Use the RS232/USB IO page to change the parameters of the IS-SPX Player’s RS232 port. This may be used to control both when information is transmitted to the display and when the display itself is turned on and off. FIG. 30 Administration - RS232/USB IO page Administration - RS232/USB IO page Settings: Protocols: Use this dropdown menu to select the particular serial port protocol to be used. Click Apply to save all changes. Note: The default is "Disabled".
Web-Based Configuration Pages Pull Mode From the Pull Mode page, the IS-SPX Player may be configured to pull project files, logs, and iCalendar files from remote sources. Determine the type and source of content pulled to the IS-SPX-1000 by selecting between "Disabled," "Manual Settings," "From Uploaded iCalendar File," and "From Remote iCalendar File." FIG.
Web-Based Configuration Pages Accessing a Remote iCalendar File on an IS-SPX Player Multiple IS-SPX Players may access the same iCalendar schedule file, so long as you have the serial number for the device storing the file. For more information on generating and editing iCalendar files, please refer to the Inspired Signage XPress Programming Guide, available at www.amx.com. 1. From the Pull Content Scheduling page, click the From remote iCalendar file (ics) button. 2.
Web-Based Configuration Pages Settings The Settings tab displays the currently selected update server, as well as offers options on selecting automatic updates and setting when firmware updates will be made. Examples for the IS-SPX-1000 and IS-SPX-1300 are shown below. FIG. 33 Administration - Firmware Update - Settings Administration - Firmware Update - Settings Update Server: Server / URL In this field, enter the URL of the folder where firmware updates are stored on a remote server.
Web-Based Configuration Pages Updater Info The Updater Info tab displays the current status of the updater and the latest update log. FIG.
Web-Based Configuration Pages Maintenance The Maintenance page contains basic user functions for the IS-SPX Player such as restart, restoring default content, getting reports and basic diagnostics. Basic The Basic tab of the Maintenance page contains basic maintenance functions for the IS-SPX Player that require human assistance. FIG. 35 Administration - Maintenance - Basic Administration - Maintenance - Basic System Restart: Restart Now: Click Restart Now to restart the player.
Web-Based Configuration Pages Advanced The Advanced tab on the Maintenance page contains more features for IS-SPX Player maintenance, including the ability to put the device into diagnostic and installation modes to assist with troubleshooting and firmware updates. FIG. 36 Administration - Maintenance - Advanced Administration - Maintenance - Advanced Diagnostic Mode Restart: Restart Now: Click Restart Now to restart the IS-SPX-1000 in Diagnostic Mode.
Web-Based Configuration Pages Administration - Maintenance - Advanced Clear Cache: Click the Clear Cache button to wipe all information stored in the player cache. Note: Clicking this button automatically restarts the IS-SPX-1000. Clear Clock Calibration: Click the Clear Clock Calibration button to wipe all data on the player clock calibration. Note: Clicking this button automatically restarts the IS-SPX-1000.
Web-Based Configuration Pages Backup The Backup tab on the Maintenance page enables users to create backup configuration files and restore the player using existing backups previously saved to the player. FIG. 38 Administration - Maintenance - Backup Administration - Maintenance - Backup Backup Configuration: Backup users and Passwords: Click to enable the Backup users and passwords checkbox.
Web-Based Configuration Pages 44 IS-SPX-1000 & IS-SPX-1300 Inspired Signage XPress Players
Appendix: Encoding Guides Appendix: Encoding Guides Encoder Tools FFMpeg FFmpeg is a complete, cross-platform solution to record, convert and stream audio and video. Download the windows version here. VLC VLC is a free and open source cross-platform Multimedia Player, Media Converter and Streamer. Download here. WinMEnc WinMEnc is a free front-end for encoder. Download here. Encoding SD video The recommended format for SD video that will be played across all HMP devices is MPEG2.
Appendix: Encoding Guides Encoding Into MOV Format Using WinMEnc To encode a file using preset settings: 1. Download the following preset and save it into the "profile" folder below the folder containing WinMEnc.exe: 6MB MPEG-2, 16x9, MP3 audio File: Profile-720w 16x9 6MB MPG2 MP3.7z 2. Open WinMEnc.exe and select the profile from the dropdown menu (FIG. 39): FIG. 39 WinMEnc.exe - Selecting a Profile 3. Drag and drop the file(s) you wish to encode into the first tab (FIG. 40): FIG. 40 WinMEnc.
Appendix: Encoding Guides FIG. 41 WinMEnc.exe - Select an Output Folder 5.
In the ever-changing AV industry, continual education is key to success. AMX University is dedicated to ensuring that you have the opportunity to gather the information and experience you need to deliver strong AMX solutions. Plus, AMX courses also help you earn CEDIA, NSCA, InfoComm, and AMX continuing education units (CEUs).