instruction manual FileTransfer2 So ftw are
Software License and Warranty Agreement LICENSE GRANT. AMX grants to Licensee the non-exclusive right to use the AMX Software in the manner described in this License. The AMX Software is licensed, not sold. This license does not grant Licensee the right to create derivative works of the AMX Software. The AMX Software consists of generally available programming and development software, product documentation, sample applications, tools and utilities, and miscellaneous technical information.
Table OF Contents Table OF Contents Welcome To FileTransfer2 .......................................................................................1 The FileTransfer2 User Interface ...................................................................................... 1 Send Tab.................................................................................................................................. 2 Receive Tab ......................................................................................
Table OF Contents Configuring the Touch Panel for Virtual NetLinx Master TCP/IP Transfers ........................... 22 Step 3: Device Mapping .................................................................................................. 22 Editing Device Mapping Information ...................................................................................... 22 Device:Port:System (D:P:S)...................................................................................................
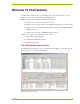
Welcome To FileTransfer2 Welcome To FileTransfer2 The FileTransfer2 application gives you the ability to queue a list of files to transfer to various NetLinx and Axcess devices, without launching NetLinx Studio. FileTransfer2 supports the following capabilities for file transfers: Ability to select the Platform type (NetLinx or Axcess). Ability to set the username and password for NetLinx masters that have security enabled.
Welcome To FileTransfer2 Use the Send tab for transferring files from the PC running FileTransfer2 and the target Master Controller or System Device. Use the Receive tab for transferring files from a Master Controller or System Device to the PC. The Menu bar provides access to the main functions of the program. The Transfer Command Buttons allow you to control transfer functions. The Load Options provide flexibility in how you can add files to the Transfer List.
Welcome To FileTransfer2 depending on the file type). Currently there are only options available when transferring TPD and TP4 type files. This button is disabled for all other file types. Receive Tab The Transfer List table in the Receive tab indicates the files that are currently in the Files To Receive queue. Each row in the table represents a single System file, and could be any of the supported system file types.
Welcome To FileTransfer2 Mapping — Opens the Enter DPS dialog, where you can view/edit the D:P:S assignment of the source device for the selected file. If the file being transferred is a TPD file, and is being sent via serial connection, then the Enter DPS dialog also offers a Connect Directly To the Device - No Master option.
Welcome To FileTransfer2 When sending a TP4 file to a G4 panel, verify that the NetLinx Master Firmware is build 85 or later. Verify the TPDesign4 program being used is Version 1.01 or higher. Earlier versions of the firmware and TPD4 software are incompatible with G4 panels. Communication Settings — Opens the Communication Settings dialog, where you can edit the Platform, Transport Connection type and Communication Settings for the selected file.
Welcome To FileTransfer2 Transfer Status Window Once you have started a file transfer operation, the following types of status information are displayed in the File Transfer Status tab of the Output Display window: Type — The type of transfer (sending or receiving). Status — The current state of the transfer (Pending, Transferring, Complete or Failed). Connection — The communications settings used to establish communication with the target device.
Welcome To FileTransfer2 Supported File Types The following are the types of files this application can send to and receive from, various NetLinx and Axcess devices: TOK Files TKN Files (including compiled Duet TKN Files) TP4 Files TPD Files KPD Files IRL/IRV Files SRC Files Notes on supported file types: The selection of available file types depends on the selected platform, Send/Receive selection and communication settings All files must mapped to devices before they can be selected for transfer.
Welcome To FileTransfer2 Tested Modems List The following is a list of internal and external modems that have been tested with the program. Internal Modems --- Windows Operating System --- Manufacturer Model - Internal 95 98 ME NT 2000 XP Diamond Supra 336i SP ASVD ? C ? ? ? ? Diamond Supra 56i SP ? C ? ? ? ? Lucent 56K LU PCI ? C ? C ? ? US Robotics 56k Fax PCI #3CP5610A ? C ? C ? ? US Robotics Sportster WinModem - #0467 ? X ? ? ? ? Zoom Fax 28.8 v.
Welcome To FileTransfer2 FileTransfer2 9
Welcome To FileTransfer2 10 FileTransfer2
Using FileTransfer2 Using FileTransfer2 The basic steps for using transferring files to and from system devices are: Sending Files To System Devices: 1. Adding Files To The Files To Send Queue 2. Configuring Communications Settings for Transfers 3. Device Mapping 4. Transferring the Files Receiving Files From System Devices: 1. Adding Files To The Files To Receive Queue 2. Configuring Communications Settings for Transfers 3. Device Mapping 4.
Using FileTransfer2 You can disable the Quick Load dialog from automatically opening by deselecting the After opening a Workspace file...Visit the Quick Load dialog option in the Preferences dialog. 1. Selection Options menu — Click the down arrow to access the following load options: Active System — Loads only the files from the active System. Entire Workspace — Loads all files from the Workspace. Select System — Select an individual System from the Workspace to load. 2.
Using FileTransfer2 All Projects and associated Systems and System files are linked to the Workspace, so that you can add and remove Projects and Systems without having to make copies of the files. NetLinx Studio also allows you to copy and paste Projects within the Workspace; in the case that you need to create several similar Projects you can quickly generate multiple Projects and modify each one as necessary.
Using FileTransfer2 File Transfer List (*.FTL) Files File Transfer List (FTL) files are created in FileTransfer2, and allow you to save a list of files as they appear in either the Files To Send or Files To Receive queues (with communications settings and device mapping information). Once saved as an FTL file, the file transfer list can be quickly reloaded without having to open and configure each file. To create a FTL file: 1.
Using FileTransfer2 Adding Files To The Files To Send Queue There are several possible approaches to adding files to the Files To Send List (Send tab). Add some or all of the files contained in a Workspace file or a Workspace-To-Go file. Add a set of files, defined in a File Transfer List file. Add individual systems (see Supported File Types list). Notes: The file types that are available for selection depend on the selected Platform (Axcess or NetLinx), Send/Receive selection and Communication settings.
Using FileTransfer2 Adding Files From a Specific Project/System In the Send tab: 1. Select File > Load Workspace/AXW/FTL File or click the Load Workspace command button to open the Open File dialog. 2. Set the File of Type drop-down to NetLinx Studio Files (*.apw). 3. Locate and select the Workspace file that contains the Project/System with the file(s) you want to add, and click Open. This opens the Quick Load dialog. 4.
Using FileTransfer2 KPD Keypad Touch File (*.KPD) 3. Select the type of file that you want to add to the Transfer List. 4. Click the Add button. This invokes the Open dialog, with the Files of Type selection already set to the selected file type. 5. In the Open dialog, locate and select the file that you want to add. 6. Click Open to add the selected file to the Files To Send queue. Adding Files To The Files To Receive Queue IR files cannot be received from Axcess Master controllers.
Using FileTransfer2 Step 2: Communication Settings Communication settings for each file is established and saved with the files when they are created in NetLinx Studio, but can be overwritten in FileTransfer2, via options in the Communication Settings dialog (accessible via the Edit menu). Files can be transferred to/from a NetLinx master via TCP/IP, Serial-RS232, Modem or Virtual NetLinx Master connection. Files can be transferred to/from a Axcess master via Serial-RS232 or Modem connection.
Using FileTransfer2 Virtual NetLinx Master connections can be used to transfer TPDesign4 panel (.TP4) file, NetLinx Firmware (.KIT) files, or IR Files directly to G4 touch panels. USB direct transfers require that you configure the Master Connection setting on the panel itself to USB prior to attempting the transfer. TCP/IP direct transfers require that you configure the Master Connection setting on the panel itself to TCP/IP prior to attempting the transfer.
Using FileTransfer2 6. Click OK to save the new TCP/IP communication settings with the selected file. Configuring Serial Communication Settings With a Transfer selected in the Transfer List: 1. Click the Edit command button, and select Communication Settings to open the Communication Settings dialog. 2. Specify the Platform Selection (NetLinx Master or Axcess Master). 3. Select Serial as the Transport Connection Option. 4. Click Edit Settings to open the Serial Settings dialog. 5.
Using FileTransfer2 7. Click OK to save the new Modem communication settings with the selected file. Configuring Virtual NetLinx Master Communication Settings (NetLinx only) 1. Click the Edit command button, and select Communication Settings to open the Communication Settings dialog. 2. Select NetLinx Master as the Platform Selection. 3. Select Virtual NetLinx Master as the Transport Connection Option. 4.
Using FileTransfer2 Configuring the Touch Panel for Virtual NetLinx Master TCP/IP Transfers If it is not already powered up and connected, apply power to the G4 panel and verify that it is connected to the LAN via the TCP/IP connector on the rear (or side) of the panel. 1. Press and hold the grey Front Setup Access button (below the touch screen) for 3 seconds to access the Setup page. 2. Press the Protected Setup button to access the Protected Setup page. 3.
Using FileTransfer2 Here’s the syntax: DEVICE:PORT:SYSTEM where: Device: 16-bit integer representing the device number Port: 16-bit integer representing the port number (in the range 1 through the number of ports on the device) System: 16-bit integer representing the system number (0 = this system) that the device belongs to. For example, 128:1:0 represents the first port on device 128 on this system.
Using FileTransfer2 Transfer Errors and Definitions The following table describe the most common error messages that might be displayed in the Error column of the Transfer Status Window. Error String • Failure generic/unclassified failure. • Success generic success. • File does not exist the file supplied on the cmdline doesn't exist. • Failed to create temporary file couldn't create a required temporary file.
Using FileTransfer2 Sending Files To System Devices Once you have: Added the desired file(s) to the File To Send Queue, Configured the communication settings for the files in the list, and Specified the device-file mapping information for the files in the list, you are ready to begin transferring the file(s) to devices in the system: 1. Click the Send command button. This initiates the transfer of every file listed in the Transfer (Send) List, in the order in which they are listed (top to bottom). 2.
Using FileTransfer2 USB direct transfers require that you configure the Master Connection setting on the panel itself to USB prior to attempting the transfer. TCP/IP direct transfers require that you configure the Master Connection setting on the panel itself to TCP/IP prior to attempting the transfer.
Using FileTransfer2 6. Click OK to return to the Send tab, where the new file should appear in the Files to Send queue. 7. Click inside the checkbox to the left of the file you just added. Keep in mind that any files with a checkmark will be included in this transfer. Note that the Connection column indicates that the file you just added is using Virtual NetLinx Master. 8. Click the Send button to begin the transfer. The procedure for Virtual NetLinx Master transfers via TCP/IP connection is identical.
Using FileTransfer2 Configuring FileTransfer2 for Virtual NetLinx Master TCP/IP Transfers 1. Click Edit and select Communication Settings to open the Communication Settings dialog. 2. Select Virtual NetLinx Master as the Transport Connection Option. 3. Click the Edit Settings button to access the Virtual NetLinx Master Settings dialog, which displays the System number of the Virtual NetLinx Master (default = 1).
Using FileTransfer2 Virtual NetLinx Master USB Transfers FileTransfer2 supports direct connection to G4 panels via USB (and TCP/IP), for situations where the target panel is not connected to a NetLinx Master. In this situation, you can use your PC's USB connection to connect directly to the panel, using your PC as a Virtual NetLinx Master. There are three basic steps to Virtual NetLinx Master USB file transfers: 1. Configuring the Touch Panel for Virtual NetLinx Master USB Transfers 2.
Using FileTransfer2 4. Click OK to close the Virtual NetLinx Master Settings dialog. 5. Click OK to close the Communication Settings dialog. Transferring Files Using a Virtual NetLinx Master USB Connection Note: Verify that Virtual NetLinx Master is selected as the Transport Connection Option in the Communication Settings dialog. To use Virtual NetLinx Master to transfer TPDesign4 panel (.TP4) files or IR files directly to a MVP-7500, MVP-8400 or NXD/T-CV7 panel via USB: 1.
Setting Program Preferences Setting Program Preferences Overview Select Settings > Preferences to access the Preferences dialog. Use the options in this dialog to set various (global) default preferences for FileTransfer2. Preferences dialog Use the options in the Preferences dialog (Settings > Preferences) to set default preferences for file transfer operations. The options on this tab include: File Transfer Options Automatically select reboot when sending a TKN file (default = enabled).
Setting Program Preferences NetLinx/Axcess Source Code Passwords These options allow you to supply the password that was applied to the source code files at the time they were compiled in NetLinx Studio. Source Code Passwords are only applicable to source code files that are received from a master, and allow you to open the received code file for viewing/ editing in NetLinx Studio.
Using the FTCon Console Program (Advanced Programmers Only) Using the FTCon Console Program (Advanced Programmers Only) The FTCon.exe ("FTCon") program is provided with FileTransfer2 so that transfers may be made from a normal windows console (DOS box). Command line arguments supplied to FTCon.exe are passed along to the FileTransfer 2 program which then runs from the system tray. FTCon is intended for use only by advanced programmers.
Using the FTCon Console Program (Advanced Programmers Only) AXW File Transfer Arguments The following arguments specify how to launch the FTCon program with an AXW file: "FileName" ["Project Id"] [“System Id”] "Project Id" – If not supplied, all files in the workspace are transferred. Otherwise, this must be the identifier of a project. The first matching project is transferred. "System Id" - If not supplied, all systems in the project are transferred. Otherwise, this must be the identifier of a system.
Using the FTCon Console Program (Advanced Programmers Only) parity = specifies the parity. This should be set to N for no. Other values are O for odd, E for even, M for mark and S for space. stopbits = specifies stop bit value. This should be set to 1. flow = specifies flow control. This should be set to N for none. Other values are D for DTR-DSR, X for XON-XOFF, and R for RTS-CTS.
Using the FTCon Console Program (Advanced Programmers Only) -t=B|I|F B = Send bitmaps within the TPD file. I = Send icons within the TPD file. F = Send fonts within the TPD file. You many use any combination. For example: -t do not send bitmaps, fonts, or icons. -t=B send bitmaps only. -t=BI send bitmaps and icons only. -t=BF send bitmaps and fonts only. -t=BIF send bitmaps, icons, and fonts.
Using the FTCon Console Program (Advanced Programmers Only) FileTransfer2 37
033-004-2931 8/05 ©2005 AMX Corporation. All rights reserved. AMX, the AMX logo, the building icon, the home icon, and the light bulb icon are all trademarks of AMX Corporation. In Canada doing business as Panja Inc. AMX reserves the right to alter specifications without notice at any time.