Operation/Reference Guide Mio Modero® R-3 Remote Control Device M i o R e m o t e C on t r ol s Last Updated: 1/29/2008
AMX Limited Warranty and Disclaimer AMX warrants its products to be free of defects in material and workmanship under normal use for three (3) years from the date of purchase from AMX, with the following exceptions: • Electroluminescent and LCD Control Panels are warranted for three (3) years, except for the display and touch overlay components that are warranted for a period of one (1) year.
Table of Contents Table of Contents Overview ............................................................................................................1 The Mio Modero® R-3 .............................................................................................. 1 Touch And Tilt Sensor ..................................................................................................... 2 Specifications ..................................................................................................
Table of Contents ii Mio Modero R-3 Remote
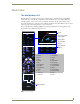
Overview Overview The Mio Modero® R-3 The Mio Modero® R-3 remote provides custom control features, contained in an elegant handheld rechargeable device. The Mio R-3 communicates with a NetLinx® master via a wireless Zigbee® network. Selecting a source device sends a command to the master and runs predetermined events associated with that source. Selecting a macro will run predefined events, which might not be associated with sources listed, then return the device to its previous mode.
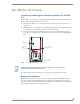
Overview Touch And Tilt Sensor The Mio R-3 wakes up upon touching either the chrome side rails or pressing a button. When the remote times out while holding it, you can reawaken the device by tilting it. Errant jostling, such as a bumped table, will not wake the device unless you are actually holding it.
Overview FCC Compliance This radio module was tested and certified as a stand-alone device according to FCC Rules CFR 47, Part 15, Subpart C. If this device is installed in a manner such that the radio module FCC ID. label is not visible on the outside of the end product, a label must be placed on the end product with the following statement: "Contains FCC ID. CWU-NXR-MO" This device complies with Part 15 of the FCC rules. Subject to the following two conditions: 1.
Overview 4 Mio Modero R-3 Remote
Mio Modero R-3 Setup Mio Modero R-3 Setup Inserting or Replacing the Lithium-ion Battery for the Mio R-3 The Mio Modero R-3 comes with a rechargeable Lithium-Ion battery that needs to be installed before use. To install your Lithium-Ion battery into the device: 1. Flip and turn the Mio R-3 device so that the buttons are facing away from you and the device is upside down. 2. Holding the device in both hands, place your thumbs on the battery door and slide the battery door free.
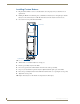
Mio Modero R-3 Setup Installing Custom Buttons 1. Flip and turn the Mio R-3 device so that the buttons are facing away from you and the device is upside down. 2. Holding the Mio R-3 in both hands, place your thumbs on the battery door and push up to slide the battery door free. The battery door will slide in the direction of the bottom end of the device. 3. Unscrew the 6 screw points indicated in FIG. 3. 6 Screw Points Programming Jack FIG. 3 Internal Mio R-3 Components 4.
Setup Mode Setup Mode The Setup mode allows you to set the following device features on the Mio R-3: Transmit Mode Timeout Adjustment Download Mode Debug Mode Firmware Version Device ID LED Awake Brightness LED Sleep Brightness ZigBee ID PAN, Channel, and System Connection Site Survey To enter Setup mode: 1. Press and hold the STOP button and the INPUT button. The two buttons must be pressed within 0.1 seconds of each other and held down for 2 seconds. The device indicates you are now in Setup mode.
Setup Mode Download Mode In order to download new firmware or a new configuration or font file to the Mio R-3 remote using the remote's program port (see Using the Programming Jack on The Mio R-3 section on page 11 for details), the remote must first be placed into Download mode. Press 3 on the remote to toggle the Download mode OFF and ON. The Download mode must be ON before you can download a file to the Mio R-3 device. While the Download mode is ON, the device will not go to sleep.
Setup Mode LED Sleep Mode Brightness The red LEDs that backlight the Power button when the remote is awake are also used to indicate charging status. These LEDs will slowly blink on and off if the remote is place in the charging cradle and the Lithium-Ion battery pack is being charged. The LEDs will remain on when charging is complete. This setting controls the brightness of these LEDs when the remote is sleeping.
Setup Mode 10 Mio Modero R-3 Remote
Programming The Mio R-3 Programming The Mio R-3 Most functionality of the Mio R-3 is handled using the KeypadBuilder application. Go to www.amx.com for the KeypadBuilder Instruction Manual. The Mio R-3 recognizes a select number of Serial Commands. For a full list and descriptions, consult the Serial Commands section on page 15. Using the Programming Jack on The Mio R-3 The programming jack is used for communication between the device and KeypadBuilder. The programming jack uses a three-wire, 2.
Programming The Mio R-3 Updating Mio R-3 Firmware Updating firmware in the Mio R-3 is also done through the programming jack. To update the main firmware for the Mio R-3: 1. Connect the Mio R-3 to your computer via the programming jack (FIG. 4). 2. Put the device into Download mode, as shown on page 8. 3. Open NetLinx Studio. 4. Set the Master Communication Settings to Axcess Master and set the baud rate to 115200. 5. Go to Tools > Firmware Transfers > Send to Axcess Device...
Programming The Mio R-3 Channel Codes The following table gives the channel codes associated with each button on the Mio R-3. Thirty-six of the buttons change channel codes based on what button was last pressed. Nine of the buttons always emit the same channel code regardless of what button was last pressed. The Mio R3 also works in "single device mode," configurable by setting the mode to dynamic and the number of devices to 1 (see the Send_Commands section on page 21).
Programming The Mio R-3 Channel Codes (Cont.
Programming The Mio R-3 Serial Commands The Mio R-3 remote supports a few commands that can be uploaded to the device using a terminal program such as HyperTerminal. These commands are not needed for normal usage or programming of the remote. Serial Commands @BRT Set Brightness level This command can be used to customize the brightness of the red LEDs that backlight the power button if the predefined brightnesses in Setup Mode are not fine enough.
Programming The Mio R-3 Serial Commands (Cont.) ^FML ^FML S Sets a line of the display to a menu line Syntax: "'^FML-,S'" Variables: • variable text address range = 1; the address range corresponds to the dynamic line number-only one line is supported on this device.
Programming The Mio R-3 Serial Commands (Cont.) IRMODE # Sets the IR transmission frequency to either 38 or 455KHz Syntax: IRMODE # Variables: • = 38 - IR only, 38KHz 455 - IR only, 455KHz ZIG - ZigBee only ZIG38 - ZigBee + IR 38KHz ZIG455 - ZigBee + IR 455KHz Example: IRMODE 455 Sets the IR transmission frequency to 455 KHz. IRMODE ZIG Sets the IR to disabled and communications to only use ZigBee.
Programming The Mio R-3 Serial Commands (Cont.) REVD # Reverse the image on the LCD Syntax: REVD # Variables: • # = (1 = Reverse video, 0 = Normal Video) Example: REVD 1 Reverses the image on the LCD; pixels previously lit go off; pixels previously off, come on. SETD Sets the ICSP Device Number Syntax: SETD Example: SETD 10020 Note: ICSP Device number cannot be set above 32000.
Programming The Mio R-3 Serial Commands (Cont.) @SST Sends a string to the master upon startup Syntax: "'@SST-'" Variables: • new text = 1 - 20 ASCII characters. Default string is STARTUP. Example: SEND_COMMANDPanel,"'@SST-Panel Start'" Sends the string " Panel Start " to the master at time of start up. @SWK Sends a string to the master upon wake up Syntax: "'@SWK-'" Variables: • new text = 1 - 20 ASCII characters. Default string is WAKEUP.
Programming The Mio R-3 Serial Commands (Cont.) ZAP! Erase Configuration Information in Flash Memory Syntax: ZAP! t Variables: • t = MENU or FONT or blank Example: ZAP! Clears all configuration information and erases the font. The text displayed on the LCD for the six devices returns to default and all parameters that can be set in Setup Mode are reset to their default value. ZAP! MENU Sets the text displayed on the LCD for the six devices to the default values. ZAP! FONT Erases the font from the flash.
Programming The Mio R-3 Send_Commands When used with ZigBee communications and a NetLinx master, the Mio R-3 supports a small set of Send_Commands. The table below captures all Send_Commands supported by the Mio R3 Send_Commands @BRT Set Brightness level This command can be used to customize the brightness of the red LEDs that backlight the power button if the predefined brightnesses in Setup Mode are not fine enough.
Programming The Mio R-3 Send_Commands (Cont.) ^FML ^FML S Sets a line of the display to a menu line Syntax: "'^FML-,S'" Variables: • variable text address range = 1; the address range corresponds to the dynamic line number-only one line is supported on this device.
Programming The Mio R-3 Send_Commands (Cont.) ^JST Set text alignment using a numeric keypad layout for those buttons with a defined address range Syntax: '^JST-,'" Variable: • variable text address range = 1; the address range corresponds to the dynamic line number.
Programming The Mio R-3 Send_Commands (Cont.) SLEEP Set the Sleep timer or put the remote to sleep immediately. This command can be used if a sleep time other than 3, 6, 9, or 12 seconds is desired. Syntax: SLEEP Forces keypad to turn backlight off. SLEEP-# Sets sleep time. Variables: • # = 0 - 60 in seconds; time to wait before going to sleep. Example: SLEEP-45 Sets the sleep timer to 45 seconds. After 45 seconds of inactivity, the remote will go to sleep.
Programming The Mio R-3 Send_Commands (Cont.) ^TXT Sets non-unicode text. Assign a text string to those buttons with a defined address range Syntax: SEND_COMMAND ,"'^TXT-,
Programming The Mio R-3 26 Mio Modero R-3 Remote
Mio Remote Charging Base Mio Remote Charging Base The Mio remotes are complemented with a Mio-RCC charging base (FG147-02). FIG. 6 Mio-RCC Charging Base Specifications Rubber feet Angle barrel power connector (Bottom View) Charging contacts (Top View) FIG.
Mio Remote Charging Base The specifications for the Mio remote charging base and kit are as follows: Mio-RCC Remote Charging Kit (FG147-03K) with Base (FG147-02) Specifications Dimensions (HWD) Charging Base - 1.61 (4.09 cm) (height); 4.25 (10.80 cm) (diameter) Lithium Ion Battery - 2.13” x 1.38” x .28” (5.41 cm x 3.45 cm x .71 cm) Weight • 1.15 lbs (.52 kg) - Remote Charging Cradle • .15 lbs (.07 kg) - Power Supply • .06 lbs (.
Mio Remote Charging Base Mio Modero R-3 Remote 29
1/08 ©2007 AMX. All rights reserved. AMX and the AMX logo are registered trademarks of AMX. AMX reserves the right to alter specifications without notice at any time. It’s Your World - Take Control™ 3000 RESEARCH DRIVE, RICHARDSON, TX 75082 USA • 800.222.0193 • 469.624.8000 • 469-624-7153 fax • 800.932.6993 technical support • www.amx.