
Specifications
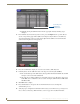


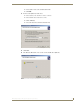
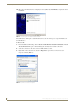
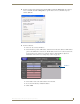
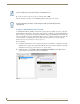
Table Of Contents
- MVP-5100/5150 Modero® ViewPoint® Touch Panels, 5.2" and 5”
- Introduction
- Accessories
- Configuring Communication
- Overview
- IR Communication
- Modero Setup and System Settings
- Wireless Settings - Wireless Access Overview (MVP-5150 Only)
- Configuring Wireless Network Access (MVP-5150 Only)
- Step 1: Configure the Device’s Wireless IP Settings (MVP- 5150 Only)
- Step 2: Configure the Card’s Wireless Security Settings
- Panel Downloads and Firmware Updates
- Setup Pages
- Protected Setup Pages
- Upgrading Firmware
- Programming
- Overview
- Page Commands
- Programming Numbers
- "^" Button Commands
- ^ANI
- ^APF
- ^BAT
- ^BAU
- ^BCB
- ^BCF
- ^BCT
- ^BDO
- ^BFB
- ^BIM
- ^BLN
- ^BMC
- ^BMF
- ^BMI
- ^BML
- ^BMP
- ^BNC
- ^BNN
- ^BNT
- ^BOP
- ^BOR
- ^BOS
- ^BPP
- ^BRD
- ^BSF
- ^BSM
- ^BSO
- ^BSP
- ^BVL
- ^BVN
- ^BVP
- ^BVT
- ^BWW
- ^CPF
- ^DLD
- ^DPF
- ^ENA
- ^FON
- ^GDI
- ^GIV
- ^GLH
- ^GLL
- ^GRD
- ^GRU
- ^GSC
- ^GSN
- ^ICO
- ^IRM
- ^JSB
- ^JSI
- ^JST
- ^MBT
- ^MDC
- ^SHO
- ^TEC
- ^TEF
- ^TOP
- ^TXT
- ^UNI
- Miscellaneous MVP Strings back to the Master
- MVP Panel Lock Passcode commands
- Text Effects Names
- Button Query Commands
- Panel Runtime Operations
- Input Commands
- Embedded codes
- Panel Setup Commands
- Battery Life and Replacement
- Appendix A: Text Formatting
- Appendix B: Wireless Technology
- Appendix C: Troubleshooting
- Overview
- Panel Doesn’t Respond To Touches
- Battery Will Not Hold Or Take A Charge
- MVP Isn’t Appearing In The Online Tree Tab
- MVP Can’t Obtain a DHCP Address
- My WEP Doesn’t Seem To Be Working
- NetLinx Studio Only Detects One Of My Connected Masters
- Can’t Connect To a NetLinx Master
- Only One Modero Panel In My System Shows Up
- Panel Behaves Strangely After Downloading A Panel File Or Firmware
- Overview
Configuring Communication
32
MVP-5100/5150 5.2" Modero Viewpoint Touch Panels
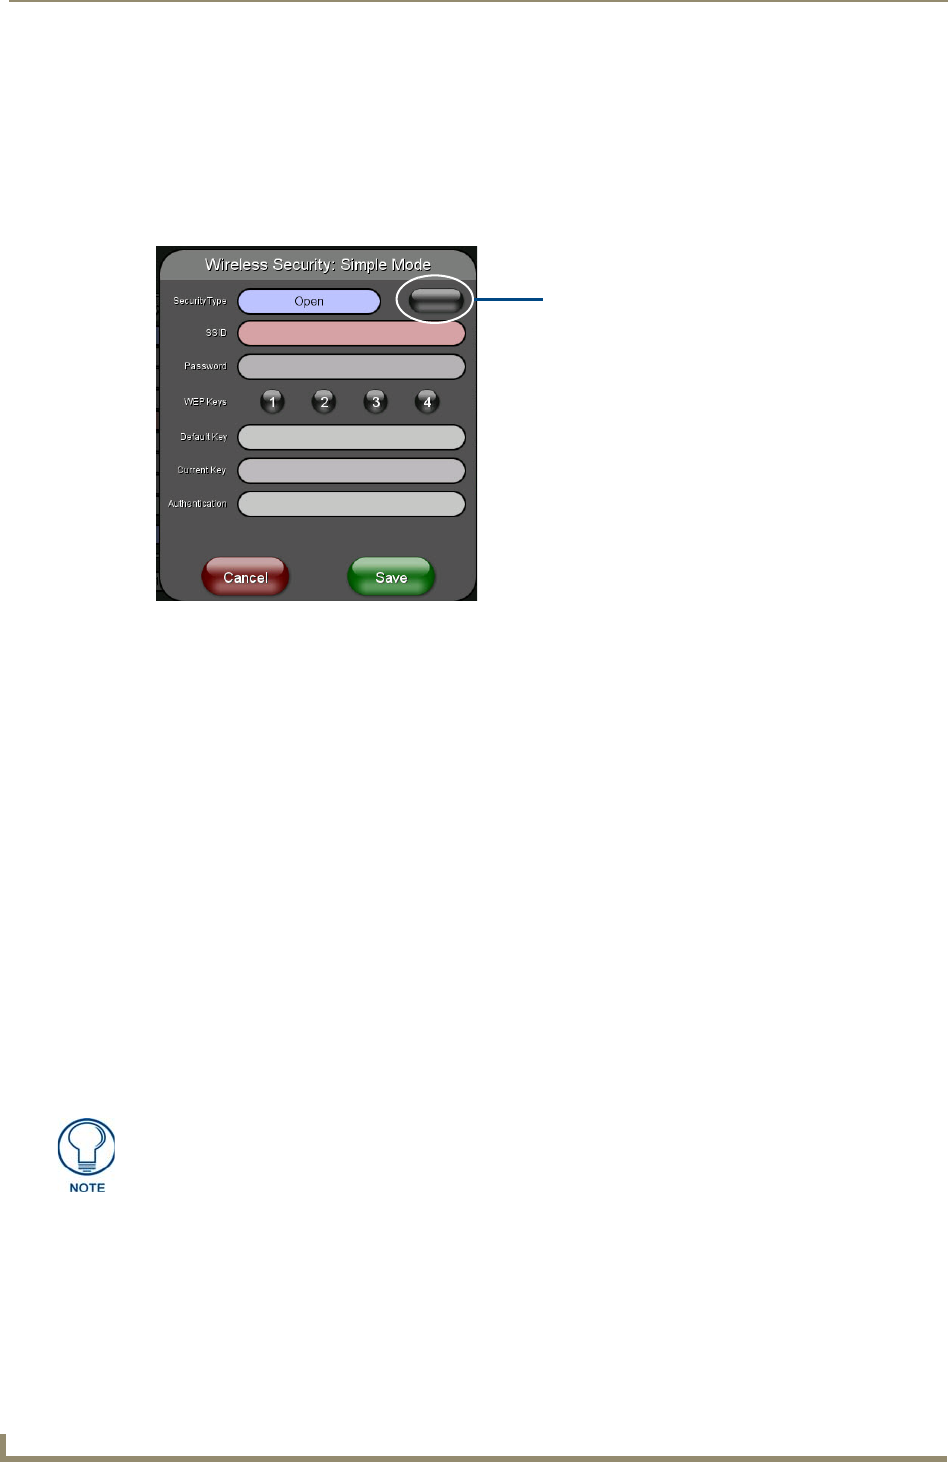
Manually Setting SSID
From the Protected Setup page:
1. Select Wireless Settings.
2. From the Information/Configuration section of the Wireless Settings page, press the Simple button
to open the Wireless Security: Simple Mode popup window (FIG. 20).
3. Press the Security Type field to select WEP.
4. Press the SSID field. From the Network Name (SSID) keyboard, enter the SSID name used by the
target Access Point (case sensitive), and press Done when finished.
The card should be given the SSID used by the target AP. If this field is left blank, the device
will attempt to connect to the first available AP.
One of the most common problems associated with connection to an AP arises because of an
improperly entered SSID. The same case must be maintained when entering this information.
ABC is not the same as Abc.
The alpha-numeric string is AMX by default, but can later be changed to any 32-character
entry. This string must be duplicated within the Network Name (SSID) field on the AP. As an
example, if the SSID is MINISTRY, this word and the case within must match both the
Network Name (SSID) field on the touch panel’s Network Name SSID field and on the AP’s
Basic Wireless Configuration page.
5. Toggle the Encryption button until it reads either 64 or 128 Bit Key Size.
The 64/128 selection reflects the bit-level of encryption security. This WEP encryption level must
match the encryption level being used on the AP.
6. Toggle the Default Key field to choose a WEP Key value (from 1- 4) that matches what will be used
on the target. This value MUST MATCH on both devices (FIG. 21).
7. Write down this Current Key string value for later entry into the AP’s WEP Key field (typically
entered without colons) and into other communicating panel’s Current Key field.
FIG. 20 Wireless Security page
WEP will not work unless the same Default Key is set on both the panel and the
Access Point. For example: if the Access Point has been set to default key 4 (which
was 01:02:03:04:05), the panel’s key 4 must be set to 01:02:03:04:05.
Encryption button (disabled in Open)