Specifications
Table Of Contents
- MVP-5100/5150 Modero® ViewPoint® Touch Panels, 5.2" and 5”
- Introduction
- Accessories
- Configuring Communication
- Overview
- IR Communication
- Modero Setup and System Settings
- Wireless Settings - Wireless Access Overview (MVP-5150 Only)
- Configuring Wireless Network Access (MVP-5150 Only)
- Step 1: Configure the Device’s Wireless IP Settings (MVP- 5150 Only)
- Step 2: Configure the Card’s Wireless Security Settings
- Panel Downloads and Firmware Updates
- Setup Pages
- Protected Setup Pages
- Upgrading Firmware
- Programming
- Overview
- Page Commands
- Programming Numbers
- "^" Button Commands
- ^ANI
- ^APF
- ^BAT
- ^BAU
- ^BCB
- ^BCF
- ^BCT
- ^BDO
- ^BFB
- ^BIM
- ^BLN
- ^BMC
- ^BMF
- ^BMI
- ^BML
- ^BMP
- ^BNC
- ^BNN
- ^BNT
- ^BOP
- ^BOR
- ^BOS
- ^BPP
- ^BRD
- ^BSF
- ^BSM
- ^BSO
- ^BSP
- ^BVL
- ^BVN
- ^BVP
- ^BVT
- ^BWW
- ^CPF
- ^DLD
- ^DPF
- ^ENA
- ^FON
- ^GDI
- ^GIV
- ^GLH
- ^GLL
- ^GRD
- ^GRU
- ^GSC
- ^GSN
- ^ICO
- ^IRM
- ^JSB
- ^JSI
- ^JST
- ^MBT
- ^MDC
- ^SHO
- ^TEC
- ^TEF
- ^TOP
- ^TXT
- ^UNI
- Miscellaneous MVP Strings back to the Master
- MVP Panel Lock Passcode commands
- Text Effects Names
- Button Query Commands
- Panel Runtime Operations
- Input Commands
- Embedded codes
- Panel Setup Commands
- Battery Life and Replacement
- Appendix A: Text Formatting
- Appendix B: Wireless Technology
- Appendix C: Troubleshooting
- Overview
- Panel Doesn’t Respond To Touches
- Battery Will Not Hold Or Take A Charge
- MVP Isn’t Appearing In The Online Tree Tab
- MVP Can’t Obtain a DHCP Address
- My WEP Doesn’t Seem To Be Working
- NetLinx Studio Only Detects One Of My Connected Masters
- Can’t Connect To a NetLinx Master
- Only One Modero Panel In My System Shows Up
- Panel Behaves Strangely After Downloading A Panel File Or Firmware
- Overview

Configuring Communication
34
MVP-5100/5150 5.2" Modero Viewpoint Touch Panels
Panel Downloads and Firmware Updates
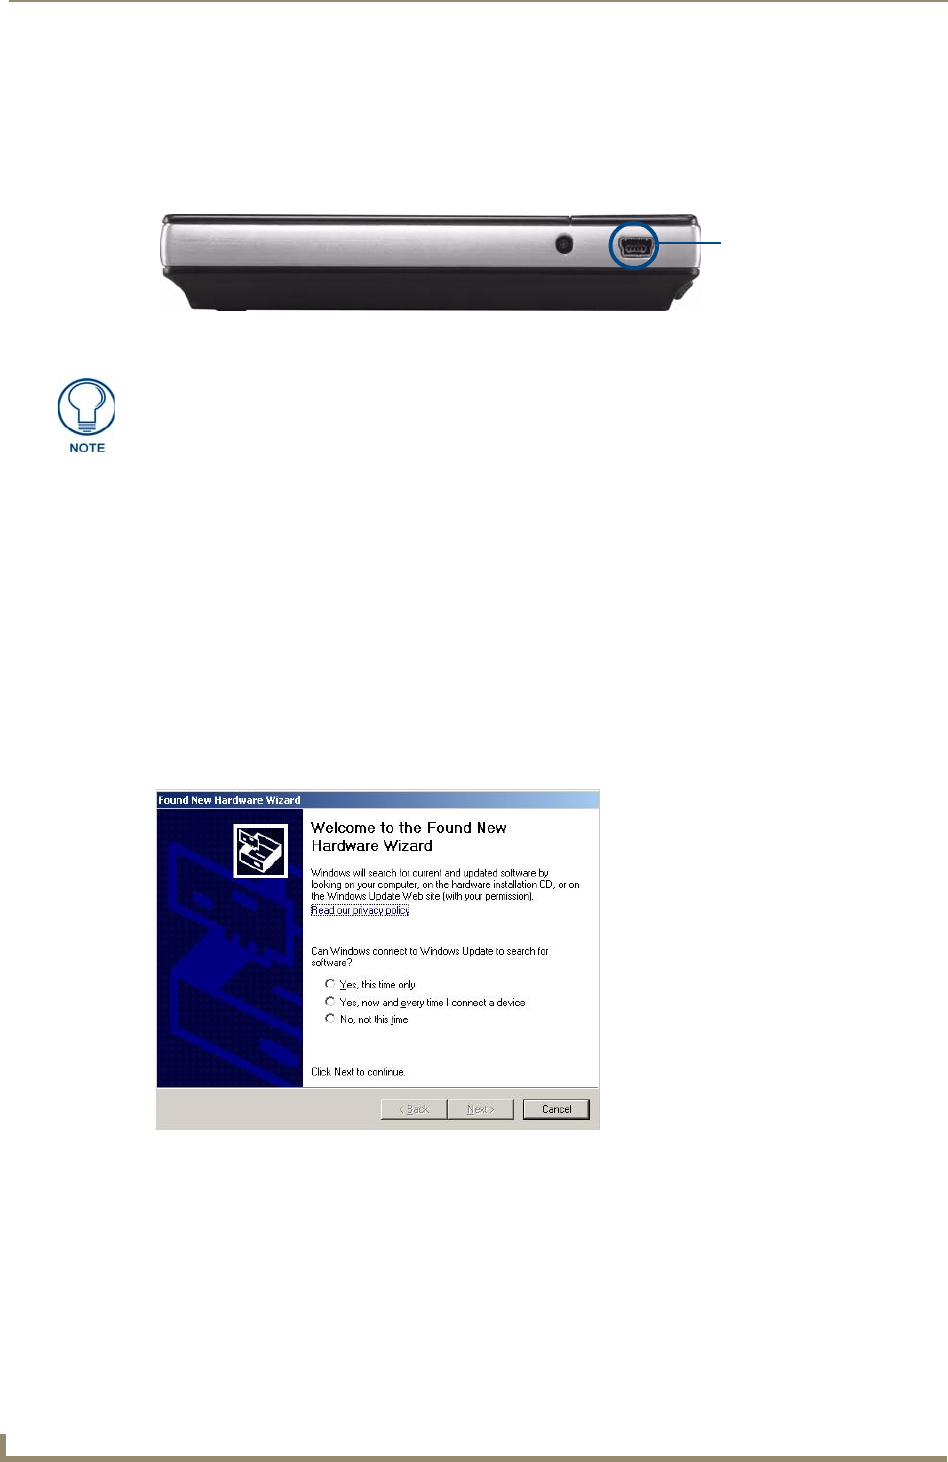
The MVP-5100 and MVP-5150 devices support a USB driver for panel downloads and firmware
updates. This means that the devices connect to a host computer for updates through their Mini USB
ports (FIG. 22). All touch panel setup is done through NetLinx Studio and TPDesign4.
Touch Panel Setup
To prepare the device for USB communication:
1. Turn on the device and wait for it to finish booting up.
2. Make sure that you have downloaded the latest versions of NetLinx Studio and TPDesign4,
available from www.amx.com.
3. Insert the mini-USB end of the USB Programming Cable into the mini-USB port on the device.
Insert the other end into the appropriate USB port on the computer containing the files to be
downloaded.
4. If the connection goes well, the Windows XP machine will detect the device as an unsupported USB
device. It then presents a dialog that prompts the user for a suitable driver (FIG. 23):
5. Select Yes, this time only and click on Next.
6. In the new window:
- Select Use the following IP Address.
Under IP address, provide an IP address. Ensure that it is in the same subnet as the IP address
given to the usb0 interface on the MVP-5100, but make sure that it has a different node
number. The IP address cannot be the same as the panel`s USB IP address.
FIG. 22 USB Port on the MVP-5100/5150
Mini-USB Port
Firmware downloads require use of the USB Programming Cable (FG10-5965) and a
computer running Windows XP.
FIG. 23 Found New Hardware Wizard dialog box


