
Specifications

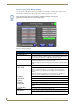
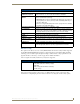
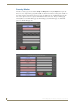
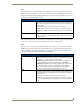
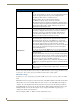
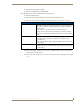
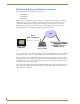
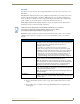
Table Of Contents
- MVP-5100/5150 Modero® ViewPoint® Touch Panels, 5.2" and 5”
- Introduction
- Accessories
- Configuring Communication
- Overview
- IR Communication
- Modero Setup and System Settings
- Wireless Settings - Wireless Access Overview (MVP-5150 Only)
- Configuring Wireless Network Access (MVP-5150 Only)
- Step 1: Configure the Device’s Wireless IP Settings (MVP- 5150 Only)
- Step 2: Configure the Card’s Wireless Security Settings
- Panel Downloads and Firmware Updates
- Setup Pages
- Protected Setup Pages
- Upgrading Firmware
- Programming
- Overview
- Page Commands
- Programming Numbers
- "^" Button Commands
- ^ANI
- ^APF
- ^BAT
- ^BAU
- ^BCB
- ^BCF
- ^BCT
- ^BDO
- ^BFB
- ^BIM
- ^BLN
- ^BMC
- ^BMF
- ^BMI
- ^BML
- ^BMP
- ^BNC
- ^BNN
- ^BNT
- ^BOP
- ^BOR
- ^BOS
- ^BPP
- ^BRD
- ^BSF
- ^BSM
- ^BSO
- ^BSP
- ^BVL
- ^BVN
- ^BVP
- ^BVT
- ^BWW
- ^CPF
- ^DLD
- ^DPF
- ^ENA
- ^FON
- ^GDI
- ^GIV
- ^GLH
- ^GLL
- ^GRD
- ^GRU
- ^GSC
- ^GSN
- ^ICO
- ^IRM
- ^JSB
- ^JSI
- ^JST
- ^MBT
- ^MDC
- ^SHO
- ^TEC
- ^TEF
- ^TOP
- ^TXT
- ^UNI
- Miscellaneous MVP Strings back to the Master
- MVP Panel Lock Passcode commands
- Text Effects Names
- Button Query Commands
- Panel Runtime Operations
- Input Commands
- Embedded codes
- Panel Setup Commands
- Battery Life and Replacement
- Appendix A: Text Formatting
- Appendix B: Wireless Technology
- Appendix C: Troubleshooting
- Overview
- Panel Doesn’t Respond To Touches
- Battery Will Not Hold Or Take A Charge
- MVP Isn’t Appearing In The Online Tree Tab
- MVP Can’t Obtain a DHCP Address
- My WEP Doesn’t Seem To Be Working
- NetLinx Studio Only Detects One Of My Connected Masters
- Can’t Connect To a NetLinx Master
- Only One Modero Panel In My System Shows Up
- Panel Behaves Strangely After Downloading A Panel File Or Firmware
- Overview

Protected Setup Pages
64
MVP-5100/5150 5.2" Modero Viewpoint Touch Panels
Refer to the Configuring Wireless Network Access (MVP-5150 Only) section on page 26 and the Using
the Site Survey Tool section on page 28 for further details on these security options.
WPA-PSK Settings
In the Wireless Security: Simple Mode popup window (FIG. 52), press the Security Type field to select WPA-
PSK.
WPA-PSK security is designed for environments where using WPA or WPA2 is desirable, but an 802.1x
authentication server is not available. PSK connections are more secure than WEP and are simpler to
configure, since they implement dynamic keys but share a key between the AP and the panel (client).
Using WPA-PSK, the encryption on the AP could either be WPA or WPA2. The firmware in the panel
will automatically connect to the AP using the correct encryption. The WPA encryption type is
configured on the AP, not in the firmware.
APs do not display “WPA” or “WPA2” on their configuration screens:
WEP Settings (Cont.)
WEP Keys: This feature provides another level of security by selecting up to four WEP
Keys.
Push any of the four buttons to open an on-screen keyboard. Both ASCII and
HEX keys are supported. Up to four keys can be configured for both.
• An ASCII key utilizes either 5 or 13 ASCII characters
• A HEX key utilizes either 10 or 26 Hexidecimal characters
Press Done to accept any changes and save the new value.
Note: A 64-bit key will be 10 characters in length while a 128-bit key will be
26 characters in length. The length of the key entered determines the level of
WEP encryption employed (64 or 128-bit). 128-bit keys may be used if
supported by the internal wireless card.
Default Key: Cycles through the four available WEP key identifiers to select a WEP key to
use. As the Default Key value is altered (through selection) the corresponding
“Current Key” is displayed. Each Current Key corresponds to a WEP key.
This feature is useful for accessing different networks without having to
re-enter that networks’ WEP key. It is also sometimes used to set up a
rotating key schedule to provide an extra layer of security.
Current Key: Displays the current WEP key in use.
• When working with a single panel and a single AP, manually entering the
Current Key from the AP into the selected WEP Key is recommended.
• When working with a single AP and multiple panels, generating a Current
Key using the same passphrase on all panels and then entering the
panel-produced WEP key manually into the Access Point is recommended.
• Keys may also be examined by touching the key buttons and noting the
keyboard initialization text.
• Use the on-screen keyboard’s Clear button to erase stored key information.
Authentication: Toggles between the two authentication modes:
Open (broadcast publicly) or
Shared (encrypted).
•An
Open network allows connections from any client without authentication.
•A
Shared network requires the client to submit a key which is shared by the
network AP before it is given permission to associate with the network. In
this case the key is the same as the WEP encryption key.
In either case, if WEP encryption has been enabled, the client will still require
the WEP key to encrypt and decrypt packets in order to communicate with the
network.
Cancel/Save: • Cancel - discard changes and return to the previous page.
• Save - store the new security information, apply changes, and return to the
previous page.