Communications Module User Guide User Guide Communications Module Voice and Video Communication Systems Last Revised: 12/03/2009
AMX Limited Warranty and Disclaimer This Limited Warranty and Disclaimer extends only to products purchased directly from AMX or an AMX Authorized Partner which include AMX Dealers, Distributors, VIP’s or other AMX authorized entity.
AMX Software License and Warranty Agreement • LICENSE GRANT. AMX grants to Licensee the non-exclusive right to use the AMX Software in the manner described in this License. The AMX Software is licensed, not sold. This license does not grant Licensee the right to create derivative works of the AMX Software. The AMX Software consists of generally available programming and development software, product documentation, sample applications, tools and utilities, and miscellaneous technical information.
Table of Contents Table of Contents Using the Communications Module ....................................................................1 Overview .................................................................................................................. 1 Main Screen .............................................................................................................. 1 Using the Keypad to Place a Call ..............................................................................
Table of Contents vi SIP Module User Guide
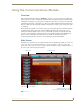
Using the Communications Module Using the Communications Module Overview With a CSG Communications Gateway (FG2182-01, -02, -03), you can use an intercom-enabled touch panel to place phone calls or communicate with another intercom-enabled touch panel or Metreau Entry Communicator. Setting up your touch panel as a telephone requires that you set it up as one in the CSG Communications Gateway configuration pages.
Using the Communications Module The following options appear on the main screen: Main Screen Options 2 Global PB Displays all listings in the global phone book. The global phone book includes all listings from all panels on the network. Local PB Displays all listings in the local phone book. The local phone book includes only the listings on the panel you are currently using. Keypad Displays a keypad you can use to enter a phone number to call.
Using the Communications Module Using the Keypad to Place a Call You can use your touch panel to place a call by using the keypad to manually enter a phone number. You can manually enter a phone number on the Keypad screen (FIG. 2). Perform these steps to use the keypad to place a call: 1. Press Keypad. The Keypad screen appears. FIG. 2 Keypad screen 2. Use the keypad to enter the number you want to call. 3. Press Call. The number you entered is dialed.
Using the Communications Module When the doorbell button is pressed at an entry communicator, your panel opens a pop-up screen (FIG. 4) with options for the call. If no option is selected, the call terminates after 35 seconds. FIG. 4 Entry Communicator Alert pop-up screen The following options appear on the Entry Communicator Alert pop-up screen: Entry Communicator Alert Pop-up Screen Options Flash Connects to the call at the entry communicator.
Using the Communications Module Adding a Contact to Your Phone Book Adding contacts to your phone book enables you to place calls to more quickly and easily. After adding a contact to your phone book, you can view the list of contacts by pressing the Local PB button. The following options appear on the Phone Book Setup screen: Phone Book Setup Screen Options Add New Contact Opens the Add New Contact pop-up screen (FIG. 6). This pop-up screen does not appear if the phone book is full.
Using the Communications Module 4. Press the Name field to open an alphanumeric keypad. Using the keypad, enter the name of the contact, and press Done to return to the Add New Contact pop-up screen. 5. Press the Number field to open a numeric keypad. Using the keypad, enter the phone number or extension of the contact, and press Done to return to the Add New Contact pop-up screen. 6. Press Save. The contact now appears in your phone book.
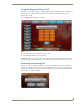
Using the Communications Module Monitoring an Entry Communicator You can use a touch panel to monitor an entry communicator. When monitoring an entry communicator, the images captured by the entry communicator’s video camera stream onto the panel. Perform these steps to monitor an entry communicator: 1. Press Global PB. The Global Phone Book screen appears (FIG. 8). FIG. 8 Global Phone Book 2. Press Monitor Entry. A pop-up screen opens with a list of entry communicators. 3.
Using the Communications Module The images captured by the video camera on the entry communicator stream onto the touch panel (FIG. 10). FIG. 10 Monitoring Entry Communicator 4. Press Exit to stop monitoring the entry communicator. Setting the Image on the Entry Communicator MET-ECOM-D model entry communicators have LED displays which can display various messages or graphics. The Communications module enables you to easily select the image you want to display on the LED.
Using the Communications Module Perform these steps to set the image on the entry communicator: 1. Press Setup. 2. Press Entry Communicator. The Set Image for Entry Communicators screen appears (FIG. 11). 3. Press the corresponding entry communicator button repeatedly until you find the image you want. Follow Me Follow Me is a feature which allows a caller to reach you wherever you may be by forwarding your calls to a list of predefined numbers until you are reached.
Using the Communications Module FIG. 13 Add Follow Me pop-up 4. Use the numeric pad to enter an extension. 5. Press Done.
Using the Communications Module Advanced Setup The Advanced Setup screen enables you to set permissions for your panel and adjust the settings on your entry communicator. FIG. 14 displays the Advanced Setup screen. FIG. 14 Advanced Setup The following options appear on the Advanced Setup screen: Advanced Setup Screen Options Allow this panel to be Monitored Toggles whether other panels can monitor this panel. Allow this panel to Monitor Toggles whether this panel can monitor other panels.
Using the Communications Module Modifying the Entry Communicator Settings The Entry Communicator Adjustments pop-up screen enables you to change the microphone and speaker levels in addition to other settings on your entry communicator. The following options appear in the Entry Communicator Adjustments pop-up screen: Entry Communicator Adjustments Pop-Up Screen Options Mute buttons Each corresponding turns off the sound from the microphone or speakers on the entry communicator.
Using the Communications Module 4. Press Door Adjustments. The Entry Communicator Adjustments pop-up screen opens (FIG. 16). FIG. 16 Entry Communicator Adjustments 5. Use the up-and-down arrows to adjust the microphone and speaker levels. 6. Press the Number Communicator will Call button to change the extension the communicator calls when its button is pressed. A numeric keypad pop-up screen opens. Use the numeric keypad to enter a new extension, and press Done. 7.
Using the Communications Module 14 Communications Module User Guide
Using the Communications Module Communications Module User Guide 15
12/09 ©2009 AMX. All rights reserved. AMX and the AMX logo are registered trademarks of AMX. AMX reserves the right to alter specifications without notice at any time. It’s Your World - Take Control™ 3000 RESEARCH DRIVE, RICHARDSON, TX 75082 USA • 800.222.0193 • 469.624.8000 • 469-624-7153 fax • 800.932.6993 technical support • www.amx.