
User's Manual
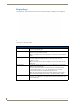
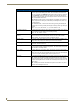

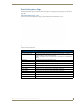
Table Of Contents
- MVP-9000i9" Modero® ViewPoint®Touch Panel with Intercom
- Introduction
- Accessories
- Configuring Communication
- Overview
- IR Communication
- Modero Setup and System Settings
- Wireless Settings - Wireless Access Overview
- Configuring Wireless Network Access
- Step 1: Configure the Device’s WiFi Settings
- Step 2: Configure the Card’s Wireless Security Settings
- Step 3: Choose a Master Connection Mode
- Ethernet Over USB
- Using G4 Web Control to Interact with a G4 Panel
- Using the NetLinx Master To Control the G4 Panel
- Setup Pages
- Protected Setup Pages
- Upgrading Firmware
- Programming
- Overview
- Animated Transitions
- Touch Gesture Recognition
- Page Commands
- Programming Numbers
- "^" Button Commands
- Text Effects Names
- Button Query Commands
- Panel Runtime Operations
- Input Commands
- Embedded codes
- Panel Setup Commands
- Dynamic Image Commands
- Intercom Commands
- SIP Commands
- ^PHN- AUTOANSWER
- ^PHN-CALL
- ^PHN-INCOMING
- ^PHN- LINESTATE
- ^PHN- MSGWAITING
- ^PHN-PRIVACY
- ^PHN-REDIAL
- ^PHN- TRANSFERRED
- ^PHN-ANSWER
- ^PHN- AUTOANSWER
- ?PHN- AUTOANSWER
- ^PHN-CALL
- ^PHN-DTMF
- ^PHN-HANGUP
- ^PHN-HOLD
- ?PHN- LINESTATE
- ^PHN-PRIVACY
- ?PHN-PRIVACY
- ^PHN-REDIAL
- ^PHN- TRANSFER
- ^PHN-SETUP- DOMAIN
- ^PHN-SETUP- ENABLE
- ^PHN-SETUP- PASSWORD
- ^PHN-SETUP- PORT
- ^PHN-SETUP- PROXYADDR
- ^PHN-SETUP- STUNADDR
- ^PHN-SETUP- USERNAME
- Battery Life and Replacement
- Appendix A: Text Formatting
- Appendix B: Wireless Technology
- Appendix C: Troubleshooting
- Overview
- Panel Doesn’t Respond To Touches
- Battery Will Not Hold Or Take A Charge
- MVP-9000i Isn’t Appearing In The Online Tree Tab
- MVP Can’t Obtain a DHCP Address
- My WAP Doesn’t Seem To Be Working
- NetLinx Studio Only Detects One Of My Connected Masters
- Can’t Connect To a NetLinx Master
- Only One Modero Panel In My System Shows Up
- Panel Behaves Strangely After Downloading A Panel File Or Firmware
- Overview

Setup Pages
52
MVP-9000i Modero® Wireless Touch Panel with Intercom
Power Management Page (Cont.)
Shutdown This value determines the number of seconds or minutes that need to pass
before the panel automatically shuts down. Once shut down, the device will
have to be restarted. The Up/Down buttons alter the timeout value (in minutes).
Use the Up/Down arrows to change the settings; the setting bar will change
from blue to orange to display the percentage of minimum versus maximum. A
value of Off disables this feature.
Note: Shutdown mode turns the unit completely off, including communication
circuits, and preserves battery life, unlike Sleep or Standby mode, which only
turn off the display.
From Shutdown mode, a unit must be turned on by pressing and holding the
directional pad or overlay until the panel begins a bootup, which may take up to
a minute.
Range = 3, 5, 10, 15, 30 minutes; 1, 2, 3, 4 hours Default = Off.
Low Battery Warning: The Up/Down buttons adjust the time value (in minutes) available on the battery
(for use) before the panel displays a low battery warning.
Range - 10 - 45, default = 15 min.
Disable Timers on External
Power?:
Touch this button to disable the Sleep, Stand By, and Shutdown timers if the
panel is connected to an external power source, such as a Table or Wall
Docking Station. Touch the button again to enable the timers.
Charge Status: The Charge Status field indicates the power charge currently available on the
battery. When fully charged, the field is green and reads “Charged”.
Battery Type: The Battery Type field indicates the type of battery currently installed in the
MVP-9000i. The value listed is 1.
Docking Station Version: The Docking Station Version field indicates the version of firmware used for
the currently used Table or Wall Docking Station. This field is blank if the panel
is not docked in a Docking Station.
Dock Status: The Dock Status icon turns green when connected to an active Table or Wall
Docking Station, and turns red when disconnected.
NOTE: when using the panel’s included power source, this icon will still appear
red, even if the panel is drawing power from the power source.
Auto Dim: The DISABLE/DISABLED button acts as a power save feature with two options:
•On - Clicking on this button activates the brightness limit set on the panel,
conserving battery power. Activating this feature causes the panel to function
at 80% of full brightness and overrides the Panel Brightness value set on the
Setup page.
• Off - Clicking on this button deactivates this power save feature. The panel
will use the Panel Brightness level.