
Specifications


Record Service
118
Vision
2
Operation/Reference Guide
Scheduled Recording
The Scheduled Record feature allows you to schedule when a live service is to be recorded. You must select
the source from which to record and enable the service before editing the schedule. Scheduled recordings are
only supported in the Live MPEG service and in 10 minute increments.
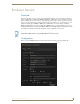
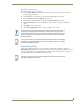
1. Select Configure DVR from the Record Services menu on the left pane of the window. The Record
Service page appears (FIG. 114).
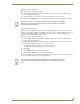
2. In the Schedule editor, select the time where the recording should occur. A pop-up dialog box appears
(FIG. 115).
3. Enter the name the recording in the Program Name field.
4. Use the up-and-down arrows to indicate the duration of the recording in 10 minute increments.
5. Click Save.
Event Log
In common with other services, the Record service generates an event log which you can examine by selecting
View Event Log from the Record services menu.
FIG. 114 Scheduled Recording screen
FIG. 115 Scheduled Recording dialog box
You can enter a value in the Duration field, however, Vision
2
only supports scheduled
recordings in 10 minute increments. If you enter a value in the Duration field that isn't
a 10 minute increment, Vision
2
automatically rounds up to the next 10 minute
increment without alerting you.