
Datasheet


Table Of Contents
EVAL-ADP2118
Rev. 0 | Page 3 of 16
EVALUATION BOARD HARDWARE
POWERING UP THE EVALUATION BOARD
The ADP2118 evaluation board is fully assembled and tested.
Before applying power to the evaluation board, follow the setup
procedures in this section.
Jumper Settings
Refer to Table 1 for selecting the jumper positions.
Make sure the enable input, EN, is high.
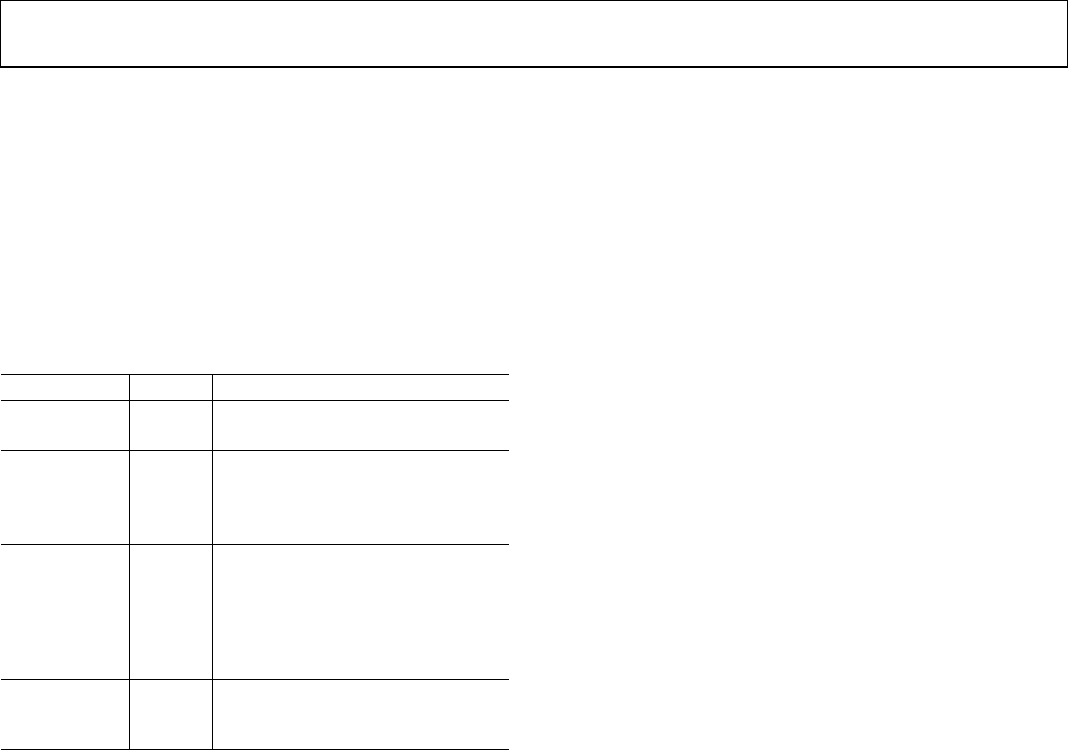
Table 1. Jumper Settings
Jumper States Function
J2 (EN) High Enable V
OUT
Low Disable V
OUT
J4
(SYNC/MODE)
High Force PWM
Low Enable PFM
External
clock
Synchronize to the external clock
J7 (FREQ) High f
S
= 1.2 MHz
180° out of phase with external clock
if synchronize function used
Low f
S
= 600 kHz
In phase with external clock if
synchronize function used
J10 (TRK) High Tracking function not used
External
voltage
Tracking with the external voltage
Input Power Source Connection
Before connecting the power source to the ADP2118 evaluation
board, make sure that it is turned off. If the input power source
includes a current meter, use that meter to monitor the input
current.
Connect the positive terminal of the power source to the VIN
terminal (J3) on the evaluation board, and the negative terminal
of the power source to the GND terminal (J6) of the board. If
the power source does not include a current meter, connect a
current meter in series with the input source voltage.
Connect the positive terminal of the power source to the ammeter
positive terminal (+), the negative terminal of the power source
to the GND terminal (J6) on the evaluation board, and the
negative terminal (−) of the ammeter to the VIN terminal (J3)
on the board.
Output Load Connection
Make sure that the board is turned off before connecting the
load. If the load includes an ammeter, or if the current is not
measured, connect the load directly to the evaluation board
with the positive (+) load connection to the VOUT terminal
(J9) and negative (−) load connection to the GND terminal
(J12).
If an ammeter is used, connect it in series with the load;
connect the positive (+) ammeter terminal to the evaluation
board VOUT terminal (J9), the negative (−) ammeter terminal
to the positive (+) load terminal, and the negative (−) load
terminal to the evaluation board GND terminal (J12).
Input and Output Voltmeter Connections
Measure the input and output voltages with voltmeters. Make
sure that the voltmeters are connected to the appropriate test
points on the board. If the voltmeters are not connected to the
right test point, the measured voltages may be incorrect due to
the voltage drop across the leads and/or connections between
the boards, the power source, and/or load.
Connect the positive (+) terminal of the input voltage
measuring voltmeter to Test Point T1, and the negative (−)
terminal to Test Point T2.
Connect the positive (+) terminal of the output voltage
measuring voltmeter’s to the Test Point T3 and the negative (−)
terminal to Test Point T5.
Power On the Evaluation Board
When the power source and load are connected to the ADP2118
evaluation board, it can be powered up for operation. If the input
pow
er source is above 2.3 V, the output voltage goes up to 1.2 V.