
Evaluation Board User Guide

UG-002 Evaluation Board User Guide
Rev. 0 | Page 4 of 12
EVALUATION BOARD SOFTWARE
The instructions included in this section are for setting up the
AD9551 evaluation board software.
INSTALLING THE SOFTWARE
Do not connect the evaluation board until the software
installation is complete. To install the software,
1. Insert the AD9551 evaluation software CD-ROM into a PC
CD disc drive.
2. Click My Computer, and then double-click the
AD9551EV CD icon.
A window opens showing the contents of the CD divided
into four sections: data sheet, layout, schematic, and software.
The readme.txt file contains a description of the CD-
ROM contents, as well as any last minute instructions or
information.
3. Double-click the Software folder, and then double-click
AD9551Eval_Setup1.1.0.exe. Follow the installation
instructions. The default location for the evaluation
software is C:\Program Files\Analog Devices\AD9551
Eval Software\.
4. If there are any updates to the evaluation software on a
supplemental CD or in the \Software\Updates folder, be
sure to copy the new .EXE file, as well as any setup files, to
the default location.
USING THE SOFTWARE
After the evaluation software has been installed, you can run
the software as follows:
1. Power up and connect the evaluation board to the PC.
2. Double-click AD9551 Eval Software to run the AD9551
evaluation software.
A hardware installation window appears. Depending on
whether the evaluation board was found by the software, the
text in this window is either light blue, indicating that the
evaluation board was found, or red, indicating that the
evaluation board was not found.
3. If the evaluation board was found, click in the window
when the Evaluation Software Ready message appears.
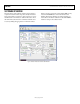
The main window of the evaluation board software appears.
Proceed to the Guide to Programming the AD9551 section
for more details about using the software.
4. If the evaluation board was not found, a dialog box appears
that allows you to select an evaluation board to use while
the software runs in standalone mode. Standalone mode is
useful for viewing and generating register setup files.
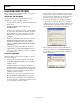
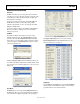
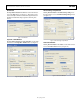
5. If you connect the evaluation board while the evaluation
board software is running, the window shown in Figure 2
usually appears to prompt you to load the evaluation board
with the evaluation board software settings or to read the
current evaluation board settings into the software.
08129-002
Figure 2. SYNC Evaluation Software Window
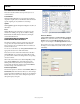
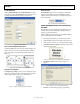
6. If the evaluation board was not automatically detected
when it was connected, choose Select Evaluation Board
from the I/O menu, and then select EZSSP-0, EZSSP-1, or
EZSSP-2 (see Figure 3).
0
8129-003
Figure 3. Select USB Device Window