
User guide
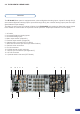

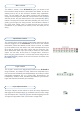

The «Input/Frame» section allows to individually select from all the
sources plugged into the Di-VentiX II, and set all of the desired
parameters, effects and tweaks to that source or frame. It is made
up of two distinct rows, the «Main» row, which indicates which input
(#1 to #8) is viewed on the main output, and the «Preview» row,
which determines which input (#1 to #8) is viewed on the preview
output. You can also, at the press of a single button, choose to
black out your preview screen, or freeze the current image via the
[BLACK]/[FREEZE] buttons at the end of both the «Preview» and
the «Main» rows.
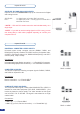
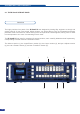
The «Menu» section of the Di-VentiX II gives you access to all
the machine’s setup functions, parameters and tweaks, and is the
starting point to any of the machine’s endless setup capabilities.
Here, you will easily nd and select functions and parameters,
quickly scroll through the extensive choices with the four practical
selection knobs, and set values with the four corresponding [SET]
buttons. The large VFD screen will clearly indicate your every move,
guiding you through your setup process, and indicate the status of
any given input, output, layer, or preset as soon as one of them
is selected, so you always know where you are and what you are
doing.
The «Layer» section is the biggest step forward in the Di-VentiX II
range evolution, and allows to easily select and manipulate up to
four live sources individually and independantly, much like you would
manipulate transparent lm on a glass plate. Superimpose, set
transparency, borders, mask, transitions and effects to your sources,
logos and frames and unleash your creativity.
The layer «Adjust» section allows for quick and easy adjustments
and toggle of the selected layer for increased control on size, image
crop and aspect ratio. The [SHIFT] button will allow toggling from the
«Cropped» image state to the «Full Screen» image state.
Menu section
Input/Frame section
Layer section
Layer adjust section
27