
User Manual

52
8.2.4 Output selecon sengs
enable or not the HDCP detecon on the output,
display the centering test paern,
choose to display one of the available test paern.
All changes have to be validated by pressing the ENTER buon in order to be saved
NOTE: The output status can provide you all informaon about the output in real me. This feature is
parcularly needed when HDCP is used with long cable to be sure that the communicaon is well
handled.
Video Out
The Video Out allows you the same sengs as other outputs with some addional specic opons:
set up the sharpness on the video out image,
apply a icker lter on your video output to eliminate ickering,
enable or not the automac video zoom overscan,
- ADJUST: adjust your video output in term of H/V posion and size.
In Matrix mode, the menu appears. It allows you to choose recording Output #1 or
Output #2.
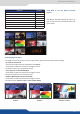
8.2.5 Preview features
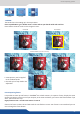
The Preview output can display all adjustments before the TAKE.
All current layers for the Program are dened by a colorful frame on Preview. They are idened by a leer
and a number with the same color.
- Frame: Frx, with x of 1 to 8,
- Layer A: Axx, with xx of 1 to 10,
- Layer B: Bxx, with xx of 1 to 10,
- Layer C: Cxx, with xx of 1 to 10,
- Logo 1: L1x, with x of 1 to 8,
- Logo 2: L2x, with x of 1 to 8,
Because the number of resources available is limited, the Preview displays only one live or sll layer at a me.
The others are only idened by their colorful frame and their number.
The Preview output can display 7 elds on OSD.
To set up your Preview:
- Field#1: Input,
- Field#2: Transparency,
- Field#3: Border,
- Field#4: Opening Eect,
- Field#5: Closing Eect,
- Field#6: Smooth Move,
- Field#7: Keying.
8.2.7 Preview Id
The funcon disables all the display of ID informaon in Preview mode. The colored frames and numbers
indicang your source selecon on each layer are disabled. To set up your Preview Id: