
User guide

Pulse - Ref. PLS300
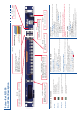
Rear Panel Description
RS-232 communication port
on a DB9 female connector
Power supply: IEC/EN/UL/CSA
60950-1, internal, autoswitchable
Universal Analog Computer TV/HDTV inputs #1 to #4
3G/HD/SD-SDI inputs #1 & #2:
female BNC
DVI connectors: DVI-D inputs #1 and #2 on the DVI-I
digital pins, and Universal Analog inputs #5 & #6 on
the DVI-I analog pins. Use the included break-in cable
Outputs #1 & #2: female HD15,
DVI-I (simultaneous analog and
digital outputs)
Main Audio Output (balanced)
IP-LAN connector
3.5mm Jack Stereo
Connector input
(unbalanced)
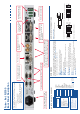
Inputs #1 to #4: Unbalanced connection
Inputs DVI1 to DVI2: Unbalanced connection
Main Output: Balanced connection
Input #7 (AUX): Balanced connection
L DVI 1
R DVI 1
L DVI 2
R DVI 2
UNBALANCED
LEFT DIV 1
RIGHT DIV 1
LEFT DIV 2
RIGHT DIV 2
GROUND
4
L+
L-
R+
R-
BALANCED
L+
R+
L-
R-
GROUND(S)
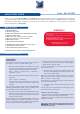
The Home Menu is the system’s top level menu, from which all others menus can be
accessed. To access a menu, press the [MENU] button. To navigate in the Home
Menu, please use the knob. To conrm, please use the [ENTER] button. You can also
return to the Home Menu by pressing the [EXIT] button.
- congure the 10 individual input types and resolutions
- in Mixer mode, set format and rate of main output
- set format and rate of preview output
- store and use presets
- change image settings of an input
- access keying and titling controls and parameters for the
selected layer
- adjust Layer size, position, border transparency or Transition
- store (record), and manage layers and frames. To display a
frame or logo, use the frame or logo layer (see next page)
- access all audio input and output parameters
- access device software information, LAN settings, reset factory settings,
amongst other user oriented functions (see next page)
- access the Virtual T-Bar
The features of PLS300 can be controlled by the external
remote control as:
- Orchestra - Ref. ORC50
- Axion2 - Ref. ARC200
- Remote Control Software - Ref. RCS (supplied)
- Triple Remote Control Keypad - Ref. TRK-800
- Remote Control Keypad - Ref. RK-300
AUDIO OUTPUT
Right
Left
Ground
IMAGE
(A3)
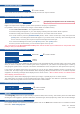
HOME MENU (extract)
Auto Centering
(R1)
Blanking Adjust
(R2)
Cropping
(R2)
Optimize
(R1)
Under/Over
(R3)
Aspect IN
Aspect OUT
Colorimetry
Advanced
(R2)
2:2 Pulldown
(R7)
3:2 Pulldown
(R8)
Reset settings
Force 4:3
(R9)
H position
H position
V position
V position
H size
H size
Phase
Underscan
Native
LetterBox_2_35
Centered
Contrast
Red Level
(R5)
Component Level
(R2)
Pillar Box
1_1
Hue
(R6)
Blue Level
(R5)
Motion Correct.
(R11)
V size...
V size...
H Total
Overscan
LetterBox_1_78
Full screen
Brightness
Anamorphic
Cropped
Color
Green Level
(R5)
(A3) displayed when an
input is active
(R1) Analog Computer Input
(R2) Analog Input
(R3) Video Input
(R4) EDTV/HDTV Input
(R5) RGB or YUV or YC or CV
(R6) NTSC Input
(R7) Interlaced 50 Hz
(R8) Interlaced 60 Hz
(R9) SDTV
The Menu allows to improve the thres-
hold of the comb lter.
0% means no adjustments and 100%
is the max. The setting is manual with
a visual correction.
The result is the removal of the alia-
sing in the moving picture.
Motion Correction
MCO Male connector for
input. DVI #1 & #2 and AUX