
User`s manual


SCAN 1600 / DIGI SCAN 1600 Chapter 2 : STARTING (continued)
PAGE 13
2-2. SCAN 1600 CONNECTIONS:
c Turn OFF all of your equipment before connecting.
d Connect your computer source to the COMPUTER INPUT (HD15) connector or the DVI-D INPUT connector.
e As required, connect a control monitor on the MONITOR OUT (HD15) connector.
NOTE
: Set the RGB Hi-Z/75 Ω button on Hi-Z if you connect a monitor on the MONITOR OUT connector. If not
set it on 75 Ω.
NOTE:
The MONITOR OUT is available only if the COMPUTER source is analog.
f Connect your display device (TV monitor, VCR…) to the outputs.
g Connect the external power supply to an AC power outlet and to the DC input connector of the SCAN 1600. Then
turn ON your input source and then your display devices.
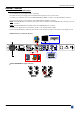
• SCAN 1600 connection diagram:
Ω
2
3
4
5
• RGB/COMPONENT output connection:
2-3. SETTINGS
c We recommend resetting the device to all of its default values, with the front panel display menu (Control > default
value > yes) before proceeding.
d Select the Input source (ANALOG or DVI) with the front panel display menu (Input > Input select.).
e Select the Output standard with the front panel display menu (Output > Output std).
f Select the type of the RGB/YUV output with the front panel display menu (Output > RGB/YUV out).
2-4. IMAGE ADJUSTMENTS
c Select the UNDERSCAN mode with the front panel display menu (Image> under/over).
d Adjust the image position & size with the front panel buttons.
e Adjust the level of anti-flicker with the panel display menu (Image > flicker filter).
f As required, make the others adjustments, available in the Image menu.