
User Manual


QUICK START GUIDE
What’s in the box
Quick install and setup
Thank you for choosing Analog Way and the Smart Edge FX. By following these simple steps, you will be able to
setup and use your powerful Hi-Resolution Mixer Switcher with Dual Output Edge Blending within minutes. Discover
the Smart Edge FX H[WHQVLYHFDSDELOLWLHVDQGLQWXLWLYHLQWHUIDFHZKLOHFRQ¿JXULQJ\RXU¿UVWVKRZDQGXQOHDVK\RXU
creativity for a new experience in show and event management by Analog Way.
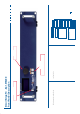
Smart Edge FX - Ref. STE200
1 x Smart Edge FX (STE200)
1 x AC Power cable
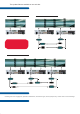
2 x DVI-I male to HD15 female and DVI-D female breakout cable
1 x HD15 to 5 BNC cable
1 x Ethernet cross cable (for device update)
1 x Set of 11 audio 5-pin screw terminals
1 x RCS - Remote Control Software (PC only) *
1 x User Manual (PDF version) *
1 x Quick Start guide *
* Download on our website: www.analogway.com
Optional:
1 x Sync Cable for multiple machine mode (Ref. AW212080)
WARNING !
If required, front handles of the device can be dismantled,
but with caution.
The original screws removed must not be reintroduced to
their location without handles in place.
Substantial damages can occur , including risk of elec-
tric shock from the mains voltage.
Only M4x12mm screws can be used.
(They are supplied with the unit)
Getting started
g
:
You ma
y
wish to reset the unit to
f
actor
y
settin
g
s to
g
et started.
G
o to
:
Me
n
u
--
>
C
ontrol --
>
D
efau
lt V
a
l
ues
--
>
Y
es
.
1.
S
elect the
O
utput resolution that matches the native
r
esolution o
f
y
our displa
y
. You will next be prompted to
c
hoose enable
f
ollow mode i
f
desired and output rate.
Me
n
u
--
>
O
utpu
t
--
>
O
utput
f
orma
t
--
>
1
0
24x7
68
--
>
Int
e
rn
a
l R
ef
--
>
60
Hz
.
2. The principle o
f
S
o
f
t Ed
g
e Blendin
g
lies in pro
j
ectin
g
an
ima
g
e on a wide screen thanks to two or more video
p
ro
j
ectors displa
y
in
g
the same content.
We Invite
y
ou to read the User Manual i
f
y
our skills are not
e
nou
g
h to achieve the necessar
y
ad
j
ustments.
T
he followin
g
setup has to be made throu
g
ht an external
Remote Control
(
RCS/RK-300/TRK-800/ORC50/ARC200
).
3
.
O
n
y
our controller, to displa
y
a source, select the
[
BACKGR
O
UND LIVE] la
y
er
(
it will be
g
in to blink
)
then, select a source
(
it will also blink
)
. Press
[
TAKE] t
o
transition on pro
g
ram output.
There will alwa
y
s be a la
y
er selected
(
blinkin
g)
and a source
s
elected
(
blinkin
g)
to the selected la
y
er
(
blinkin
g)
. To chan
g
e
the contents o
f
a di
ff
erent la
y
er, simpl
y
select it. The
S
mart
Ed
g
e FX has 2 la
y
ers available called:
[
BA
C
K
G
R
O
UND LIVE]
a
n
d
[
PIP]
.
Each la
y
er will obscure
y
our view other la
y
er below.
4. To displa
y
a titlin
g
, select the
[
PIP]
l
a
y
er,
(
it will be
g
in to
blink
)
then select
y
our source
(
it will also blink
)
. Press
[
TAKE] to displa
y
the PIP on pro
g
ram out.
The title la
y
er is onl
y
available b
y
an external Remote
C
ontrol
(
R
CS/
RK-300
/
TRK-800
/O
R
C
50
/
AR
C
200
)
.
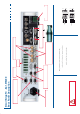
The La
y
er selection section allows to ad
j
ust La
y
er size,
p
osition, transparenc
y
or transitions.
The Ke
y
in
g/
T iltin
g
section allows to access ke
y
in
g
and titlin
g
c
ontrols and parameters.
The Ke
y
ed la
y
er has similar capabilities than an
y
other la
y
ers.
R
K-300, TRK-800 and R
CS
allow to control the Ke
y
ed La
y
er
b
y
th
e
[
PIP2]
bu
tt
o
n.
O
R
C
50 or AR
C
200 allow to control the Ke
y
ed La
y
er b
y
[
PIP1]
bu
tt
o
n.
To see the la
y
er beneath,
y
ou will need to clear or move the
l
a
y
er that are the top.
5
. To clear the PIP, select the la
y
er
(
it will blink
)
then, selec
t
[
BLA
C
K]
.
Pr
ess
[
TAKE] to remove the la
y
er
f
rom the
p
ro
g
ram output.
IMPORTANT
:
TT
Simpl
y
selectin
g
a menu item will not set it to that value.
Be sure to press the ENTER button when parameterin
g
the
m
enu items
.