
Owner's manual


Advanced Instruments Inc.
18
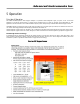
Procedure:
1. Disconnect the AC power source before servicing the analyzer.
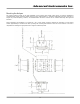
2. Insert the power cable through the user supplied approved conduit fitting on the left side of the analyzer.
3. Insert the output cable(s) through the user supplied approved conduit fittings on the right side of the analyzer.
4. Strip the ends of the wires approximately ¼ inch.
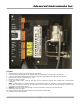
5. Remove the safety cover plate.
6. Loosen the terminal screws, insert the bare wire into the appropriate terminals and re-tighten with a small bladed
screwdriver.
7. Note: If equipped with the optional temperature controlled heater system, the necessary wiring has been installed at the
factory and no additional connections are required. The power connection services both the analyzer electronics and
temperature controlled heater system.
8. Caution: Connect the power ground directly to the ground terminal on the inside of the analyzer case.
9. Replace the safety cover plate.
10. Pack and seal the power and interconnection wiring as described in Appendix A.
11. Establish power as directed below.