OWNER’S MANUAL UHF-EXT500 1
MESSAGE FROM ANCHOR AUDIO Congratulations on purchasing an Anchor Audio wireless system! You have joined the thousands of satisfied customers including the various professional athletic teams, prestigious universities, school districts nationwide, first responders, and the branches of the U.S. Military.
UHF-EXT500 INTRODUCTION The PLL synthesized wireless microphone system operates in UHF 540 - 570 MHz frequency band with 700 selectable channels. Please read this instruction manual carefully before operating the system. This manual covers the function and operation of the wireless microphone system. FCC STATEMENT This device complies with part 15 of the FCC rules. Operation is subject to the following two conditions.
BASIC SYSTEM OPERATION - WR-EXT500 Front Panel 1. Power Button 2. LCD Display: Display channel, frequency and settings 3. Button 1 : Tap the channel forward/backward 4. SYNC Button: Press the button to actuate the synchronization with the transmitter 2 3 4 5 6 5. SET Button: Press button to activate the manual or auto-scan or preset mode 6. Volume Controller: Adjust the receiver output level LCD Display 1. MANUAL: Use this mode to select free channel manually 2.
BASIC SYSTEM OPERATION - WH-EXT500 2 7 5 4 3 6 1 1. Power Button: Press for 2 seconds to power the microphone on or off 2. Power LED: Indicates the power/low battery level status. LED Indicator Status Green Ready Flashing Green The synchronization process is actuated Flashing Red Low battery power with less than 10 minutes of operation left 3. Talk Button: Push the button up to talk. 4. SYNC Button: Press to actuate the synchronization process with the receiver 5.
SETTING UP THE HANDHELD MICROPHONE / BELT PACK TRANSMITTER Open the battery cover and insert batteries into the battery compartment conforming to the polarity +/marks. Unscrew the handheld Mic and open the battery cover to insert the battery into the battery compartment and confirm the marks of the polarity +/-. 4 SECONDS 4 SECONDS Press for 4 seconds to turn the Handheld/Belt pack transmitter on. If the LED stays flashing. It indicates that the battery will be out of power soon and should be replaced.
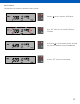
SETTING UP CHANNEL ON RECEIVER Notice: Do not put two or more transmitters operating nearby when setting up the frequency channel. Please keep transmitter at least one meter away from receiver. Manual Mode Setting up interference-free channel by manual operation Using the button to select the “MANUAL” mode. Press “SET” button for 2 seconds till LCD display is flashing. Press button to change the channel forward. Press “SET” button to lock the setting.
Preset Mode Set multiple channels by using preset channels. There are 4 preset groups. Excluding the interference from external, there are 8 preprogrammed channels that can be operated simultaneously in each group. Use the button to select the “PRESET” mode. Press “SET” button for 2 seconds till LCD display is flashing. Press the channel button to change the programmable group forward. Press “SET” button to lock group setting. Press the channel button to change the programmable channel forward.
Auto-Scan Mode Set interference-free channel by automatic frequency function. Using the button to select the “SCAN” mode. Press “SET” button for 2 seconds till LCD display is flashing. Press button to scan in forward direction, and it will stop at the free-interference channel automatically. Press the “SET” button to lock the setting.
Insert Batteries 4 SECONDS 4 SECONDS SYNC Step 2 PRESS AND HOLD SYNC SYNC or MUST BE LESS THAN 1 METER AWAY FROM Belt pack OR HANDHELD MICROPHONE PRESS AND HOLD SYNC Step 1 9
SYSTEM OPERATION Prior to setting up, please check that the transmitter and receiver are tuned to the same frequency or channel. Two or more transmitters operating in the same frequency can not be used at the same time and same area. Connect the provided DC power supply to the receiver with an appropriate AC power source. The receiver is on when the LCD screen display lights up.
QUICK START GUIDE 1. Connect Receiver to Power Cable then plug into a Grounded Power Outlet 2. Connect Mixer or Amplifier Balanced XLR Cable Unbalanced 1/4” Phono Cable 3.
SYNCHRONIZING A TRANSMITTER WITH A RECEIVER Automatic frequency synchronization via remote channel for easy setup 1. First, switch the transmitter and the receiver on. Press and hold the SYNC button on your transmitter. The SYNC flashes on the receiver display panel. Press the SYNC button on the receiver front panel, the transmitter will set the same channel as receiver automatically. 2. When using SYNC setting, the distance of receiver and transmitter should be within 1 meter.
COLOR AND LABEL IDENTIFICATION You can also stick the color label on the receiver and transmitter for quickly identifying the paired system.
MOUNTING THE RECEIVER To combine two receivers in 19” standard rack, use the two short L type metal racks and two metal connecting plates, included in the UHF-EXT500 box.
TECHNICAL SPECIFICATIONS UHF-EXT500 Receiver Frequency Range UHF 540 ~ 570 MHz (Regionally Selected) Case Half 19” EIA Rack Metal Case Oscillator PLL Synthesized Modulation FM S/N Radio > 100 dB at 200 KHz deviation and 60 dBµV antenna input Image & Spurious Rejection 70 dB minimum Receiving Sensitivity At 2µV over 52 dB S/N ratio AF Response 80 Hz to 18 KHz T.H.D. <1% (at 1 KHz) IF Frequency 1st: 243.95 MHz 2nd: 10.7 MHz Dynamic Range >100 dB Tone Signal 32.
IMPORTANT SAFETY INSTRUCTIONS General Warning or Caution Inspection for Damage The Exclamation Symbol in the figure to the left appears in Warning and Caution tables throughout this document. This symbol designates an area where personal injury or damage to the equipment is possible. Anchor Audio products are carefully packaged at the factory to minimize the possibility of damage during shipping. Inspect the box for external signs of damage or mishandling. Inspect the contents for damage.
IMPORTANT SAFETY INSTRUCTIONS (CONT’D) 1) Read Instructions – All the safety and operation instructions should be read before the product is operated. 2) Retain Instructions – The safety and operating instructions should be retained for future reference. 3) Heed Warnings – All warnings on the product and in the operating instructions should be adhered to. 4) Follow Instructions – All operating and use instructions should be followed.
ANCHOR AUDIO WARRANTY Anchor Audio products are warranted to be free from defects in materials and workmanship for the period of SIX (6) YEARS from the date of original purchase unless listed below.