
Installation Guide


Step 4: Venting
• Fix the damper on the top vent of hood with 4 screws (requires screw C).
If ventilation system is equipped with an external air duct with a different diameter, apply a reduction fitting.
However, for maximum performance and safety, a 6” round ducting is recommended. (See Figure # 2)
Step 5: Mounting the hood on the wall
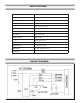
• Hang the range hood on the hooks of the lower mounting bracket. (See Figure # 3)
• Screw the range hood to the wall.
CAUTION - Make certain the range hood is secure before releasing!
• Remove the protective coating from the inner chimney. Carefully slide the inner chimney down into the
outer chimney.
• Use 2 screws (requires screw D) to fix the two chimneys together with the lower chimney bracket,
make sure inside chimney is moving freely. (See Figure # 4)
• Screw the inner chimney to the upper mounting bracket (requires screw D). (See Figure # 5)
• Connect the duct to the damper / duct connector and seal with duct tape.
• Connect the range hood to a designated standard outlet (120-Volt, 60 Hz, AC only).
INSTALLATION CONTINUE:
2
3
4 5
D
D