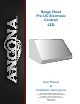
® Range Hood Pro UC Electronic Controls LED User Manual & Installation Instructions IMPORTANT SAFETY INSTRUCTIONS Carefully read the important information regarding installation, safety and maintenance. Keep these instructions for future reference.
Before You Begin INSTALLERS - Start Here Safety Instructions are on pages 4 and 5 and Installation Instructions are on pages 6 to 14. Please perform these steps: 1. Read the safety instructions. 2. Read all instructions in the Installation section of this manual BEFORE installing the range hood. 3. Remove all packing materials. 4. When finished, make sure to leave these instructions with the consumer. 5. Installation is to be done by a qualified technician only.
Table of Contents Before You Begin................................................................................................................................ 2 Table of Contents............................................................................................................................... 3 Important Safety Information............................................................................................................. 4 Included Parts..............................................
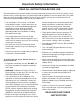
Important Safety Information READ ALL INSTRUCTIONS BEFORE USE Read and follow all instructions before using the range hood to prevent the risk of fire, electric shock, personal injury, or damage when using the range hood or appliances with the range hood. This guide does not cover all possible conditions that may occur. Always contact your service technician or manufacturer about problems that you do not understand. disconnecting means to prevent power from being switched on accidentally.
Important Safety Information WARNING: TO REDUCE RISK OF A RANGE TOP GREASE FIRE: To reduce the risk of injury to persons in the event of a gas leaks: a) Never leave surface units unattended at high settings. Boilovers cause smoking and greasy spillovers that may ignite. Heat oils slowly on low or medium settings. • Extinguish any open flame. • DO NOT turn on the lights or any type of appliance. • Open all doors and windows to disperse the gas.
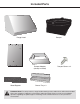
Included Parts Range Hood Baffle Filters x 3 Wood Support Damper Damper Adapter (already installed) Damper Screws x 4 Grease Tray x 3 Hardware Note: For safety reasons, range hood mounting screws and anchors will not be included due to the variation of cabinetry constructions and wall material. Please consult your installation specialist regarding the optimal type of mounting screws and wall anchors to suit your home’s construction.
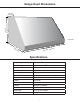
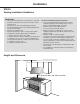
Range Hood Dimensions 18-1/16” (460 mm) 12-1/8” (310 mm) 2” (35 mm ) 25 -1 (63 /8” 8m m) ” - 35-7/8 29-7/8” m) m 0 - 91 m m 7 5 (7 Specifications Body Design Power Rating Stainless Steel 120 V / 60 Hz (cETLus Certified) Total Input Power 506 W Motor Input Power 500 W Total Amps 4.
Installation STEP 1 Read the Safety Instructions • It is very important to read the safety instructions on pages 4 and 5. IMPORTANT: It is the installer’s responsibility to comply with installation clearances. STEP 2 Unpack Range Hood and Prepare Tools • Carefully unpack the range hood and parts. Make sure all parts are included as shown on page 6. • DO NOT remove the protective film covering the appliance until the installation is fully completed.
Installation STEP 5 Venting Installation Guidelines IMPORTANT: • Vent system must terminate to the outside (roof or side wall). • DO NOT terminate the vent system in an attic or other enclosed area. • DO NOT use 4” (10.2 cm) laundry-type wall caps. • Use metal/aluminum vent only. A rigid metal/aluminum vent is recommended. • DO NOT use a plastic vent. • Always keep the duct clean to ensure proper airflow. • Calculate the following figures before installation: 1. Distance from the floor to the ceiling 2.
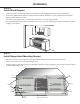
Installation STEP 6 Install Wood Support • Locate at least two vertical studs at the wood mounting location by tapping drywall or by using a stud finder. • Position the supplied wood support 3” (76 mm) below the cabinet and drill 1/8” (3.175 mm) pilot holes through the support, drywall and into the studs. • Secure the wood support to two or more vertical studs with wood screws (not provided). • Use threaded drywall anchors when mounting the hood onto sheet rock.
Installation STEP 8 Mount the Range Hood • Lift the range hood and place over the protruding mounting screws; the keyhole slots on the top of the range hood should engage with the protruding mounting screws. • Gently slide the range hood backwards until it cannot slide back any further. Finish screwing in the mounting screws. Notes: • Please make sure to read ALL safety precautions on pages 4 and 5. • Check to be sure the range hood is level and centered.
Installation STEP 10 Install Damper • Position the damper over the damper adapter and secure using the screws provided. f DAMPER f WALL f DAMPER ADAPTER STEP 11 Connect Ductwork • Attach ductwork to damper. Secure the ductwork with duct tape to make joints are secure and air-tight. • Do not install the duct tape too tightly as this may prevent the damper flaps from opening which will overwork the motor and cause improper functioning of the unit.
Installation STEP 12 Connect to AC • Connect AC plug into a grounded AC outlet having 120V, 60Hz. Place the outlet at a maximum distance of 33-1/2” (851 mm) from where the cord exits on the hood. • SEE IMPORTANT INSTRUCTIONS BELOW 3-Pronged Plug Ground Plug 3-Prong Receptacle IMPORTANT: • Observe all governing codes and ordinances. • It is the customer’s responsibility to contact a qualified electrical installer.
Installation STEP 13 Install Grease Trays • Place the grease trays into the the track at the back of the range hood. • Slide them left and right until all trays are placed side-by-side in the track. • cleaned once a month, or as needed. See page 16 for cleaning instructions. STEP 14 • • front of the range hood. • until it sits securely. • by cooking foods into the grease trays and damaging the inside of the range hood. For installed during range hood use. • cleaned once a month, or as needed.
Operation Using the Fan Turning the Light On of Off u Press the 1 button to turn on the fan and set it to slow speed; the button will light up. Press the same button to turn the fan off. Press the button to turn the light on. v Press the 2 button to increase the speed to the second setting; the 2 button will light up. Press the button again to turn the light off. 1 2 3 4 u 1 2 3 4 v 1 2 3 4 Press the 3 button again to increase the speed to the third setting; the 3 button will light up.
Maintenance Replacing the Light Bulbs Cleaning the Range Hood Be sure electrical power is off and all surfaces are cool before cleaning or servicing any part of the hood. u Unplug the unit from the AC outlet. v Remove five screws from the light panel, then remove the light bulbs by popping them out. Range Hood Body • Do not use a steel wool pad; it will scratch the surface. • To clean the stainless steel surface, use warm soapy water or a stainless steel cleaner.
Replacement Parts 1 2 3 4 6 5 7 8 15A & 15B 9 Description Part Code Description Part Code 1 - Capacitor PACAP-15 10 - Light Panel 30”* PALPL-20 2 - Circuit Board PABRD-14 11 - Light Panel 36”* PALPL-21 3 - Transformer PATRA-13 12 - Hardware Bag* PASCR-16 4 - Damper PADAM-14 13 - Baffle Filter - 30”* PA02058 5 - Light Bulb PRH-0225 14 - Baffle Filter - 36”* PA02060 6 - Motor PAMOT-14 15A - Grease Tray - 30”* PAGTR-03 7 - Squirrel Cage PAMCG-12 15B - Grease Tray - 36”*
Please register your product warranty by visiting the Ancona Home website. Canada & USA Phone: 1-800-350-4562 Fax: 800-350-8563 Email: service@anconahome.com Website: www.anconahome.com Ancona is in association with Mr Appliance for all after sales service calls. Please contact their service provider or visit their website: Phone: 888-998-2011 Website: www.mrappliance.com MAAN1244-03 © 2017 Copyright of Ancona Home. All rights reserved.