
Instructions / Assembly


— 36 —
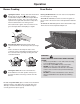
Care and Maintenance
u
Remove the glass cover by turning counter-
clockwise.
v
Remove the bulb by turning it counter-clockwise.
w
Replacethebulbwitha240V,25Wtypee-14bulb.
Reconnect power.
u
Turn all burners to their
highest settings and
checktheames.They
should be blue in color
and may have some
yellow tipping at the
endsoftheamewhen
using LP gas. Foreign
particles in the gas line
may cause an orange
ameatrst,butthis
will soon disappear.
v
Turn the desired burner knob to Low ( ) and
observetheame.
w
Set two other burners to Medium. This will prevent
theupperrowofamesfrombeingsettoolow,
resultingintheamebeingextinguishedwhenother
burners are turned on.
x
Toadjusttheame,removetheknobs;insertthe
included3/32screwdriverthroughtheaccesshole
to engage the brass slotted screw as shown. Make
the adjustment by slowly turning the screw until the
ameappearanceiscorrect.
Test 1:TurntheburnerknobfromHigh( ) to Low
( )quickly.Iftheamegoesout,increasetheame
size and test again.
Test 2: With the burner knob on a
Low ( )
setting,
openandclosetheovendoorquickly.Iftheame
is extinguished by the air currents created by the
doormovement,increasetheameheightandtest
again.Iftheamesaretoosmalloruttered,open
thevalvemorethantheoriginalsetting.Iftheames
are too large, close the valve more than the original
setting.
Replacing the Light Bulb
Adjusting the Burner Flames
WARNINGS:
• Beforereplacingyourovenlightbulb,DISCONNECT
the electrical power to the range at the main fuse or
circuit breaker panel.
• Makesureovenandbulbarecooledcompletely.