
Full Product Manual


— 19 —
Installation
STEP 5 (Continued)
Liquefied Pet oleum (Propane)
Gas Conversion
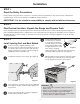
Changing Burner Nozzles
INSTALLATION TIP: To prevent any omissions,
remove ALL existing Natural Gas nozzles before
replacing them with the LP nozzles.
V
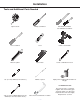
Remove the burner grates, burner caps and burner
rings. Using the provided 7mm nut driver, remove
ALL the existing Natural Gas burner nozzles.
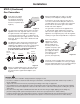
Carefully read and observe each nozzle label for
correct location (DO NOT force or over-tighten
nozzles as doing so will damage the burner base
andaffecttheame
W
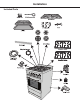
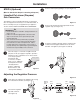
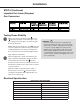
Install the proper nozzles in the exact locations as
noted in the illustrations and the table below. (See
Figures 17 and 18)
Adjusting the Burner Flames
X
Ensure electricity and gas are switched on. Turn all
burners to their highest settings. Flames should
beblueincolor(LPgasamesmayhaveyellow
tips). Foreign particles in the gas line may cause an
orangeameatrst,butthiswillsoondisappear.
at
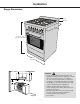
Checkeachcooktopburnerforproperlowame:
PushandturnburnerknobtoLow();theame
sizeshouldbe1/4”to3/8”(0.64cmto0.95cm)
high. (See Figure 19)
ak
Settwootherburnersto“Medium”.Thiswill
preventtheupperrowofamesfrombeingsettoo
lowresultingintheamebeingextinguishedwhen
the other burners are turned on.
al
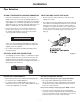
Toadjusttheame,removetheknobs;insert
theincluded3/32
screwdriver through the
access hole to engage
the brass slotted
screw as shown (See
Figure 20). Slowly turn
the screw counter-
clockwise to lower the
ameandclockwiseto
increasetheame.
Note: If burner does
not stay ignited at low setting, return burner knob to
“OFF”positionthenpushandturnburnerknobto
Mediumsettingandadjusttheameslightlyhigher.
Returnburnerknobto“OFF”positionthenre-check
ameheightatLowsetting.
Triple Ring Burners
5 Nozzles
Auxiliary Burner
Semi-Rapid Burner
Rapid Burner
1 Nozzle Each
Figure 17
Figure 18
Figure 19
Figure 20
56
56
56
56
56