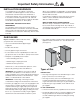
® Gourmet Freestanding Range Gas Cooktop Electric Oven User Manual & Installation Instructions IMPORTANT SAFETY INSTRUCTIONS Carefully read the important information regarding installation, safety and maintenance. Keep these instructions for future reference.
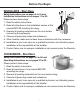
Before You Begin INSTALLERS - Start Here Safety Instructions are on pages 4 to 10 and Installation Instructions are on pages 11 to 23. Please perform these steps: 1. Read the safety instructions. 2. Read all instructions in the Installation section of this manual BEFORE installing the range. 3. Remove all packing materials from the oven before connecting the gas supply. 4. Observe all governing codes and ordinances. 5. When finished, make sure to leave these instructions with the consumer. 6.
Table of Contents Before You Begin...................................................................................................................................... 2 Table of Contents..................................................................................................................................... 3 Important Safety Information................................................................................................................... 4 Installation..............................
Important Safety Information READ ALL INSTRUCTIONS BEFORE USE Read and follow all instructions before using your oven to prevent the risk of fire, electric shock, personal injury, or damage when using the range. This guide does not cover all possible conditions that may occur. Always contact your service technician or manufacturer about problems that you do not understand.
Important Safety Information WARNINGS • Ensure that the room is well ventilated by keeping the air intakes open and in good working order or by installing an extractor hood with discharge pipe. If the appliance is used intensively for a long time the effectiveness of the ventilation will have to be increased, for example by opening a window or increasing the power of any electric extractor fan.
Important Safety Information DANGER • Clean the appliance regularly to keep all parts free of grease that could catch fire. Exhaust fan ventilation hoods and grease filters should be kept clean. Do not allow grease to accumulate on hood or filter. Greasy deposits in the fan could catch fire. When cooking food, turn the hood fan on. Refer to hood manufacturer’s instructions for cleaning. • Do not store items of interest to children in the cabinets above the appliance or on the back splash of a range.
Important Safety Information DANGER • Use the proper pot/pan sizes. This appliance is equipped with surface units of different sizes. Select pots/pans having flat bottoms large enough to cover the surface unit. The use of undersized utensils will expose a portion of the surface heating unit to direct contact and may result in ignition of clothing. Proper relationship of utensil to the surface unit will also improve efficiency. • Do not use stove top grills on your gas appliance.
Important Safety Information VENTILATION WARNINGS • The range should have proper ventilation in order to keep the unit operating properly and maintain the temperature of immediate surroundings within safe limits. Check your local building codes as they may vary from the general rules outlined in this guide. • Observe all governing codes and ordinances. Do not obstruct flow of combustion and ventilation air.
Important Safety Information INSTALLATION WARNINGS To avoid damage to your cabinets, check with your builder or cabinet supplier to make sure that the materials used will not discolor, delaminate or sustain other damage. This oven has been designed in accordance with the requirements of UL and CSA International and complies with the maximum allowable wood cabinet temperatures of 194°F (90°C). When such standard is not applicable, use the Standard for Manufactured Home Installations, ANSI A225.
Important Safety Information ELECTRICAL DANGER Electrical Shock Hazard. Do not use an extension cord. Failure to follow these instructions can result in death, fi e, or electrical shock. • Any additions, changes or conversions required in order for this appliance to satisfactorily meet the application needs must be made by a qualified service technician in accordance with the manufacturer’s instructions and all codes and requirements of the authority having jurisdiction.
Installation Pipe Selection OPTION 1: FLEXIBLE METAL APPLIANCE CONNECTOR: MUST INCLUDE A SHUT-OFF VALVE: • Never reuse old flexible connectors. The use of old flexible connectors can cause gas leakage and personal injury. Always use new flexible connectors when installing a gas appliance. To reduce the possibility of gas leakage, apply Teflon tape or a thread compound approved for use with LP or Natural gases to all threaded connections.
Installation Included Parts — 12 —
Installation Tools and Additional Parts Needed Tape measure Phillips screwdriver Flat blade screwdriver 1/8” flat blade screwdriver Hex screwdriver Level Hand or electric drill Wrench or pliers Pipe wrench 15/16” combination wrench 1/8” (3.2 mm) drill bit (for wood floors) Marker or pencil Pipe-joint compound resistant to LP gas For Additional Parts: 3/16” (4.
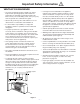
Installation Range Dimensions 2 3/8 “ (60 mm) 23 5/8” (600mm) 35 1/2 - 37 7/8” (900 mm - 960 mm) 23.62 “ (600 mm) 18” Min 30” Min DANGER: • Avoid placing cabinetry directly above the appliance when possible. If cabinetry is used above the cooking surface, use cabinets no more than 13” deep. Make sure the wall coverings, countertop and cabinets around the appliance can withstand heat up to 200º F (93°C) generated by the appliance. • Cabinet opening dimensions that are shown must be used.
Installation STEP 1 Read the Safety Precautions Please read the safety precautions on pages 4 to 10. Safety instructions pertaining to each step have been outlined in the installation steps; however it is important to read ALL the safety instructions. IMPORTANT: It is the installer’s responsibility to comply with installation clearances. STEP 2 Plan Desired Location, Unpack the Range and Prepare Tools Plan a desirable location that fits all requirements in the Safety and Install sections of this manual.
Installation STEP 4 Gas Connection WARNINGS: • • • • • • Please make sure to read ALL safety precautions on pages 4 to 10. Explosion Hazard. Use a new CSA International approved gas supply line. Install a shut-off valve. Securely tighten all gas connections. If connected to LP, have a qualified person make sure gas pressure does not exceed 14” (36 cm) water column. Examples of a qualified person include: licensed heating personnel, authorized gas company personnel, and authorized service personnel.
Installation STEP 4 (Continued) Gas Connection v w x Shut off the gas supply valve before removing the old range and leave it off until the new hook-up has been completed. (See Figure 8) U If metal hoses are used, make sure they do not come into contact with mobile parts and are not crushed. Make sure to use a pipe-joint compound that is made for use with LP gas to the smaller thread ends of the adapters.
Installation STEP 5 (Optional) (Must be done before Step 6 if converting to Propane) x Remove retainer pin by pulling it out. (See Figure 13) Liquefied Pet oleum (Propane) Gas Conversion This appliance can be used with Natural Gas or LP/Propane Gas. It is shipped from the factory for use with Natural Gas. A kit for converting to LP gas is supplied with your appliance. The kit is marked “FOR LP/PROPANE GAS CONVERSION”.
Installation STEP 5 (Continued) Adjusting the Burner Flames Liquefied Pet oleum (Propane) Gas Conversion X Ensure electricity and gas are switched on. Turn all burners to their highest settings. Flames should be blue in color (LP gas flames may have yellow tips). Foreign particles in the gas line may cause an orange flame at first, but this will soon disappear. at Check each cooktop burner for proper low flame: Push and turn burner knob to Low ( ); the flame size should be 1/4” to 3/8” (0.
Installation STEP 5 (Continued) Liquefied Pet oleum (Propane) Gas Conversion Testing Flame Stability am Test 1: Turn a burner knob from High ( ) to Low ( ) quickly. If the upper row of flames goes out at this setting, increase the flame size and test again. Repeat for all burners. WARNING: Once the conversion has been completed and has passed testing, fill out the conversion sticker and include your name, organization and the date conversion is made.
g s g C A STEP 6 D Installation C B A. ¼" drive ratchet B. Rear leveling leg B C. Wrench or pliers D. Front leveling leg To reduce the risk of tipping of the range, the A. range must be ¼" drive ratchet B. Rear leveling leg secured to the floor with a properly installed Anti-Tip Bracket C. Wrench or pliers (included). D.
Installation STEP 7 Burner Rings and Caps Placement u w Make sure each burner cap is properly aligned and level, then place the two grates and one triple ring grate over the burners. (See Figure 27) See below for Location of the Burners, as well as the illustrations of the burner caps and heads. (See Figure 25 3 Figure 27 1. riple-ring burner ner ne 2.. Semi-rapid b 3..
Installation STEP 8 Connect to AC DANGER: • Please make sure to read ALL safety precautions on pages 4 to 10. • Electrical Shock Hazard. • Do not use an adapter. • Do not use an extension cord. • Failure to follow these instructions can result in death, fire, or electrical shock. • Electrical connection must be performed by a qualified service technician in accordance with the kit instructions and all local codes and requirements.
Safety Before Operating Safety Precautions Before operating this appliance it is VERY important that you read the safety precautions on pages 4 to 10 as well as all safety precautions listed on this and the following pages with the header, “Safety Before Operating”. • Make sure your range is properly adjusted by a qualified service technician or installer for the type of gas (natural or LP) that is to be used. Your range can be converted for use with either type of gas.
Safety Before Operating Surface Burner Safety • Use the least possible amount of fat for effective shallow or deep-fat frying. Filling the pan too full of fat can cause spillovers when food is added. WARNINGS: • If the top burner flame goes out, gas will continue to flow to the burner until the knob is turned to the OFF position. • Do not leave the burners ON unattended. • Use proper pot/pan size—DO NOT use pans that are unstable or easily tipped.
Safety Before Operating Cook Meat and Poultry Thoroughly • Cook meat and poultry thoroughly—meat to at least an INTERNAL temperature of 160°F and poultry to at least an INTERNAL temperature of 180°F. • To protect against food-borne illness, always cook to the proper temperatures. Oven WARNINGS: • NEVER block any slots, holes or passages in the oven bottom or cover an entire rack with materials such as aluminum foil. Doing so blocks air flow through the oven and may cause carbon monoxide poisoning.
Installation Included Parts — 12 —
Operation Setting the Clock u v When first connected to AC power or after a power outage, the display will blink “12:00” and the Clock indicator will blink. You can enter the Time Setting mode manually by pressing and releasing the Function button until the Clock indicator blinks. To set the correct time, press the + or – button to advance forward or backward until the correct time is displayed. When finished, press the Function button, or wait five seconds; the time will then be set.
Operation Burners and Cookware u Each burner has a different BTU; chose the appropriate burner(s) for best result. w 3 To avoid potential hazards and prevent uneven cooking it is important to place cookware directly on the burner (See above illustration). Using the appropriate cookware will also help reduce cooking times and cook food more evenly (See Chart Figure 34) 1.
Operation Burner Cooking u Oven Racks Igniting the burner: Push in and rotate the desired Burner knob to the Ignite ( ) position (clicking sound will be heard). Continue pressing the Burner knob (5 to 10 seconds). This is necessary to heat up the thermocouple and activate the safety valve, which would otherwise cut off the gas flow. If the burner fails to ignite, wait one minute for the gas to dissipate before attempting to reignite.
Operation Oven Controls u Oven Cooking Modes LIGHT Rotate the Cooking knob to select the desired Cooking Mode. OFF Rotate the Cooking Knob to this position to turn on the oven light. Heat will not be produced by the oven while the oven light is turned on. 140 The Cooking Indicator will 180 light when activated and turn210 off when desired tempertature 250 430 is reached.
Operation Oven Cooking (Continued) BROWNING (Upper element and fan) 140° F TO MAX: FAN ASSISTED GRILL COOKING (Grill element and Fan) 140° F TO 392° F: Heat is produced from the upper element and the convection fan. Heat is produced from the grill element and the convection fan. The Browning mode best used to gently brown dishes at the end of the cooking time period. The Fan Assisted Grill Cooking mode is best used for grilling meats, vegetables and poultry.
Operation Cooking Chart — 33 —
Care and Maintenance Burner Caps Lift off when cool. Wash Burner Caps in hot, soapy water and rinse with clean water. Remove any food from between the burner slots using a small non-abrasive brush like a toothbrush, and afterwards wipe using a damp cloth. WARNINGS: • Please make sure to read ALL safety precautions on pages 4 to 10 and 25 to 27. • Electric Shock Hazard. • To avoid possible burns use care when cleaning the appliance.
Care and Maintenance Removing the Oven Door WARNINGS: • The oven door is removable, but it is heavy. You may need help removing and replacing the door. • Be careful when removing and lifting the door. • DO NOT lift the door by the handle. w While holding the door on each side, shut the door until it touches the levers. Continue closing the door until it is about 4" (10 cm) from being fully closed. x Pull the door towards you, pulling it out of its seat. The door will gently come away from the oven.
Care and Maintenance Replacing the Light Bulb Adjusting the Burner Flames WARNINGS: • Before replacing your oven light bulb, DISCONNECT the electrical power to the range at the main fuse or circuit breaker panel. • Make sure oven and bulb are cooled completely. u u Turn all burners to their highest settings and check the flames. They should be blue in color and may have some yellow tipping at the ends of the flame when using LP gas.
Before Calling for Service Before calling for service, review this list. It may save you both time and expense. This list includes common experiences that are not the result of defective workmanship or materials in your appliance. NOTHING WILL OPERATE OVEN MAKES POPPING NOISES • Is the electrical supply disconnected? Verify that electrical wires are connected to the mains properly. See “Connect to AC” section. If the problem continues, contact a qualified technician.
Before Calling for Service OVEN TEMPERATURE TOO HIGH OR TOO LOW THE FLAME GOES OUT ONCE RELEASING THE KNOB • Was the oven preheated? Push in and rotate the Temperature knob to the desired setting and let the oven preheat until it reaches the temperature before you begin cooking. • Are the racks positioned properly? See pages 31 to 32 for rack positioning. • Is there proper air circulation around bakeware? If bakeware takes up too much room, air circulation will be reduced.
Please register your product warranty by visiting the Ancona Home website. Canada & USA Phone: 888-686-0778 Fax: 800-350-8563 Email: service@anconahome.com Website: www.anconahome.com Ancona is in association with Mr Appliance for all after sales service calls. Please contact their service provider or visit their website: Phone: 888-686-0778 Website: www.mrappliance.com MAAN2210-05 © 2016 Copyright of Ancona Home. All rights reserved.