Novara Dual Towel Warmer User Manual & Installation Instructions IMPORTANT SAFETY INSTRUCTIONS Carefully read the important information regarding installation, safety and maintenance. Keep these instructions for future reference.
Required Tools STARHEAD SCREWDRIVERS FLAT HEAD SCREWDRIVERS DRILL & BIT MEASURING TAPE 5/16” Diameter LEVEL PENCIL Electrical requirements: 120V, 140W, 60Hz, 1.167A. MUST HAVE A GROUND CONNECTION. Should be protected by a 15 amp GFI circuit breaker or equal. READ ALL INSTRUCTIONS IN THE MANUAL BEFORE INSTALLING THIS TOWEL WARMER. Before You Begin Unpack the towel warmer carefully to avoid any damage or loss of any part.
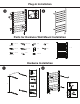
Product Dimensions 11.2 cm (4.4 in.) 93 cm (36.6 in.) 16 cm (6.3 in.) 57.8 cm (22.75 in.) 61 cm (24 in.) 6.5 cm (2.5 in.) 6.5 cm (2.5 in.) 8 cm (3.1 in.) Ø 1.9 cm (0.75 in.) 4.5 cm (1.75 in.) Ø 3.2 cm (1.25 in.) 10.5 cm (4.1 in.) Ø 2.5 cm (1 in.) 64 cm (25.2 in.) Parts for Plug-In Wall Mount Installation ×4+1 ×4+1 ×4 ×4+1 M8×20 ×4+1 ST4.
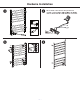
Plug-In Installation w x Parts for Hardwire Wall Mount Installation ×4+1 ×4+1 ×1 ×4 ×4+1 M8×20 ×4+1 ST4.
Hardwire Installation w x y U —5— All electrical connections in the junction box
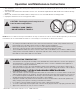
Operation and Maintenance Instructions • • • • After installation, connect the electric power and turn on the switch. The indicator light will show red and the towel warmer will start to work. Turn off the switch when the towel warmer is not in use. The indicator light will turn dark and the towel warmer will stop working. When cold, clean the towel warmer with a soft dry towel. Do not clean with abrasive cleaning powder. Unplug the unit if not in use for a long period of time.
Installation INSTALLATION INTRUCTIONS Wireless Home Automation Control Device Interchangeable Face Cover On/Off Switch The PA-TM-WF01 ON/OFF Switch is a perfect wireless manual and remote on/off control, replacing regular wall switch, controlling incandescent, LED, fluorescent, ballast and so on. 1. WARNING: To avoid fire, shock, or death. High Voltage - Turn off power at circuit breaker or fuse and test that power is off before wiring. 2. Remove wall plate and existing switch mounting screws. 3.
Manual Control 4. Once the device is added, Wi-Fi switch can be opened, closed, set countdown and timer. The switch paddle allows the user to turn ON/OFF the connected lighting. • • To turn the connected lighting ON: Tap the top of the switch paddle. To turn the connected lighting OFF: Tap the bottom of the switch paddle. Please Note: After a power failure, the on/off switch returns to OFF state. Tuya Smart App Control 1. Download Tuya Smart app from the App Store or Google Play. 2.
Operation and LED Indication • • • • • • Quick blinking green: Connecting to the network. Slow blinking green: AP mode. Green bright after 2 seconds off: Connected to the network. Solid green: Network working normally or in standby mode. Solid blue: The Wi-Fi switch is switched on. Off: The Wi-Fi switch is switched off.