
Instructions / Assembly


3
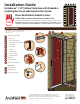
INSTALLATION
PREPARATION
2
b
a
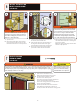
1. Most homeowners prefer to have the storm door
handle on the same side as the entry door handle.
In shallow door openings, this can cause the two
handles to interfere (see Figure 4).
2. Check for potential interference by measuring up
from the Door Sill 40 ½". Measure in from mounting
surface on brickmould 3 ⁄". This is roughly the
location and depth of the storm door handle.
3. If you anticipate interference, purchase a storm door
hinged on the opposite side of your entry door.
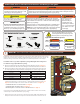
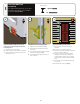
In this step, you will conrm that your storm door hinges on the correct side.
1. To determine the exterior and interior of the door panel: at the bottom of the door,
the interior side has a sweep with screws (Figure 5). The exterior is the side without
a sweep and screws.
2. Left Handed (Figure 6): From the exterior, a left handed storm door will have the handle
on the left side of the storm door. See pages 4-8 for installation instructions.
3. Right Handed (Figure 7): From the exterior, a right handed storm door will have the
handle on the right side of the storm door. See pages 9-13 for installation instructions.
Figure 6 Figure 7
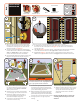
40 ½"
GRASP HERE
d e
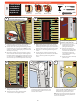
1. Lay the door at on a protected surface with
the exterior side down, be sure to grasp by
door frame not by the hinge or latch rails.
TIP: Lay on door carton.
2. Remove insect screen (P) by pressing down
on the shipping clip to release insect screen.
3. Remove the shipping clip using a pair of
pliers. Grasp shipping clip and pull out of
door frame and dispose of properly.
4. Set aside rain cap extender and the screw
covers for use in a later step
1. To remove the glass panel (K), rst reach under
the side of the door frame near the handle
holes and gently push up on glass panel until
you are able to rmly grasp onto it.
2. While maintaining a rm grip on glass panel,
gently lay door frame back down. Pull glass
panel away from opposite side of door frame
and then lift it out of door frame and set aside.
3. Stand glass panel on its edge to prevent
damage.
Ensure all orange clips are properly attached.
1. With door standing from the exterior, ensure
latch rail is properly seated in orange spacer
clips (I), and ensure bottom spacer (J) is
attached to bottom of door and slid to
handle side.
NOTE: See troubleshooting section at end
of install guide if bottom spacer becomes
detached.
Figure 5
i
VIEW
i
VIEW
i
VIEW
X
VIEW
TO DOOR SILL
X
VIEW
J
I
!
!
1/2”
1/2”
1/2”
1”
1 1/2”
2”
1 1/2”
5/8”
5/8”
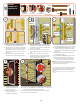
Pliers
Glass Panel is not secured to door once Shipping Clip has
been removed. The door needs to be laying at for these
steps so glass panel doesn't fall out of the door.
WARNING
Tape Measure
MOUNTING
SURFACE
BRICKMOULD
EXTERIOR
TRIM
HINGE
RAIL
SHIPPING
CLIP
LATCH
RAIL
MIN.
3 ⁄"
Figure 4
Tools needed:
Bottom SpacerSpacer Clips
J
I
c
P
K
1
2
3
=
=
X
VIEW
i
VIEW
EXTERIOR
VIEW
INTERIOR
VIEW