
Instructions / Assembly


4
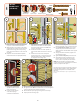
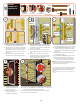
1. While holding door in position, use 1/8” drill
bit from the installation kit to drill a hole in the
mounting surface through two pre-drilled holes
(indicated above with extra-large green arrows).
2. Fasten door to mounting surface using two 1”
screws.
3. Pre-drill holes in mounting surface through
remaining twelve holes in side rails, then
fasten door to mounting surface using
twelve 1” screws.
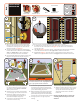
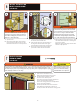
1. Unlatch upper and lower
handle side spacer clips by
pulling tab toward you.
2. Remove two handle hole
fasteners by inserting Phillips
screwdriver into handle hole
and rmly pressing them
out. Properly discard orange
handle fasteners.
3. Grasp edge of door and rmly
pull door open.
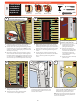
1. Using 1/8” drill bit, drill holes in door jamb
through holes in hinge rail.
2. Fasten hinge rail to door jamb using eight
1” screws. Do not overtighten screws.
1. Set bottom of door centered in opening. Make sure
orange bottom spacer (J) is sitting on door sill.
2. Tip top of door into opening while ensuring bottom
of door frame rests on orange spacer. TIP: Place foot
against door bottom while tipping top of door frame
assembly into opening.
3. Door frame assembly is properly seated in opening
when both latch rail and hinge rail are ush against
mounting surface, while hinge rail and bottom spacer
are resting on door sill. NOTE: The gap between top of
door and rain cap is intentionally uneven at this step.
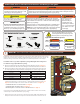
Tools needed:
Handle Clip Bottom SpacerSpacer Clips
HANG HINGED
STORM DOOR
AND REMOVE
SPACER CLIPS
(Left Hand)
3
b
c
d
For a Right Hand Installation, go to Page 9.
J
!
!
1/2”
1/2”
1/2”
1”
1 1/2”
2”
1 1/2”
5/8”
5/8”
H
J
I
1/8"
!
!
1/2”
1/2”
1/2”
1”
1 1/2”
2”
1 1/2”
5/8”
5/8”
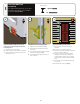
1. From the exterior, look into handle holes
on door to make sure lock case is oriented
properly. Notch in square spindle hole
should be facing out from door panel.
TIP: If notch is not facing out from door panel,
use handle and spindle to rotate spindle hole
into correct orientation.
f
1"
x 22
#8
#10
#12
#6
3/4” Machine Pan Painted
1/2” SMS Pan
1/2” SMS Pan Painted
1/2” SMS Flathead
1/2” Self-Drill Pan
1/2” Self-Drill Pan Painted
3/4” Machine Flathead
7/8” Machine Pan Painted
1” SMS Pan
1” SMS Pan Painted
1” Machine Pan Painted
1-1/2” Machine Flathead
1-1/2” Machine Flathead
2” SMS Pan Painted
5/8” SMS Pan Painted
1-1/4” SMS Pan
X
VIEW
X
VIEW
X
VIEW
i
VIEW
X
VIEW
1.
If your door has clear protective lm, start
at the frame corners and remove the clear
protective lm from both the interior and
exterior of door frame.
e
i
VIEW
LOCK CASE
LEFT HAND HINGED INSTALLS ONLY
FOR RIGHT HAND HINGED INSTALL, SEE PG. 9
a
Do not open door by pulling on the
handle holes. Injury could result
CAUTION