Multi-functional food mixer Please read the manual fully before using the appliance and keep the manual safe for future reference.
Contents Safety guide Page 3 Appliance components Page 5 Recommended Running Times Page 5 Technical specification Page 8 Standard accessories Page 8 Assembly and use of the blender attachment Page 9 Assembly and use of the mixer Page 10 Assembling and use of the meat grinder attachment Page 12 Assembling the sausage attachment Page 13 Sausage Recipe Page 14 Making Kibbeh Page 15 Ice cream maker attachment Page 17 Ice Cream Recipes Page 20 Cleaning and maintenance Page 22 Disposal
Safety guide When using any electrical appliance, basic safety precautions should always be followed including: This appliance can be used by children aged from 8 years and above and persons with reduced physical, sensory or mental capabilities or lack of experience and knowledge if they have been given supervision or instruction concerning use of the appliance in a safe way and understand the hazards involved. Children shall not play with the appliance.
extension cord in a position where it can be pulled on by children or animals or be tripped over. Always operate the appliance on a smooth, even and stable surface. Do not place the unit on a hot surface. Always remove the plug of the appliance safely. Do not pull on the appliances cord to remove the appliance plug from the electrical socket. Never handle or operate the appliance with wet hands.
Do not use outdoors. Do not operate more than one of the appliance functions at the same time. When using the blender attachment the mixer will automatically start, please do not add any attachments to the mixer or use it to mix ingredients whilst blending. Please note: To use all of the appliances functions apart from the blender attachment, the top cover of the appliance must always be attached. The food mixer will not function unless it is assembled correctly.
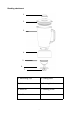
Appliance components parts 13. 1. 17. 2. 14. 18.18 12. 15. 3. 11. 4. 16. 10. 5. 6. 9. 7. 8. 1. Meat Dish 10. Beater Blade 2. Meat Grinder Case 11. Egg Beater 3. Mixing Bowl 12. Dough Hook 4. Small Lever 13. Blender Jar 5. Sausage Holder 14. Upper Housing Cover 6. Front Cover 15. Upper Cover 7. Sausage Tube 16. Lower Cover 8. Speed Control Dial 17. Flexible Beater Blade 9. Caudal Cover 18.
Blending attachment 1. 2. 3. 4. 5. 6. 7. 1. Measuring Cup 5. Cutting Plate 2. Lid 6. Rotating blade 3. Glass Jar 7. Rotating screw 4.
Meat Grinder attachment 1. 6. 5. 4. 3. 2. 7. 1. Meat Dish 5. Cutting plate 2. Meat grinder case 6. Nut 3. Roller 7. Tamper 4.
Assembly and use of the blender attachment 1. Place the ingredients into the jar (3) and fix the lid (2) onto the top of the jar by pressing it down. (fig.1.1) 2. Insert the measuring cup (1) into the opening of the lid and turn it until it is locked. (fig. 1.2) 3. Place the blender onto the blender fitting (14) situated on top of the mixer and turn clockwise to lock. The blender is now ready to use. (fig. 1.3 & 1.4) 4.
Assembly and use of the mixer 1. Make sure the mixer is unplugged from the mains outlet. Open the upper housing cover (14) using the small lever (this should be in the down position) and place the ingredients in the mixing bowl (4). (fig. 2.1) 2. Place the mixing bowl (3) on the mixer plate, and turn the mixing bowl in an anti-clockwise direction until the bowl is in a fixed position. (fig. 2.2) 3. Fix the bowl cover (18) into the locking plate on the underside of the housing cover.
To mix or knead dough: 1. 2. 3. 4. 5. Use a flour to water at a ratio of 5:3. Turn the operating switch to speed 1, mix for 20 seconds, then select speed 2 and mix for 20 seconds. Afterwards select speed 3 and mix for approximately 3 minutes. When filling the mixing bowl, please ensure that the maximum quantity is not exceeded. Maximum quantity of mixture is 2kg. The dough hook should be used. Whipping egg whites or cream: 1. 2. 3. 4.
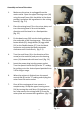
Assembling and use of the Meat Grinder Attachment 1. Make sure the mixer is unplugged from the mains outlet. Attach the meat grinder case (2) to the meat grinder inlet situated on the front of the mixer and turn it anti-clockwise till it is correctly positioned. (fig. 3.1) 2. Place the roller (3) into the meat grinder case then fit the blade (4) onto the end of the roller, ensuring the blade faces outwards. (fig. 3.2 & 3.3) 3.
Assembling the sausage attachment 1. Insert the meat grinder case (2) into the inlet in the Multifunctional Food Mixer. Turn and lock into place. (fig. 4.1) 2. Place the roller (3) into the meat grinder case. (fig. 4.2) 3. Place the blade (4) onto the roller followed by the sausage holder (5) and sausage tube (7). (fig. 4.3, 4.4, 4.5) 4. Hold the sausage holder (5) and sausage tube (7) into Fig. 4.2 place, slide the nut over and tighten until the attachments are firmly secured. (fig. 4.6) 5.
Sausage recipes Pork Sausage Pork Shoulder (80% Meat/20% Fat) 900g Garlic powder 4 tsp Thyme 2 tsp Fennel seed 1 tsp Parsley 1 tsp Black pepper 2 tsp Salt 2 tbsp 1. Mince the pork until the desired consistency is reached. 2. In a bowl, add the dry ingredients to the minced pork. Mix with hands until the dry ingredients are evenly distributed. 3. Soak the skins in water for 10 minutes, then feed them onto the sausage attachment. 4. Follow the steps found in “Making sausages”.
Making Kibbeh Recipe Mutton 100g Olive oil 1 tbsp. Onion, finely chopped 1 onion All spice To taste Salt To taste Flour 1 tbsp. Method 1. Mince mutton once or twice. 2. Fry onion until brown and add minced mutton, all spice, salt and flour. Shell Recipe Lean meat 450g Flour 150g All Spice To taste Nutmeg 1 (finely grated) Cayenne To taste Pepper To taste Method 1. Mince the meat three times. 2. Add all of the ingredients to the meat and mix together, in a bowl. 3.
Fig. 5.1 7. Fig. 5.2 Fig.5.3 Feed the shell mixture into the grinder and the kibbeh attachment will form the outer shell for your kibbeh. 8. Stuff the outer shell with the stuffing mixture and form kibbeh before deep frying (Fig. 5.4). Fig. 5.
Ice cream maker (attachment purchased separately ) Accessories: 1. Cover& chute 2. Paddle 3. Freezing bowl 4. Mixing bowl Before first time use Wash all parts of the attachment that come into contact with food before using the ice cream maker attachment. 24 hours in advance, place the freezing bowl into a plastic bag and then place it into the freezer. Place the paddle and cover into the refrigerator. Prepare the ice cream or sorbet mix (refer to recipes).
If the freezing solution appears to be leaking from the Ice Cream Maker discontinue use. The freezing solution is non-toxic. Using your ice-cream maker 1. Lock the mixing bowl onto the machine. (fig. 6.1) 2. Add the freezing bowl direct from the freezer, then position the paddle. 3. Fit the cover on the top. (fig. 6.2) 4. Lower the mixer head, inserting the metal pin into the plastic hole. If the mixer head won’t shut, raise it, then switch the appliance on and off to reposition the metal pin.
Note In order for the Ice Cream Maker to be operated safely and successfully, the following guidelines should be followed: The freezing bowl should be placed in a freezer that is operating at a temperature of -18˚C or below for 24 hours before use. Do not switch off the mixer until the ice cream or sorbet is ready.
Recipe suggestions Vanilla Ice cream Ingredients: Full fat milk 500ml/ 1 pint Single cream 125ml/ 1/4 pint Vanilla essence 5ml/1tsp Caster sugar 150g/ 6oz Eggs 3 Yolks Method 1. Combine the cream, milk and vanilla essence in a pan and bring it almost to the boil. Set it aside to cool slightly. 2. Meanwhile, in a large bowl, whisk the egg yolks and the sugar together until thick and pale in colour. 3. Stirring continuously, pour the milk/cream mix onto the whisked egg and sugar.
Strawberry Ice cream Ripe strawberries 400g Double cream 200ml Caster sugar 75g Lemon (juice) 1/2 Method: 1. Puree the strawberries. 2. Mix the sugar, cream and lemon juice into the puree. 3. Place the mix in a refrigerator to cool. 4. When the mix is cool, pour it into the ice cream maker and mix until it is firm. Variations: Strawberries can be substituted for any soft fruit. The sweetness of the mix will depend on the fruit used, so remember to taste it for sweetness before freezing.
Cleaning and maintenance Please ensure that the switch knob is at “0” position and that the plug has been disconnected from the mains socket before cleaning! After use, allow the mixer to cool down before you start to clean it. Use a moist cloth and a mild detergent to clean the exterior of the mixer. Do not use any abrasive detergents or alcohol when cleaning the interior and exterior of the bowl cover. Do not submerge the device in water to clean it.
Electrical information Plug Please note: It is extremely important that the wires or cores in the flex are connected to the correct terminals in the plug. If the colour of the mains lead of the appliance does not correspond with the coloured markings identifying the terminals in your plug proceed as follows: The Live (Brown) wire connects to the right- most live (L) terminal nearest to the fuse. The Neutral (Blue) wire connects to the left-most neutral (N) terminal.
Please note after replacing the fuse, ensure that the cover is correctly fitted back onto the plug. Never attempt to run the appliance if the plug does not have a cover. If a moulded plug is fitted and has to be removed take great care in disposing of the plug and severed cable, it must be destroyed to prevent it from engaging into a socket. If the supply cord is damaged it must be replaced by a service agent or a similarly qualified person in order to avoid a hazard.
Customers are responsible for any taxes applied to our products when they are shipped outside of the EU. All of our prices are inclusive of VAT. Once a product has been returned to us, we will aim to repair or replace it within 30 days of receipt. The guarantee does not cover any defect arising from improper use, damage, buildup of lime scale or repair attempts made by third-parties. Also, the guarantee does not cover normal wear and tear of individual parts.