Multifunctional Processor Please read the manual fully before using the appliance and keep the manual safe for future reference.
Contents page General safeguards Page 3 Appliance components diagram Page 5 Attachments parts list Page 6 Use Knife blade/ dough tool Page 6-7 Slicing/ rasping/ shredding disc Page 8 Twin beater whisk attachment Page 9 Mill Page 10 Liquidizer Page 11 Citrus press Page 12 Centrifugal juicer Page 13 Mini processor bowl Page 14 Recipes Page 15—24 Cleaning Page 25 Disposal of the appliance Page 25 UK & EU Guarantee Page 26 Electrical information Page 27 2
General safeguards When using any electrical appliance, basic safety precautions should always be followed including: This appliance can be used by children aged from 8 years and above and persons with reduced physical, sensory or mental capabilities or lack of experience and knowledge if they have been given supervision or instruction concerning use of the appliance in a safe way and understand the hazards involved. Children shall not play with the appliance.
place the unit on a hot surface. Always remove the plug of the appliance safely. Do not pull on the appliances cord to remove the appliance plug from the electrical socket. Never handle or operate the appliance with wet hands. Appliance specific Safeguards Always unplug the appliance before attempting to reach into the blender jar with your fingers or an object (e.g. a spatula). Avoid contact with moving parts and fitted attachments during operation.
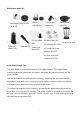
Appliance components diagram Food pusher (1) Feeder (7) Bowl cover (2) 1.
Attachment parts list Centrifugal juicer and lid (10 & 11) Grinder with lid (12) 0.5 litre bowl (18) S/S Knife blade (16) Spatula (17) Small knife blade (19) Twin beater whisk (13) Citrus press (14 & 15) S/S Shred disc (20) 1.5L glass jar (24) S/S Julienne disc (21) S/S rough slicer and julienne disc (22) S/S Fine slicer and julienne disc (23) Knife Blade/Dough Tool The knife blade is the most versatile of all the attachments.
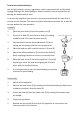
Knife Blade/ Dough Tool Assembly 1. Place drive shaft (4) into the centre of the power unit (5). Ensure it is firmly in place. 2. Guide the 1.5L mixing bowl (3) over the drive shaft (4) and align with the locking system. Turn the bowl clockwise until it is locked firmly in place. 3. Place the blade (16) over the drive shaft (4) until it reaches the base of the bowl. 4. Place the bowl cover (2) on the 1.5L bowl (3), aligning it with the locking system.
Slicing/ Rasping/ Shredding discs Use the slicing disc for cheese, carrots, potatoes and foods of a similar texture. Use the shredding disc for cheese, carrots, potatoes and foods of a similar texture. Use the rasping disc to grate parmesan cheese or foods where a fine grate is required. Do not use this function for more than 3 minutes at a time. The motor should be allowed to cool down for at least 30 minutes before the next operation. Assembly 1.
Twin beater whisk attachment Use for light mixtures only e.g. egg whites, cream, evaporated milk and for whisking eggs and sugar for fatless sponges. Heavier mixtures such as fat and flour will damage the attachments if used. To ensure the long life of your machine, do not use continuously for more than 3 minutes on this function. The motor should be allowed to cool down for at least 30 minutes before the next operation. Assembly 1. Place the drive shaft (4) on to the power unit (5). 2. Put the 1.
Mill function (refer to manual) Use the mill function for milling herbs, nuts and coffee beans. To ensure the long life of your machine, do not use the machine continuously for more than 1 minute at a time. The motor should be allowed to cool down for at least 30 minutes before the next operation. Assembly 1. Place your ingredients into the grinder (12) and attach the grinder blade ensuring that it Is securely fitted (a locked symbol will appear on the grinder). 2.
Liquidiser Use the liquidiser function for pasta sauces, soups, milkshakes etc. Do not use the machine continuously for more than 30 seconds on this function. The motor should be allowed to cool down for at least 1 minute. Only use for a maximum of 3 times before letting the machine cool down fully. DO NOT PUT HOT LIQUIDS INTO THE LIQUIDISER AS THIS WILL CAUSE THE APPLIANCES JUG TO CRACK. THE TEMPERATURE OF FOODS ADDED TO THE LIQUIDISER SHOULD NOT EXCEED 60°C ABOVE THE TEMPERATURE OF THE ROOM.
Citrus press Assemble the appliance according to the diagram Use the citrus press to squeeze the juice from citrus fruits (e.g. oranges, lemons, limes and grapefruits). To ensure the long life of your machine, do not use it continuously for more than 3 minutes on this function. Only use for a maximum of 3 times before letting the machine cool down fully. The motor should be allowed to cool down for at least 30 minutes before the next operation. Assembly 1.
Centrifugal juicer Use the centrifugal juicer for making juice from firm fruit and vegetables. Assembly 1. Place drive shaft into the centre of the base unit. Ensure it firmly in place. 2. Guide the 1.5L mixing bowl over the drive shaft and align with the locking system. Turn the bowl clockwise until it is locked firmly in place. 3. Insert the centrifugal juicer attachment (11) onto the drive shaft (4). 4. Place the centrifugal juicer lid (11) onto the 1.
Mini processor Use the mini processor for pesto, salsa, baby purees etc. Do not continuously use the appliance for more than 30 seconds on this function. The motor should be allowed to cool down for at least 1 minute. Only use for a maximum of 3 times before letting the machine cool down fully. The motor should be allowed to cool down for at least 30 minutes before the next operation. Assembly 1. Steps 1-4 of shredding function. 2. Insert the 0.5 bowl (18) into the 1.
Recipes Chicken Liver Pate 400g chicken livers, washed 200g butter 2 shallots, finely chopped 2 cloves of garlic, finely chopped 75ml brandy 110ml double cream 1/2 tsp salt 1/2 tsp black pepper 1 tsp thyme Attachment: knife blade 1. Cut the livers into small pieces (approx. 1.5cm). Heat a knob of butter in a frying pan. 2. Sauté shallot and thyme until soft. 3.
Hidden Vegetable Pasta Sauce 2 carrots, diced 2 sticks of celery, diced 5 mushrooms, sliced 1 red onion, chopped 2 red peppers, diced 1 clove of garlic, chopped finely 2 cans of chopped tomatoes 1 tbsp. olive oil Attachment: Liquidiser 1. Heat the olive oil in a large saucepan. Add onion, carrot and celery. Cook on a low/medium heat for approx. 20 mins until soft. 2. Add peppers, mushrooms and garlic and cook for a further 7 minutes. 3. Tip in the tomatoes and simmer for 15mins on a low heat. 4.
Victoria Sponge Cake 200g baking margarine 200g caster sugar 200g self raising flour 4 medium eggs 1 tsp baking powder 1 tsp vanilla extract Attachment: Knife blade 1. Preheat the oven to 180°C/Gas Mark 4. 2. In the 1.5l bowl, cream butter and sugar together until pale and fluffy. 3. Add 4 eggs, vanilla, self-raising flour and baking powder and mix on mini mum until all ingredients are combined. 3. Take the bowl cover off.
Caramelised Onion Tart 340g short crust pastry—see recipe included 4 red onions, skinned and halved 4 eggs 200ml milk 120g Gruyere cheese 1 tbsp. oil Salt and pepper 1. Preheat the oven to 190°C/Gas mark 5. 2. Roll out pastry to fit a 20cm quiche tin. Place the pastry in the tin and push in to the sides. Trim the pastry around the edge of the tin. 3. Cut a circle of greaseproof paper just larger than the tin and place on top the pastry.
8. Place in the oven for 35-40 minutes until the cheese is golden brown and the filling is firm. 9. Allow to cool slightly before serving. Short crust Pastry 220g plain flour 110g block baking margarine 1/2 tsp salt 2-3 tbsp. water Attachment: Knife blade 1. Add plain flour and salt into the 1.5l bowl. 2. Cut the baking margarine into chunks and add to the flour. 3.
Tomato Bread 250g strong white bread flour. 1 tsp salt 7g yeast 55g sundried tomatoes, jarred 1 tbsp. oil from sundried tomatoes 110ml warm water Attachment: dough knife 1. Add salt, flour and yeast to the 1.5l bowl. Using dough blade, mix on minimum for 30 seconds. 2. Add water, sundried tomatoes and oil. If the sundried tomatoes are large, chop into 3 pieces. 3. Mix for 1-2 minutes until dough is formed. 4. Remove dough and place in a bowl covered with cling film.
Crunchy Herb Breadcrumbs Handful of basil Handful of parsley Ciabatta (day old) Olive oil Salt and pepper Attachment: Mill 1. Place torn pieces of ciabatta into the mill. Pulse until the breadcrumbs are chunky. 2. Preheat 1 tsp of oil in a non-stick frying pan. Pour the breadcrumbs into the pan and cook until crisp. 3. Put parsley and basil into the mill and chop until fine. 4. Sprinkle herbs into the frying pan with the breadcrumbs and mix until evenly distributed. Season with salt and pepper. 5.
Chunky Pesto Bunch of fresh basil 3 cloves of garlic 3 tbsp. parmesan cheese 75g sunflower seeds 6 tbsp. olive oil Attachment: Mini-processor bowl 1. Place garlic cloves, basil and 2 tbsp. of olive oil into the mini-processor bowl. Pulse until the garlic is fine. 2. Add grated parmesan cheese and the rest of the olive oil. Pulse until ingredients are combined. 3. Add the sunflower seeds. Pulse once last time. Don’t pulse too much here as you want the sunflower seeds to remain chunky.
Meringue 6 egg whites 170g caster sugar 150g icing sugar Attachment: Twin Beater Whisk 1. Preheat the oven 110°C/Gas mark ¼. 2. Pour egg whites into 1.5l bowl and whisk on medium until the mixture forms soft peaks. 3. Turn the Multifunctional Food Processor onto high and add sugar a desert spoonful at a time. Follow the same procedure for adding the icing sugar. 4.
St Clements Juice 8 oranges 1 lemon Sparkling water Attachment: Citrus press 1. Halve 8 oranges. Place on the citrus press and turn the Multifunctional Food Processor to minimum. Hold until all the juice has been extracted. Continue until all the oranges are juiced. 2. Halve a lemon and place on the citrus press until the juice is extracted. Continue with the other half. 3. Pour juice into a glass and top up with sparkling water.
Cleaning Always switch off and unplug the appliance before cleaning. Handle the blades and cutting discs with care, they are extremely sharp. Some foods may discolour the plastic. This is perfectly normal and wont harm the plastic or affect the flavour of your food. Rub with a cloth dipped in vegetable oil to remove the discolouration. Do not immerse the main unit in water or any liquid for any reason. Wipe the power unit with a damp cloth, then dry.
UK and EU Guarantee Your new Andrew James product comes with a 24 month guarantee and a 2 year fixed warranty, effective from receipt confirmation. Your receipt or order number is required as proof of purchase date so it is imperative that you keep it safe. This guarantee only applies if the item has been used solely for the use intended, and all instructions have been followed accordingly. Please note this product is only for domestic use only and is not for commercial use.
Electrical information Please note: It is extremely important that the wires or cores in the flex are connected to the correct terminals in the plug. If the colour of the mains lead of the appliance does not correspond with the coloured markings identifying the terminals in your plug proceed as follows: The Live (Brown) wire connects to the rightmost live (L) terminal nearest to the fuse. The Neutral (Blue) wire connects to the leftmost neutral (N) terminal.
plug and severed cable, it must be destroyed to prevent it from engaging into a socket. If the supply cord is damaged it must be replaced by a service agent or a similarly qualified person in order to avoid a hazard. All of our electrical appliances conform to pre-existing EC Directives 2006/95/EC (Low Voltage Directive) and 2004/108/EC (EMC Directives). For further information please visit http://www.esc.org.