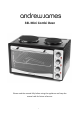
33L Mini Combi Oven Please read the manual fully before using the appliance and keep the manual safe for future reference.
Contents page Important safeguard Page 3 Appliance components diagram Page 4 Before first time use Page 5 Using your electric oven Page 6 Cleaning and maintenance Page 9 UK & EU Guarantee Page 10 Electrical information Page 11 Disposal of the appliance Page 12 Contact details Page 13 2
General safety instructions When using any electrical appliance, basic safety precautions should always be followed including: This appliance can be used by children aged from 8 years and above and persons with reduced physical, sensory or mental capabilities or lack of experience and knowledge if they have been given supervision or instruction concerning use of the appliance in a safe way and understand the hazards involved. Children shall not play with the appliance.
place the unit on a hot surface. Always remove the plug of the appliance safely. Do not pull on the appliances cord to remove the appliance plug from the electrical socket. Never handle or operate the appliance with wet hands. Appliance specific safety instructions Do not place the appliance on or near hot gas/electric burners, heated ovens or in a microwave.
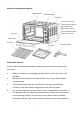
Appliance components diagram Big hot plate Small hot plate Enclosure Small hot plate knob Small hot plate indicator Big hot plate knob Big hot plate indicator Oven temperature knob Door glass Oven function knob Door handle Grill rack Food tray Food tray handle Before first time use Please read the following instructions before using your electric oven for the first time: Make sure the oven is unplugged and the timer knob is set to the “off” position.
Using your electric oven The function nob has five settings: 1. Upper heating & low heating with fan 2. Upper heating & fan 3. Upper heating & lower heating 4. Lower heating 5. Upper heating 1. 5. 2. 4. 3. Thermostat knob: Choose your desired temperature. Indicator cover: Illuminates when the oven has been turned on. Grill rack: Functions for toasting, baking and general cooking in casserole dishes and standard pans.
Function 1 & 2 Operation 1. 2. 3. 4. 5. 6. Preheat the oven to your required temperature. This function is ideal for baking. Set the thermostat knob to high. Turn the knob function to 1 or 2. Check your food 5-10 minutes before its expected cooking time. When the food is cooked turn the function knob to “Off”. Function 3 Operation 1. 2. 3. 4. 5. 6. Place the grill in the middle support rack. Turn the function knob to function 3. Place the food tray on the wire rack. Check the food using a thermometer.
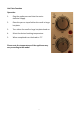
Hot Plate Function Operation 1. Plug the appliances cord into the mains electrical supply. 2. Place the pan on top of either the small or large hot plate. 3. Turn either the small or large hot plate knob on. 4. Select the desired cooking temperature. 5. When completed turn the knob to “0”.
Maintenance instructions: Cleaning instructions Do not for any reason immerse the unit, cord or plug in water or any other liquid. To clean the oven wipe the walls of the oven with a mild detergent and dry completely before the next use. Do not clean the oven with steel wool scouring pads or abrasive cleaners. Do not scrape the oven walls with metal utensils as this may damage the quick clean interior. Wash all the accessories in hot soapy water or in the dishwasher.
UK and EU Guarantee Your new Andrew James product comes with a 24 month guarantee and a 2 year fixed warranty, effective from receipt confirmation. Your receipt or order number is required as proof of purchase date so it is imperative that you keep it safe. This guarantee only applies if the item has been used solely for the use intended, and all instructions have been followed accordingly. Please note this product is only for domestic use only and is not for commercial use.
Electrical Information Please note: It is extremely important that the wires or cores in the flex are connected to the correct terminals in the plug. If the colour of the mains lead of the appliance does not correspond with the coloured markings identifying the terminals in your plug proceed as follows: The Live (Brown) wire connects to the rightmost live (L) terminal nearest to the fuse. The Neutral (Blue) wire connects to the leftmost neutral (N) terminal.
plug and severed cable, it must be destroyed to prevent it from engaging into a socket. If the supply cord is damaged it must be replaced by a service agent or a similarly qualified person in order to avoid a hazard. All of our electrical appliances conform to pre-existing EC Directives 2006/95/EC (Low Voltage Directive) and 2004/108/EC (EMC Directives). For further information please visit http://www.esc.org.