Pro Vacuum Sealer Please read the manual fully before using the appliance and keep the manual safe for future reference.
Contents page Important safeguards Page 3 Functions and features Page 5 Cutting bag roll into small sachets Page 6 Present food with the bag Page 6 Vacuum package unit canister Page 8 Operating instructions Page 9 Hints for best vacuuming performance Page 11 Cleaning and maintenance Page 12 Vacuum package guidelines Page 14 Troubleshooting Page 15 Disposal of the appliance Page 16 UK & EU Guarantee Page 17 Electrical information Page 18 2
Important safeguards When using any electrical appliance, basic safety precautions should always be followed including: This appliance can be used by children aged from 8 years and above and persons with reduced physical, sensory or mental capabilities or lack of experience and knowledge if they have been given supervision or instruction concerning use of the appliance in a safe way and understand the hazards involved. Children shall not play with the appliance.
Do not allow the cord to touch hot surfaces and do not place the cord near hot gas or electric burners or in a heated oven. Use of an extension cord with this appliance is not recommended. However if it is necessary to use an extension cord, ensure that the extension cord is equal to or greater than the power consumption of the appliance to avoid overheating of the appliance and extension cord. Do not use any other appliance on the extension cord.
Functions and features 1.Bag Cutter Used for bag roll cutting 2. Cancel button Stop working at any time 3.Indicator light Shows the working status 4. Seal time According to food type to optimize the seal timenormal or extended 5. Jar Port To which the adaptor is connected 6. Release button Press to release the front cover from base as well as release air. 7. Seal only Button Used for bags sealing only 8. Vacuum/ Seal button Used for vacuuming and sealing bags 9.
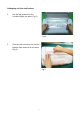
Cutting bag roll into small sachets 1. Put the bag material to the suitable length you want ( Fig 1) Fig 1. 2. Close the lid and move the incision bottom from one end to the other (Fig 2) Fig 2.
Preserve food with the bag 1. Put the bag that contains food to the bottom of the air portal (Fig 3). Fig 3. 2. Close the upper lid and press tightly (Fig 4). Fig 4. 3. Press the Vacuum/Seal button (Fig 5). Fig 5. 4. Press down the release button till the lid opens automatically (Fig 6). Fig 6.
Vacuum package with canister (Canisters purchased separately at www.andrewjamesworldwide.com 1. After the lid is closed, connect the ends of the adaptor separately to the lid of the canister and jar port tightly as shown in the picture (Fig 7). Fig 7. 2. Press the canister button only, the appliance will vacuum and stop automatically (Fig 8). Fig 8. 3. Press the release button when you are finished vacuum sealing (Fig 9). Fig 9. 4.
Operating instructions Making a bag with the bag roll 1. The bag cutter (1) must be positioned at either end of the cutter slide before cutting. 2. Open the rear lid and place the bag roll into the roll storage compartment (10). 3. Pull the bag material out of the storage compartment (10) to the suitable length you want and then close the rear lid. 4. Press and slide the bag cutter (1) from one side to the end, pull the bag gently to achieve a better effect. 5.
6. When the indicator lights of seal only and seal/vacuum turn off, the process is completed. Press the two release buttons (6), lift the lid and remove the bag. 7. Refrigerate or freeze if needed. Note: For best sealing effect, it is best to let the appliance cool down for one minute before using it again. Wipe away any excess liquid or food residue on the removable interface after each bag package. Open a sealed bag Cut bag straight with scissors, just inside the sealing line.
Open canister after vacuum packaging In order to open the canister, you need to release the vacuum by turning the knob switch clockwise to the max position. Hints for best vacuuming performance: 1. Do not put too much food inside the bag: leave enough space at the open end of the bag so that the bag can be placed on the removable interface more positively . 2. Do not wet the open end of the bag. Wet bags may be difficult to melt and seal tightly. 3.
Vacuum packaging non-food items The vacuum preservation system also protects non-food items from oxidation, corrosion and moisture. Simply follow the directions to vacuum package items using bag or canister. 1. To vacuum package items ensure that sharp edges are cushioned in soft material, such as a paper towels, to avoid puncturing bag. 2. The appliance can keep camping supplies such as matches, first aid kits and clothing clean and dry. Keep flares for auto emergencies ready. 3.
3. Make sure that the bags are thoroughly dry before using. Accessories (including canister base, cover and hose accessories). 1. Wash all vacuum accessories in warm water with a mild detergent, but do not immerse the cover in water. 2. Canister bases (not lids) are top rack dishwasher safe. But canister cover should be wipe down with a damp cloth. 3. Ensure the accessories are dried thoroughly before re-using. 4. Canister and cover are not suitable for use in microwave but suitable for freezer.
Vacuum package guidelines Vacuum sealing for the refrigerator For the busy family, on-the-go meals can be prepared ahead and vacuum-sealed in individual servings, ready to heat anytime. Preparing food for the freezer 1. In properly stored conditions, the vacuum sealer helps you to maintain the food’s freshness. Try to start with the freshest food possible. 2. Freeze foods which need to hold their shape or are fragile in nature, then vacuum seal in a vacuum bag and return to freezer.
Troubleshooting Nothing happens when you press the vacuum sealer. 1. Make sure the power cord is correctly plugged into the electrical outlet and in the “On” position. Test electrical outlet by plugging in another appliance and seeing if it works. 2. Check the power cord for any damage, if it is damaged do not use the vacuum sealer. Air has not been removed from the bag completely 1. To seal properly, the open end of the bag should be resting entirely inside the vacuum channel area. 2.
Disposal of the appliance THIS PRODUCT IS FOR HOUSEHOLD USE ONLY! Correct disposal of this product This marking indicates that this product should not be disposed with other household wastes throughout the EU. To prevent possible harm to the environment or human health from uncontrolled waste disposal, recycle it responsibly to promote the sustainable reuse of material resources. To return your used device, please use the return and collection systems or contact the retailer where the product was purchased.
UK and EU Guarantee Your new Andrew James product comes with a 24 month guarantee and a 2 year fixed warranty, effective from receipt confirmation. Your receipt or order number is required as proof of purchase date so it is imperative that you keep it safe. This guarantee only applies if the item has been used solely for the use intended, and all instructions have been followed accordingly. Please note this product is only for domestic use only and is not for commercial use.
Electrical Plug Information Please note: It is extremely important that the wires or cores in the flex are connected to the correct terminals in the plug. If the colour of the mains lead of the appliance does not correspond with the coloured markings identifying the terminals in your plug proceed as follows: The Live (Brown) wire connects to the rightmost live (L) terminal nearest to the fuse. The Neutral (Blue) wire connects to the leftmost neutral (N) terminal.
onto the plug. Never attempt to run the appliance if the plug does not have a cover. If a moulded plug is fitted and has to be removed take great care in disposing of the plug and severed cable, it must be destroyed to prevent it from engaging into a socket. If the supply cord is damaged it must be replaced by a service agent or a similarly qualified person in order to avoid a hazard.