OPERATION MANUAL Head and Combo 11/03/2012
Thank you for purchasing an Andrews Amplifier. The Para-DyneTM name is derived from the two-channel dynamic tone of the amp. As with all Andrews amps, these models are built to the highest standards of craftsmanship and are finely tuned for the ultimate tone. This manual will help you to get the most from your new amp. Please feel free to contact us with any questions at andrewsamps.
FEATURES; • 2 CHANNELS OF ALL-TUBE TONE - Selectable by front panel or footswitch, Channel One provides those classic warm yet sparkling clean tones and is a perfect platform for pedal boards while Channel Two gives you a wide range of smooth, sustaining overdrive lead tones. • OPTIONAL BUFFERED SERIAL EFFECTS LOOP – See the rear panel explanation for more information. If effects are to be used on the lead channel at high gain settings, the optional effects loop is recommended.
Warnings and Precautions During operation, vacuum tubes can reach temperatures over 400 degrees F. Do not touch hot tubes. Insure plenty of ventilation behind the amp. Keep the amp away from curtains and other flammable objects and children. Do not expose your amplifier to rain. Never set any cups, glasses, bottles or cans of liquid on your amplifier. Do not use any solvents to clean your amplifier. Never operate your amplifier without a proper speaker load or damage may occur.
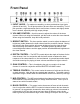
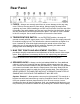
Front Panel 1. INPUT JACKS – For maximum versatility, we have provided two input jacks (labeled HI and LO). The HI jack provides a bit more drive and sensitivity. The LO jack provides a slight attenuation and is useful when a cleaner and slightly darker tone is desired, especially with high output pickups. 2. VOLUME CONTROL – Use this control to adjust the volume of the clean channel. When not using the footswitch, pull this knob to select the clean channel.
9. MASTER VOLUME CONTROL – Use the MASTER VOLUME control to adjust the loudness of the amp when using the lead channel. Try setting it a little louder than the clean channel and switching to the lead channel for solos. For practicing at low volume, the control is designed to maintain a great overdrive tone when turned down. See additional notes below. 10. STANDBY SWITCH – This switch turns on the high voltage for the tubes.
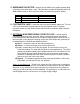
Rear Panel 1. FUSES – Always use correctly rated fuses or severe damage to the amp may occur. Refer to the rear panel for fuse ratings. Always unplug the amp before replacing any fuses. When installing a new HV fuse, first insert it into the cap of the fuse holder, then while holding only the cap, insert the fuse into the holder, push in and turn clockwise to lock the cap and fuse in place. The main AC fuse is located in the AC cord jack. Use a small screwdriver to remove the fuse holder. 2.
5. IMPEDANCE SELECTOR – Always set this switch to the proper speaker load according to the chart below. Note: The Para-Dyne combos incorporates built-in 8 ohm speaker loads so leave it set to 8 when not connecting another cabinet. Setting 4 8 16 For One Cabinet For Two cabinets One 4 ohm cabinet Two 8 ohm cabinets One 8 ohm cabinet Two 16 ohm cabinets One 16 ohm cabinet 6. FOOTSWITCH JACK – Insert the plug from the footswitch cable here.
FOR TECHNICAL TYPES We have provided this information for those who have a technical interest, proper equipment and a DYI attitude. CAUTION! GUITAR AMPLIFIERS CONTAIN LETHAL VOLTAGES. If you have any doubt about your ability to safely perform this procedure, refer the job to a qualified technician! Bias Adjustment Procedure: Precautions: Lethal voltages are present inside the chassis and at the tube pins.
TUBE REPLACEMENT Precautions: Always unplug the amplifier and allow the tubes to cool completely before touching them. It is absolutely necessary to adjust the bias when replacing the output tubes. When to replace tubes: 12AX7 preamp tubes will generally last for many thousands of hours but occasionally problems can development before they “wear out”. If you hear crackling, popping, humming, ringing, or other strange noises, try replacing your preamp tubes one at a time. This may resolve the problem.
LIMITED WARRANTY – Valid in USA and Canada only Andrews Amp Lab Inc. warrants this product to be free of defects in materials and workmanship for a period of five (5) years from the original date of purchase to the original purchaser. For subsequent owners, the length of warranty shall be for a period of 1 year from the original date of purchase.