Ofrecido por www.electromanuales.
Ofrecido por www.electromanuales.com 1 Reading Before Proceeding 1.1 Safety Precautions Please read the safety precautions carefully to ensure the correct use of your mobile phone. Do not crash, throw, or puncture your mobile phone. Avoid the falling, squeezing, and bending of your mobile phone. Do not use your mobile phone in a moist environment, such as the bathroom. Prevent your mobile phone from being soaked or washed in liquid.
Ofrecido por www.electromanuales.com Keep your mobile phone and its accessories away from children. Do not allow children to use your mobile phone without guidance. Use only approved batteries and chargers to avoid the risk of explosions. Observe any laws or regulations on the use of wireless devices. Respect others’ privacy and legal rights when using your wireless device. Strictly follow the relevant instructions of this manual while using the USB cable. Otherwise your mobile phone or PC may be damaged.
Ofrecido por www.electromanuales.com NO WARRANTY THE CONTENTS OF THIS MANUAL ARE PROVIDED “AS IS”. EXCEPT AS REQUIRED BY APPLICABLE LAWS, NO WARRANTIES OF ANY KIND, EITHER EXPRESS OR IMPLIED, INCLUDING BUT NOT LIMITED TO, THE IMPLIED WARRANTIES OF MERCHANTABILITY AND FITNESS FOR A PARTICULAR PURPOSE, ARE MADE IN RELATION TO THE ACCURACY, RELIABILITY OR CONTENTS OF THIS MANUAL. TO THE MAXIMUM EXTENT PERMITTED BY APPLICABLE LAW, IN NO CASE SHALL HUAWEI TECHNOLOGIES CO., LTD.
Ofrecido por www.electromanuales.com 2 Getting to Know Your Mobile Phone 2.1 Mobile Phone View 2.1.1 Phone at a Glance ■ Note: All the pictures in this guide are for your reference only. The actual appearance and display features depend on the mobile phone you purchase. Headset jack Earpiece Camera Volume key Charge/Data port ■ Note: If you apply protective film on the phone, please use the protective film with good transmittance. 2.1.
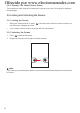
Ofrecido por www.electromanuales.com • Touch to open Google search for searching your mobile phone and the web. • Touch and hold to open Google search by voice. 2.2 Installing Your Mobile Phone 2.2.1 Installing the SIM Card There are two steps to install the SIM card: 1 1. Remove the battery cover. 2. Insert the SIM card. 2 2.2.2 Installing the Battery 1. Angle the edge labeled a (with the contacts) into the bottom end of the battery slot. 2.
Ofrecido por www.electromanuales.com If your mobile phone is charged when it is powered on, the battery icon on the Notification bar shows the charging status. When the battery icon changes to phone is fully charged. , it indicates that your mobile Status Indicator The color of the status indicator tells the battery status of your mobile phone. Status Indicator Green: Fully charged (when connected to charger). Orange: Charging in progress (when connected to charger). Red: Battery low. 2.2.
Ofrecido por www.electromanuales.com • Use the AC adapter to plug your phone into an external power source whenever possible. • Turn Bluetooth off when you are not using it. Only make your phone visible to other Bluetooth devices when you need to establish a Bluetooth connection. • Switch off Wi-Fi when you are not using it. • Turn off your phone connection to GPS satellites when you are not using it. • Lower the volume. • Close power-draining programs, when you do not need them.
Ofrecido por www.electromanuales.com 2.4.2 Rotating Your Mobile Phone Screen The orientation of most screens will rotate with the phone as you turn it from upright to sideways and back again. 2.5 Locking and Unlocking the Screen 2.5.1 Locking the Screen • When your mobile phone is on, press can still receive messages and calls. to lock the screen. When the screen is locked, you • If your mobile is idle for a while, the screen will lock automatically. 2.5.2 Unlocking the Screen 1. Press 2.
Ofrecido por www.electromanuales.com 2.6 Home Screen 10:23 Notifications bar: Displays the reminders and status icons of your phone. Flick down to open the notifications panel. Display area: Shows the operation and display areas of your phone. Screen switching dots: Indicate the number of the screens on the left or right. Touch the left or right dots to switch between the screen. Touch to open the Browser. Touch to view all your applications. Touch to open the Phone application. 2.6.
Ofrecido por www.electromanuales.com 2. On the notification panel, you can do the following: • Touch a notification to open the related application. • Touch Clear to clear all notifications. Closing the Notification Panel Touch and hold the bottom of the panel. Then flick up to close it. 2.6.3 Viewing Other Parts of the Home Screen 10:23 Flick your finger left or right across the Home screen. Touch a thumbnail to open the Home screen or its extensions.
Ofrecido por www.electromanuales.com 2. Do any of the following: • Touch Live wallpapers to select a picture and set it as the wallpaper. • Touch Gallery to select a picture and set it as the wallpaper. • Touch Wallpapers to select a picture and set it as the wallpaper. 2.7 Using a microSD Card 2.7.1 Installing the microSD Card (Optional) Your mobile phone is already equipped with a large-volume built-in eMMC card. If you want to expand your phone memory, you can also insert a microSD card. 1 2 1.
Ofrecido por www.electromanuales.com 3 Calling To make a phone call, you can dial a number or touch a number from your contact list, on a Web page, or in a document. When you are on a call, you can answer other incoming calls or send them to your voicemail box. You can also set up conference calls with several participants. 3.1 Making a Call To make a call, you can use the Phone application, or select a number from Contacts or Call log.
Ofrecido por www.electromanuales.com 3.2.2 Ending a Call During a call, touch End to hang up. 3.2.3 Rejecting an Incoming Call Drag the to the left to reject the call. 3.3 Other Operations During a Call 3.3.1 Making a Conference Call If you receive a new call while you are already on a call, you can connect the second call to the call you are on. This feature is known as conference calling. You can also set up a conference call with multiple callers.
Ofrecido por www.electromanuales.com 2. Enter the phone number of the next person you want to join the conversation and touch , or select someone from your Call log or Contacts. The first participant is automatically placed on hold while you do this. 3. Once you have connected to the second person, touch Merge calls to begin the conference call. 4. To add more people, touch Add call, and then repeat steps 2 and 3. 5. To end the conference call and disconnect everyone, touch End. 3.3.
Ofrecido por www.electromanuales.com 4 Contacts The Contacts application enables you to save and manage information such as phone numbers and addresses of your contacts. After you save contact information on your mobile phone, you have easy access to the people with whom you want to communicate. 4.1 Opening the Contacts Application If you have a new mobile phone and have not yet added any contacts, Contacts displays a message with hints on how to start adding contacts to your mobile phone.
Ofrecido por www.electromanuales.com 1. In the contacts list, touch and hold the contact whose details you want to edit, and then touch Edit contact in the options menu. 2. Touch the category of contact information you wish to change: name, phone number, email address, or any other information you recorded earlier. 3. Make the desired changes to the contact information, and then touch Done. To cancel all of your changes, touch Revert. 4.
Ofrecido por www.electromanuales.com 5 Using the Onscreen Keyboard 5.1 Displaying the Keyboard Panel To enter text, use the onscreen keyboard. Some applications open the keyboard automatically. In others, touch a text field to open the keyboard. Touch the space where you want to write text to display the keyboard. Touch to hide the keyboard. ★ Tip: Touch and hold the space where you usually write your text to open the options menu. 5.1.1 Choosing an Input Method 1.
Ofrecido por www.electromanuales.com 5.1.3 Using the Swype Keyboard EN 1 # 2 q w e r & $ 3 _ % 5 6 + a s d f g h j ! 7 ( t y u i 4 8 9 0 : ) o p ; k l / ” Touch to delete a character to the left of the cursor. Touch and hold to delete all characters to the left of the cursor. ? z x c v b n m _ SYM .’ ’ :) Touch to insert a space. Touch to change from text mode to symbol/number mode. Touch and hold to get helpful tips. Touch to get swype functions.
Ofrecido por www.electromanuales.com 6 Messaging The Messaging application allows you to exchange text messages (SMS) and multimedia messages (MMS) with anyone using an SMS-or-MMS-capable phone. With the Email application you can read and send emails. 6.1 SMS and MMS 6.1.1 Opening Messaging Touch > Messaging. 6.1.2 Creating and Sending a Text Message 1. Touch 2. Enter a phone number in the To field. > Messaging > New message. As you enter the phone number, matching contacts appear.
Ofrecido por www.electromanuales.com 4. Touch Done to finish composing your message and return to the multimedia message screen. 5. To alter your multimedia message, touch Edit on the multimedia message screen. When the message is ready to be sent, touch Send. 6.1.4 Opening and Viewing a Multimedia Message 1. In the message list, touch the message thread you wish to view. 2. Touch the multimedia message to view the message. 6.1.5 Replying to a Message 1.
Ofrecido por www.electromanuales.com ★ Tip: When adding an additional email account, you have the option to use the new account to send all outgoing messages. 6.2.2 Viewing an Email Message 1. On the accounts screen, touch the email account you want to use. 2. Access a folder, and then touch the message that you want to view. 6.2.3 Creating and Sending an Email Message 1. On the accounts screen, touch the email account you want to use. 2. On the Inbox screen, touch 3.
Ofrecido por www.electromanuales.com 7 Getting Connected 7.1 GPRS/3G Your mobile phone will be automatically configured to use your wireless service provider’s GPRS/ 3G/EDGE service (if available) when you turn on the phone for the first time. Note that the SIM card must be inserted. 7.1.1 Checking the Network Connection 1. Touch 2. Touch Wireless & networks > Mobile networks. > Settings. 3. Touch Network operators or Access Point Names to check the network connection.
Ofrecido por www.electromanuales.com ★ Tip: On the Wi-Fi settings screen, touch Add Wi-Fi network to add a new Wi-Fi network. 7.3 Sharing Your Phone’s Data Connection You can share your mobile phone's data connection with a single computer via a USB cable: USB tethering. 7.3.1 Sharing Your Phone’s Data Connection via USB To use USB tethering in different operating systems, you may need to prepare your computer to establish a network connection via USB.
Ofrecido por www.electromanuales.com 3. As you enter the address, matching web page addresses will appear on the screen. If you see the address you want, touch it and go directly to that web page or complete entering the address of the web page you want. 7.4.3 Setting a Home Page 1. In a browser window, touch 2. Touch More > Settings > Set home page. . 3. Enter the address of the desired home page, and then touch OK. 7.4.
Ofrecido por www.electromanuales.com 7.5.2 Pairing and Connecting a Bluetooth Device Your mobile Bluetooth lets you do the following: • Hands Free Profile (HFP): allows you to use a hands-free Bluetooth device. • Headset Profile (HSP): allows you to use a mono Bluetooth headset. • Object Push Profile (OPP): allows you to transfer files through Bluetooth. • Advanced Audio Distribution Profile (A2DP): allows you to use a stereo Bluetooth headset.
Ofrecido por www.electromanuales.com 8 Entertainment In addition to being a communication device and personal assistant, your mobile phone also provides you with a multitude of entertainment possibilities. You can take photos, create videos and audio clips, and download and listen to music. 8.1 Taking Photos and Recording Videos The camera is a combination of camera and camcorder that you can use to shoot and share pictures and videos. 8.1.1 Opening Your Camera • Touch > Camera to open the camera.
Ofrecido por www.electromanuales.com 2. Touch the onscreen button to do any of the following: • Touch Share to send the photo in a message or post it online. • Touch Delete to delete the photo. 8.1.4 Recording a Video 1. Open the camera, and then switch to camcorder mode. 2. If necessary, change the camcorder settings. 3. Frame the scene which you want to start your video. 4. Touch to start recording a video. 5. Touch to stop recording. 8.1.5 Viewing Your Videos 1. 2.
Ofrecido por www.electromanuales.com 3. Select either Rotate Left or Rotate Right. The picture is saved with the new orientation. 8.2.4 Cropping a Picture 1. 2. When viewing a picture, touch > Crop. to display the more operations panel, and then touch More Use the cropping tool to select the portion of the picture to crop. • Drag from the inside of the cropping tool to move it. • Drag an edge of the cropping tool to resize the image.
Ofrecido por www.electromanuales.com • Touch Current playlist to add the song to an existing playlist. • Touch New to create a playlist and add the song to it. 8.3.5 Playing a Playlist 1. Touch the Playlists tab on the music library screen. 2. Touch and hold the playlist you want to play. 3. Touch Play to play the playlist.
Ofrecido por www.electromanuales.com 9 Google Services ■ Note: Availability of Google applications, services, and features may vary according to your country or carrier. Please follow the local laws and regulations to use them. When you turn on your mobile phone for the first time, touch a Google services such as Talk, Gmail, or Market, and you will be prompted to sign in to your Google account.
Ofrecido por www.electromanuales.com 2. Touch the account that contains the email you want to read. 9.2.3 Creating and Sending an Email 1. In the mail list, touch 2. Enter the message recipient’s email address in the To field. If you are sending the email to several recipients, separate the email addresses with commas. You can add as many message recipients as you want. , and then touch Compose.
Ofrecido por www.electromanuales.com 9.3.2 Adding a Friend 1. In the friends list, touch 2. Enter the Talk instant messaging ID or Google email address of the friend you want to add. , and then touch Add friend. 3. Touch Send invitation. 9.3.3 Accepting an Invitation 1. If you have invited anyone to chat or if someone else has invited you to chat, this information will appear in the friends list. 2. Touch a pending invitation, and then touch Accept or Cancel. 9.3.4 Starting a Chat 1.
Ofrecido por www.electromanuales.com 1. Touch 2. Touch Location & security. > Settings. 3. In the My Location section, select the Use wireless networks check box, Use GPS satellites check box, or both. 9.4.2 Opening Maps Touch > Maps to open the application. 9.4.3 Searching for Places of Interest 1. On the map, touch 2. Enter the place you want to search for in the search box, and then touch the Search icon. , and then touch Search. 3. Your search results will then be displayed.
Ofrecido por www.electromanuales.com • While viewing a list of videos, touch and hold a video entry, and then touch Share on the options menu. • While watching a video, touch 2. , and then touch Share. Compose a message if you like, address the email, and send it. 9.6 Using Market Android Market provides direct access to applications and games which you can download and install on your phone. 9.6.1 Opening Market 1. Touch 2.
Ofrecido por www.electromanuales.com 2. Touch the application you want to uninstall, and then touch Uninstall. 3. When prompted, touch OK to remove the application from your mobile phone. 4. Choose the reason for removing the application, and then touch OK.
Ofrecido por www.electromanuales.com 10 Synchronizing Information Some applications on your mobile phone give you access to the same personal information that you can add, view, and edit on your computer. If you add, change, or delete your information in any of these applications on the web, the updated information also appears on your mobile phone. This is made possible through over-the-air data synchronization. The process occurs in the background and does not interfere with use of your mobile phone.
Ofrecido por www.electromanuales.com 2. Touch Remove account. 3. Confirm that you want to remove the account. 10.2 Customizing Your Account Synchronization You can configure background data use and synchronization options for all the applications on your phone. You can also configure what kind of data you synchronize for each account. For some accounts, synchronizing is two-directional; changes that you make to the information on your mobile phone are made to the copy of that information on the web.
Ofrecido por www.electromanuales.com 11 Using Other Applications 11.1 Using the Calendar Use Calendar to create and manage events, meetings, and appointments. Depending on your synchronization settings, the calendar on your phone can be synchronized with the internet-based calendar you use. 11.1.1 Opening the Calendar Touch > Calendar to open the application. ★ Tip: To access Google calendar, touch , and then touch More > Calendars. 11.1.2 Creating an Event 1. 2. On any calendar view, touch screen. .
Ofrecido por www.electromanuales.com • Hide declined events: Select to hide events for which you have declined invitations. • Set alerts & notifications: Touch to set event reminders to alert you, send you a notification, or to turn off event notifications on your mobile phone. • Select ringtone: Touch to select the ringtone to sound when you receive an event reminder. • Vibrate: Select to vibrate the mobile phone when you receive an event notification.
Ofrecido por www.electromanuales.com 11.3.2 Switching to the Advanced panel On the Calculator screen, flick the screen to the right or left to switch between Advanced panel and Basic panel. 11.4 Using the Note pad Note pad features a simple text processor and lists all notes in a linear structure. You can add, edit, and delete notes. 40 1. Touch > Note pad to open the application. 2. Touch , and then touch Add note to create a note. 3. Touch to save the note.
Ofrecido por www.electromanuales.com 12 Managing Your Mobile Phone To configure your mobile phone, touch > Settings. 12.1 Setting the Date and Time By default, your mobile phone automatically uses the date, time zone, and time provided by the network. ■ Note: When your mobile phone is using date and time settings provided automatically by the network, you cannot manually set the date, time, and time zone. 1. On the Settings screen, touch Date & time. 2. Clear the Automatic check box. 3.
Ofrecido por www.electromanuales.com 12.3.2 Adjusting the Volume You can adjust the volume from the Home screen or any application screen (except during a call or when playing music or videos). Press the Volume keys to adjust volume to the level you desire. You can also adjust the volume from the settings screen. 1. On the Settings screen, touch Sound > Volume. 2. Drag the slider left to make the volume lower, or right to make it higher. 3. Touch OK to save the adjustment. 12.3.
Ofrecido por www.electromanuales.com 12.5.1 Installing Voice Data 1. On the Settings screen, touch Voice input & output > Text-to-speech settings > Install voice data. 2. If your mobile phone does not have speech synthesizer data installed, connect to Android Market and let it guide you through the process of downloading and installing the data. 3. Follow the instructions to install the voice data. 12.5.2 Adjusting the Speech Rate 1.
Ofrecido por www.electromanuales.com 12.7.2 Removing an Installed Application 1. On the Settings screen, touch Applications > Manage applications. 2. Touch an application, and then touch Uninstall to remove the application from your mobile phone. 12.7.3 Ways to Free Up Your Mobile Phone Memory • • • • Move files and email attachments to the microSD card. In Browser, clear all temporary Internet files and Browser history information. Uninstall any downloaded programs that you no longer use.
Ofrecido por www.electromanuales.com 13 Appendix 13.1 Warnings and Precautions This section contains important information pertaining to the operating instructions of your device. It also contains information about how to use the device safely. Read this information carefully before using your device. Electronic Device Power off your device if using the device is prohibited. Do not use the device when using the device causes danger or interference with electronic devices.
Ofrecido por www.electromanuales.com • Do not use your device while flying in an aircraft. Power off your device before boarding an aircraft. Using wireless devices in an aircraft may cause danger to the operation of the aircraft and disrupt the wireless telephone network. It may also be considered illegal. Operating Environment • • • • • • Do not use or charge the device in dusty, damp, and dirty places or places with magnetic fields. Otherwise, it may result in a malfunction of the circuit.
Ofrecido por www.electromanuales.com • • • • • • • • • If battery electrolyte leaks out, ensure that the electrolyte does not touch your skin and eyes. When the electrolyte touches your skin or splashes into your eyes, wash your eyes with clean water immediately and consult a doctor. If there is a case of battery deformation, color change, or abnormal heating while you charge or store the battery, remove the battery immediately and stop using it.
Ofrecido por www.electromanuales.com Emergency Call You can use your device for emergency calls in the service area. The connection, however, cannot be guaranteed in all conditions. You should not rely solely on the device for essential communications. Certification Information (SAR) This device meets guidelines for exposure to radio waves. Your device is a low-power radio transmitter and receiver.
Ofrecido por www.electromanuales.com Co., Ltd. may void the FCC authorization to operate this device. Disposal and Recycling Information This symbol on the device (and any included batteries) indicates that they should not be disposed of as normal household garbage. Do not dispose of your device or batteries as unsorted municipal waste. The device (and any batteries) should be handed over to a certified collection point for recycling or proper disposal at the end of their life.
Ofrecido por www.electromanuales.com Italy: For private use, a general authorisation is required if WAS/RLAN’s are used outside own premises. For public use, a general authorisation is required. Luxembourg: General authorisation required for network and service supply. Norway: This subsection does not apply for the geographical area within a radius of 20 km from the centre of Ny-Ålesund. 13.
Ofrecido por www.electromanuales.