
User guide


7
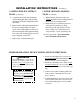
Figure 3. Typical Leg Installation
INSTALLATION INSTRUCTIONS
7. Tighten the four locking nuts evenly and
securely to hold the leg mounting plate against
the fryer mounting bracket.
LEG INSTALLATION
INSTRUCTIONS
(Continued)
LEG LEVELING INSTRUCTIONS
1. Move the fryer to its desired location.
WARNING
The fryer MUST NOT tip, rock or wob-
ble, to avoid splashing or spilling its HOT
frying fat contents during operation.
!
2. Turn the screw-type leg adjustment ends as
necessary to level the fryer, until no tipping,
rocking, or wobbling is evident.
3. Perform the “Fryer Restraining Device
Installation Instructions.”
LEG INSTALLATION
INSTRUCTIONS
1. Flatten the shipping carton (after unpacking the
fryer and its parts and accessories) for surface
protection during leg installation.
2. Position the side of the fryer flat on the carton,
exposing the fryer bottom mounting brackets
for leg installation, as shown in Figure 3.
3. Place the leg mounting plate flush against the
mounting bracket on the fryer bottom.
4. Insert one mounting bolt through a flat
washer and then through the proper
hole in the fryer mounting bracket
and through the leg mounting plate.
5. Screw a locking nut several turns
onto the mounting bolt.
6. Repeat steps 4 and 5 until all four
mounting bolts for a leg are in place
with locking nuts.