
User's Manual Part 2


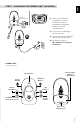


1) Insert jack 1 into the Sensor Pad and twist it clockwise to lock it.
6 5 4 3 2 1
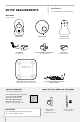
2.2 - SELECT THE CRIB LEG TO SECURE THE CORD COVERS
6
5
4
3
2
1
6
5
4
3
2
1
Figure 1 Figure 2
RECOMMENDED
OR
Use the crib leg by the wall closest to the Nursery Unit (Figure 1). In cases where the
Nursery Unit is across the room, use the leg closest to the Nursery Unit to position the
covered wire (Figure 2). It is always preferable that the covered cord run along a wall.
2.3 - INSTALL THE SENSOR PAD ON THE MATTRESS SUPPORT
IMPORTANT
If your crib does not have a solid, stable surface for the Sensor
Pad, you will need to place a support under it, to ensure correct
operation of the system.
This hardboard support should be at least 6 mm thick and should
have minimum dimensions of 13’’ x 13’’ (33 x 33 cm). This support
board must be larger than the Sensor Pad surface area.
The Sensor Pad functions with any size and type of mattress except memory-foam
mattresses, hollow frame mattresses and water beds. The hardboard maintains a
constant pressure on the Sensor Pad, enabling it to detect the baby’s movements even
when the baby is at the edges of the crib.
Hardboard
9
E
N