
User's Manual


4
5
5
6
3”
6
7
4132
CLIC!
4
3
2
1
8
The Sensor Pad functions with any size
and type of mattress except memory-foam
mattresses and hollow frame mattresses.
The hardboard maintains a constant
pressure on the Sensor Pad, enabling it to
detect the baby’s movements even when
the baby is at the edges of the crib.
10
9
WARNING
STRANGULATION HAZARD
•
Remove all slack from Sensor Pad Cord.
•
When lowering the mattress support
as your child grows, slide the vertical
Cord Cover (5) upward so it remains
approximately in the center between
the mattress support and the fl oor. Slide
the Sensor Pad Cord through the Floor
Cover to eliminate any additional slack.
•
The Sensor Pad is not designed for use
with adults, children or infants older
than 24 months.
•
Discontinue used of the Sensor Pad
when child is older than 24 months.
Remove Sensor Pad from crib and store
for future use.
•
BEFORE FIRST TIME USE: To test
that the unit is ready for use, refer to
instruction manual on how to test that
the installation has been done correctly.
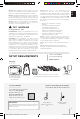
4)
Bring the fi rst 4 cord covers down
the fl oor, and keep the 5
th
cord
cover vertically, along the backside
of the crib leg,
(between the
mattress and the inside edge of
the crib).
5)
Remove any cord slack to make
sure no parts of the cord are loose.
6)
Place the 6
th
cord cover approximately
3 po (8 cm) from the edge of the
mattress support.
7)
Snap together the remaining cord
covers that will run along the fl oor.
8)
Remove any cord slack to make sure
no parts of the cord are loose.
9)
Peel off the double-sided tape on the
4
th
cord cover and place it securely
under the crib leg.
10)
Install the Nursery Unit on a fl at, stable
surface facing the crib at a distance of
at least 3 feet (0.9 meter) and plug the
Sensor Pad cord into the Nursery Unit.
11)
Check to make sure the Sensor Pad has
not moved from position.
12)
Place the mattress back inside the crib.
8