Pre-pro gra monitor mmed to sound a nd movem e n t. Sensor P ad will a larm if no mo vement detected is . Movement & Sound Monitor AC401 Movement & Sound Monitor AC401 Deluxe This instruction Manual is applicable for the AC401 (with one parent unit) and the AC401 Deluxe (with 2 parent units). Additional features of the Deluxe are highlighted throughout the Manual. The Angelcare Baby Monitor is a Personal Care Product.
How does your Angelcare Sound and Movement Monitor Work? Your monitor can be used in the following way: • To monitor sound only • To monitor movement only • To monitor sound and movement together Factory Settings Your monitor comes to you set up in sound and movement mode, as this is the most popular setting. Please take time to read the instructions as they really will help you to get the best out of your purchase.
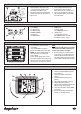
PART 1 - GETTING TO KNOW YOUR MONITOR FUNCTIONS PARENT UNIT 1. SensorPad 2. Power ON/OFF; also EXIT function; also MUTE function (Step 7) 3. ARROWS UP/DOWN (volume level); also HOLD function 4. MENU button (to access menu); also PAIRING & RECONNECTION button function 5. SELECT button (to confirm menu choices); also CHANNEL button (to change transmission channel - Step 5) 6. Parent Unit display (shows all activated functions/settings) 7. Battery compartment 8. AC Adapter socket 9.
PART 2 - SETTING UP YOUR MONITOR Step 1: Installation of the SensorPad 1. The SensorPad works with most baby bed sizes and mattresses, except memory foam mattresses and hollow framed mattresses. 2. Position the SensorPad in the middle of the bed on top of the cot base as shown on the left, with the printed side of the SensorPad facing upwards. 3. Safely pass the SensorPad cord through the slatted base/springs of the cot keeping the cord well away from baby.
Step 2b: Installation of the Nursery Unit SensorPad cord socket Adaptor socket SensorPad sensitivity dial 1. Place the Nursery Unit at least 3 feet (1 metre) away from the baby’s bed, a safe distance from baby’s reach. 2. Connect the plug of the SensorPad into the dedicated socket on the back of the Nursery Unit. 3. Insert 4 x AAA regular batteries (not included) into the Nursery Unit (for battery backup in case of power failure). 4.
Step 4: Establishing connection between the Parent Unit and the Nursery Unit Once you have completed Steps 1, 2 & 3, turn automatically. If this is not the case, please your Parent Unit on by pressing and holding follow the reconnecting procedure. Once the Power button. Turn the Nursery Unit on by both Parent Units are connected to the pushing up the left wing to the ON position. Nursery Unit your baby monitor is ready You will see the Channel Number appear and for use.
PART 3 - MENU ACCESS AND CHANGING SETTINGS The menu settings are accessed by using the MENU button on the Parent Unit. The MENU functions are in a loop. Each time you press the menu button briefly you move on to the next MENU function.
Menu 2: Out of Range Setting Functions The monitor is equipped with an OUT OF RANGE Indicator function, which will alert you when the two units are not communicating with each other. Out of range interference situations can be caused by (e.g.) too much distance or thick walls between the two units. RANGE Up to 250 metres/820 ft (open field); between 80 metres/262 ft and 100 metres/328 ft (indoors).
Menu 4: Alarm Settings Functions There are 3 options to alert you when your monitor alarms: Sound Alarm: An audible alarm will sound if an alarm is activated. Vibrating Alarm: The Parent Unit will only vibrate if an alarm is activated, no sound will be heard. Sound & Vibration Alarm: Combination of a Sound and Vibrating alarm. Options There are three combinations: Icons shown on display: 1. Sound Alarm 2. Vibrating Alarm FACTORY SETTING Sound Alarm activated OVERVIEW ICONS IN DISPLAY: 3.
Other Functions PARENT UNIT WITH LOW BATTERY LOW BATTERY WARNING Only Use Rechargable Batteries in the The parent unit should be recharged when Parent Unit. the battery icon appears empty and a short beep is heard every 15 seconds, until the unit shuts itself off. NURSERY UNIT WITH LOW BATTERY When the Nursery Unit’s Low Battery Indicator (red light) is flashing, its batteries need to be replaced.
Other Functions (continued) PAGING 1 PAGING THE PARENT UNIT Press the TOP BUTTON of the Nursery Unit to locate the Parent Unit. 1. PAIRING/PAGING BUTTON PART 4 - FREQUENTLY ASKED QUESTIONS Q. MY MONITOR KEEPS BEEPING/ ALARMING AS I SET IT UP Q. I DON’T WANT TO MONITOR MOVEMENT WHILST MY BABY IS IN THE COT NEXT TO MY BED? A. Your monitor (Nursery Unit) is already pre-programmed to record movement A. It is easy to change any settings on your (and sound).
PART 4 - FREQUENTLY ASKED QUESTIONS (continued) Q. I WANT TO TAKE MY MONITOR ON HOLIDAY ABROAD WITH ME. WILL IT WORK? Q. WHAT MATTRESS CAN I USE THE SENSORPAD WITH? false alarms as baby stands in the cot or moves away from the SensorPad. A. Your SensorPad can be used under a cot mattress or a cot bed mattress or any Q. MY BABY WAS VERY PREMATURE, other children’s mattress.
PART 5 - TROUBLESHOOTING PROBLEMS DESCRIPTION POSSIBLE CAUSE HOW TO SOLVE The SensorPad is giving false alarms Baby was removed from his/her bed and Nursery Unit was not switched OFF. Turn off the Nursery Unit. The SensorPad plug is not connected properly to the Nursery Unit. Verify the connection between the SensorPad and Nursery Unit. Unplug and reconnect the cord. The SensorPad is not in full contact with baby’s mattress and/or the mattress is not resting on a completely flat or rigid surface.
PART 5 - TROUBLESHOOTING PROBLEMS (continued) DESCRIPTION POSSIBLE CAUSE HOW TO SOLVE There is very weak reception The Parent and Nursery Units are too far apart and the ‘Out of Range’ indicator is OFF. Reduce the distance between the two units until communication is established. Ensure both units are ON. Turn the Out of Range function ON to avoid this in the future (see Part 3, Other Functions). One or both units are placed near a large metal construction which obstructs the transmission.
PART 6 - IMPORTANT INFORMATION (continued) Wireless Interference • Always keep your baby monitor (Parent HOW TO AVOID INTERFERENCE? Angelcare Baby Monitors are designed to and Nursery Unit) away from other provide optimal performance when set-up wireless devices • Never place a cordless or mobile phone and used according to the instructions.
Maintenance of your Angelcare Monitor RETAIN INSTRUCTIONS: Always keep this Instructions Manual for future reference. WATER, MOISTURE AND HEAT DAMAGE: Keep all monitor components away from water (sink, bath tub, swimming pool) and places that emit heat (stove, radiator). VENTILATION: ALWAYS place both units on a flat surface in an upright position to ensure free air circulation around the units. The SensorPad is made of plastic and does not permit the air to circulate.