
Instruction manual


Step 2b: Installation of the Nursery Unit
1. Place the Nursery Unit at least 3 feet
(1 metre) away from the baby’s bed, a
safe distance from baby’s reach.
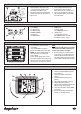
2. Connect the plug of the SensorPad into
the dedicated socket on the back of the
Nursery Unit.
3. Insert 4 x AAA regular batteries (not
included) into the Nursery Unit (for
battery backup in case of power failure).
4. Connect the AC adapter to the Nursery
Unit and plug the adapter into the mains
in the baby’s room.
SensorPad
cord socket
Adaptor
socket
SensorPad
sensitivity
dial
Battery
compartment
1. The Parent Unit is portable and fully
rechargeable.
2. Insert 4 x AAA NiMH rechargeable
batteries (included) into the Parent Unit.
NEVER use regular alkaline batteries as
these batteries are not suitable and
might explode.
3. Connect the AC adapter to the charger
and plug the adapter into the mains. Place
the Parent Unit in the charger and charge
the batteries for 15 hours before first use.
NOTE
The battery icon will appear for 5 seconds
and then the Parent Unit screen will go to
a power save screen as it charges.
4. Place the charger in a convenient place
in your home, e.g. your living room. The
maximum distance between the Parent
Unit and the Nursery Unit is approx. 100
metres indoors and 250 metres outdoors.
1. Power ON/OFF;
also EXIT function;
also MUTE function
2. ARROWS UP/DOWN
(volume level);
also HOLD function
3. MENU button
(to access menu);
also CONNECTING function
4. SELECT button
(to confirm menu choices);
also CHANNEL button (to change
transmission channel - Step 5)
1
3
4
2
Step 3a: Functions Parent Unit
Step 3b: Installation of the Parent Unit & Charger
1. Temperature Indicator (in baby’s room)
2. Movement & Sound Monitoring Setting
(Part 3, Menu 1)
3. Temperature Control Setting (Part 3,
Menu 5)
4. Sound Transmission Setting (Part 3,
Menu 3)
5. Out of Range Setting (Part 3, Menu 2)
6. Alarm Setting (Part 3, Menu 4)
7. Nursery Unit Icon (will flash if Parent and
Nursery Unit are not connected)
8. Parent Unit Icon (will be visible in MENU
access only)
9. Battery Icon (will only be visible when
batteries are inserted correctly)
Step 3c: Parent Unit Display Settings
5
6
1
5
7
9
3
8
2
4