
User Manual


Combination Oven Installation and Operation Manual 85
Section 7
Parts Replacement
PARTS REPLACEMENT
REPLACING PARTS RECOMMENDATIONS
IMPORTANT _________________________
Before performing any component replacement
procedure, activate all safety devices provided and
decide whether staff at work and those in the vicinity
should be informed. In particular, turn off the water supply
valve, cut off the electrical supply using the master switch
and prevent access to all devices that might cause
unexpected health and safety hazards if turned on. If worn
parts have to be replaced, use OEM spare parts only.
The manufacturer declines all responsibility for injury or
damage to components due to the use of non-OEM parts,
or work performed on the appliance which may modify
the safety requirements without the manufacturer’s
authorization. When ordering components, follow the
instructions provided in the parts catalog.
Replacement operations must be performed by an
authorized service agent, in accordance with the
relevant legal requirements.
REPLACING THE FUSE
WARNING
Before performing any service
that involves electrical connection or
disconnection and/or exposure to electrical
components, always follow the Electrical
LOCKOUT/TAGOUT Procedure. Disconnect
all circuits. Failure to comply can cause
property damage, injury or death.
To perform this operation, proceed as follows.
WARNING
Disconnect the power supply
before replacing fuses.
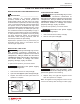
1. Undo screws and remove side panel (A).
2. Open fuse-holder (B) and replace damaged fuse (C).
3. Replace fuse-holder and side panel when the
operation is complete.
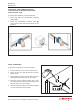
CHANGING THE LAMP
WARNING
Before performing any service
that involves electrical connection or
disconnection and/or exposure to electrical
components, always follow the Electrical
LOCKOUT/TAGOUT Procedure. Disconnect
all circuits. Failure to comply can cause
property damage, injury or death.
To perform this operation, proceed as follows.
WARNING
Disconnect the power supply
before replacing lamps.
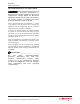
1. Undo screws and remove lamp cover (A).
2. Remove and replace lamp (B).
WARNING
During the procedure, take
care not to touch the lamp directly; wear
protective gloves if necessary.
3. Replace lamp cover (A) and retighten screws
when the operation is complete.
Note: the appliance wiring diagram location can be
found on the “Safety Lable and Sign Location” page.
B
A
C
B
A