Instruction Manual Anker USB 3.
ABOUT THIS MANUAL This manual provides a beginner's introduction to installing, configuring, and using the USB 3.0 Display Dock. Information in this document has been carefully checked for accuracy. No guarantee can be given, however, to the correctness of its contents. The information in this document is subject to change without notice.
Table of Contents 1. Introduction Application 1 1 Features 2 Package Contents 2 System Requirements 3 Front Panel 3 Rear Panel 4 2. Installation Driver Installation 5 5 Hardware Installation 6 Verifying the Installation 7 3. Using the USB Display Dock Configuring Displays 8 8 Controlling the Display 8 4. Uninstalling the Driver Uninstalling the Driver 12 12 5. Specifications 13 6.
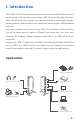
1. Introduction The USB 3.0 Dual Display Docking StationDock enables multiple USB devices to be connected to the computer using a single USB 3.0 cable. Now, with one simple cable connection to your computer, you can have access to large screen displays, stereo speakers, external hard drives, optical disk drives, printers, USB keyboards and mice. Any laptop computer can connect to the USB 3.0 Dual Display Docking Station. You will no longer need to replace a Display Dock every time you buy a new computer.
Features USB Downstream Compatible with USB 3.0 and USB 2.0. Two USB 3.0 downstream ports support Superspeed, high-speed, and full-speed traffic. Four USB 2.0 downstream ports support high-speed, full-speed and low-speed traffic. Supports USB Battery Charging Specification v1.2 (SDP, CDP, DCP) on 1 USB 3.0 downstream port. Ethernet IEEE 802.3, 802.3u, and 802.3ab compatible. Supports IPv4/IPv6. Supports full duplex operation with IEEE 802.3x flow control. Video Dual digital video outputs.
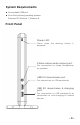
System Requirements One available USB port. One of the following operating systems: Windows XP, Windows 7, Windows 8. Front Panel Power LED: Glows when the docking station is powered. 3.5mm stereo audio output port: For connection to stereo headphones or speakers. USB 3.0 downstream port: For connection to USB peripherals. USB 3.0 downstream & charging port: For connection to USB peripherals or connection to and charging of mobile devices.
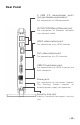
Rear Panel 4 USB 2.0 downstream ports (A-type female connectors): For connection to USB peripherals. 10/100/1000Mbps Ethernet port: For connection to Ethernet networks via a network cable. HDMI video output port: For connection to an HDMI monitor. DVI video output port: For connection to a DVI monitor. USB 3.0 upstream port: For connection to a USB 3.0 port on the host computer. Power jack: For connection to the power adapter. The Docking Station requires an external power supply for operation.
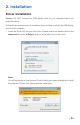
2. Installation Driver installation Caution: DO NOT connect the USB display dock to your computer before you install the driver. Follow the procedures below to install the driver and then connect the USB display dock to your computer: 1. Insert the Driver CD into your disc drive. Please locate and double-click on the setup.exe file under x:\Driver\ where x is the letter of your disc drive. Note: You will encounter a User Account Control dialog box when attempting to install the program.
2. Please wait while Windows configures the DisplayLink Core Software. Your screen may temporarily go black or flash during this process. 3. When finished, the installation screen will disappear, and you will be returned to your desktop. Note: On some machines, you may need to reboot before being able to use your display dock. Hardware installation 1. Connect the USB display dock: Plug the USB 3.0 cable into the USB upstream connector on the back of the display dock.
4. Connecting USB 2.0 / USB 3.0 devices: Connect your USB devices to the USB ports on the display dock. As long as one USB device is connected to a port and the connection works properly, make sure it’s plugged into a working electrical outlet if your device (e.g. printer, optical drive, etc.) came with its own AC adapter. 5. Connecting Microphones and Speakers/Headphones: To connect your speaker/headphones, insert the plug into the green hole on the front of the display dock.
3. Using the USB Display Dock Configuring Displays Behavior upon first connection: When the USB Display Dock is connected, the firmware version will be checked by the host’s software. If they do not match, the firmware on the device will be updated. While the firmware is updating, a window similar to that shown below will pop up. Controlling the Display When the USB Display Dock is attached, an icon will appear in the taskbar. This gives you access to the DisplayLink Manager Menu.
2. Click the DisplayLink icon. A menu will appear with several options. These are shown and described below: Menu Option Sub-menu Option Description DisplayLink Manager This is the UI title. Clicking on this item will open the Windows screen resolution. Check for Updates Connects to the Microsoft Windows Update Server to check for newer software versions, and downloads them, if available.
Display Menu Description Displays a list of available resolutions. Some resolutions may be enclosed by [ ]. This option is not available in mirror mode, as the resolution is defined as the resolution of the main monitor. Screen Resolution Screen Rotation Extend To Normal No rotation is applied to the DisplayLink display. Rotated Left Rotates the extended or mirrored display by 270 degrees clockwise. Rotated Right Rotates the extended or mirrored display by 90 degrees clockwise.
Copies what is on the main display and reproduces it on this display. Note: The resolution of this display and the primary one must be the same in mirror mode. This Mirror may be lower than the preferred resolution of the display. It is only possible to mirror 2 displays. If a display is already set to mirror mode, this option will be grayed out for the other DisplayLink displays. Off Switches off this display.
4. Uninstalling the Driver Uninstalling the Driver Please take these steps to uninstall the driver: 1. Open the Control Panel, go to Programs and Features, and double-click Uninstall a Program on Windows 7 or Add or Remove Programs on XP. 2. Select DisplayLink Graphics and click Uninstall. 3. Select [Yes] to continue the uninstall process. 4. Once uninstalled, you will be prompted to reboot. 5. Clicking [Yes] will cause the system to auto restart and complete the uninstall process.
5. Specifications General Host Interface Compliant with USB 3.0, 2.0 specifications Supported Operating Windows XP, Windows 7, Windows 8 Systems Ports and Connectors Upstream USB Hub Downstream Ethernet Video 1 x Upstream USB 3.0 Port (type-A male connector) 4 x Downstream USB 2.0 Port (type-A female connector) 2 x Downstream USB 3.
Dual digital video outputs Video Extended Desktop (default), Mirrored Desktop, Primary Display Supports High Resolution up to 2048 x 1152 Audio 2 CH Stereo output Physical Specifications Housing Material ABS (Plastic) + Metal Dimensions 220 x 90 x 25mm (H x W x D) Weight Approximately 460g Environmental Specifications Operating Temperature 10-40°C Storage Temperature -10~80°C Relative Humidity < 85% non-condensing Regulatory Compliances Safety, EMI FCC, CE RoHS RoHS compliant * Specifica
6. Regulatory Compliance FCC Statement This device complies with Part 15 of the FCC Rules. Operation is subject to the following two conditions: 1. This device may not cause harmful interference, and 2. This device must accept any interference received, including interference that may cause undesired operation. FCC Warning: Any changes or modifications not expressly approved by the party responsible for compliance could void the user’s authority to operate this equipment.