NaviCam Small Bowel Capsule Endoscopy System User Manual ANKON Technologies Co., Ltd.
NaviCam Small Bowel Capsule Endoscopy System User Manual Page |2 Copyright Statement: The ownership of the User Manual belongs to ANKON Technologies Co., Ltd., and it should not be distributed or reproduced by any means or in any form without prior written permission by ANKON Technologies Co., Ltd.. The User Manual is protected by copyright, and all rights are reserved. ANKON Technologies Co., Ltd. reserves the right to change the User Manual and the products as described herein.
NaviCam Small Bowel Capsule Endoscopy System User Manual Page |3 TABLE OF CONTENTS CHAPTER 1:....................................................................................................................... INTRODUCTION5 1.1 IMPORTANT INFORMATION................................................................................................................... 5 1.2 ABOUT NAVICAM SMALL BOWEL CAPSULE ENDOSCOPY SYSTEM........................................................... 5 1.2.
NaviCam Small Bowel Capsule Endoscopy System User Manual Page |4 4.4.11.............................................................................................................................. Add to Atlas56 4.5 REPORT GENERATION........................................................................................................................58 4.6 CASE MANAGEMENT..........................................................................................................................62 4.
NaviCam Small Bowel Capsule Endoscopy System Page |5 User Manual CHAPTER 1: INTRODUCTION 1.1 Important Information A thorough understanding of the technical principles, clinical applications and risks associated with the NaviCam Small Bowel Capsule Endoscopy System is necessary before using this product. Read this entire manual before using the system for the first time. CAUTION Failure to follow instructions could result in damage to the equipment or pollution to environment.
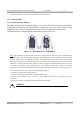
NaviCam Small Bowel Capsule Endoscopy System Page |6 User Manual in a failed examination and could damage the equipment. Table1-1: Relationship between product models and associated frequencies Frequency 2.4GHz 915MHz Capsule Model AKES-11SW AKES-11SI Data Recorder Model AKR-1 AKRI-1 A description of each component is provided below. 1.2.1 Capsule(AKES-11SW/AKES-11SI) The Capsule presented in Figure 1-1, is a capsule endoscope capable of capturing images inside the human digestive tract.
NaviCam Small Bowel Capsule Endoscopy System User Manual Page |7 —Consult the dealer or an experienced radio/TV technician forhelp. 1.2.2 Data Recorder 1.2.2.1 Data Recorder (AKR-1) The AKR-1 Data Recorder, presented in Figure 1-2, is a portable data receiving unit with built-in rechargeable lithium battery placed inside the examination cloth worn by the patient during examination. It is used for receiving image data wirelessly transmitted from the Capsule.
NaviCam Small Bowel Capsule Endoscopy System User Manual Page |8 Note: The Data Recorder is used in a hospital environment.as well as in the home healthcare environment, and shall be used by trained personnel or professional personnel. The service life of the battery under the typical condition is 5 years.
NaviCam Small Bowel Capsule Endoscopy System User Manual Page |9 correct the interference by one or more of the following measures: —Reorient or relocate the receiving antenna. —Increase the separation between the equipment and receiver. —Connect the equipment into an outlet on a circuit different from that to which the receiver is connected. —Consult the dealer or an experienced radio/TV technician for help. WARNING Do not charge the Data Recorder when it is in use.
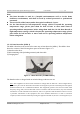
NaviCam Small Bowel Capsule Endoscopy System User Manual P a g e | 10 Figure 1- 4: Locator WARNING Never charge the Locator when it is in use by a patient. For patient who needs to undergo an MRI test before the expulsion of the capsule has been confirmed, Locator scan should not replace an X-Ray to confirm the absence of capsule in the body. 1.2.4 ESView Software ESView software is the image review software component of the NaviCam SB System .
NaviCam Small Bowel Capsule Endoscopy System User Manual P a g e | 11 capsule or comparator) for the diagnosis of small bowel diseases.
NaviCam Small Bowel Capsule Endoscopy System User Manual P a g e | 12 Per Finding Analysis: There were no statistically significant differences between the 2 capsules in the detection of vascular lesions (p=0.2087), inflammatory lesions (p=0.6831), tumors/polyps/masses (p=1.0000), ulcers/ulcerations (p=0.3938), and other lesions (p=0.4669). Safety Results: One case of capsule retention occurred where both NaviCam and PillCam capsules were retained. The incidence of adverse events was 1.15%.
NaviCam Small Bowel Capsule Endoscopy System User Manual P a g e | 13 Per Subject Analysis: Normal versus Abnormal Abnormal rates (NaviCam 84/87 – PillCam 81/87) 96.55% – 93.10%, Positive Percent Agreement (PPA) [95% CI]: 100.00% (95.47%, 100.00%) Negative Percent Agreement (NPA) [95%CI] 50.00% (18.76%, 81.24%) Overall Percent Agreement [95% CI] 96.55% (90.35%, 98.82%) Overall percent agreement per Kappa analysis [95% CI] 0.6506 (0.2866, 1.0000) Positive Predictive Value (PPV) [95% CI] 96.43% (90.
NaviCam Small Bowel Capsule Endoscopy System User Manual P a g e | 14 CHAPTER 2: INDICATIONS, CONTRAINDICATIONS AND WARNINGS 2.1 Indications The NaviCam Small Bowel Capsule Endoscopy System is intended for visualization of the small bowel mucosa in adults. It may be used as a tool in the detection of abnormalities of the small bowel. 2.
NaviCam Small Bowel Capsule Endoscopy System User Manual P a g e | 15 place the capsule directly in the duodenum. Placement of the capsule in the duodenum will decrease the risk of aspiration of the device [by vomiting] and gastric retention. A thorough understanding of the technical principles, clinical applications and risks associated with the Capsule System is necessary before using this product.
NaviCam Small Bowel Capsule Endoscopy System User Manual P a g e | 16 Undergoing an MRI while the capsule is inside the patient's body may result in serious damage to his/her intestinal tract or abdominal cavity. If the patient did not positively verify the excretion of any capsule from his/her body, he/she should contact the physician for evaluation with the Locator and possible abdominal X-ray before undergoing an MRI examination.
NaviCam Small Bowel Capsule Endoscopy System P a g e | 17 User Manual CHAPTER 3: ESVIEW SOFTWARE OPERATION INITIATION 3.1 Installation 1. Double click the ESView software installer to install ESView software. The welcome dialog box will pop up (Figure 3-1). Click “Next” to continue. Figure 3-1: ESView Installation Welcome Dialog Box 2. The Software License Agreement dialog box (Figure 3-2) is displayed. Scroll down to view the agreement in its entirety. Click “I Agree” to accept.
NaviCam Small Bowel Capsule Endoscopy System P a g e | 18 User Manual Figure 3-2: Software License Agreement Dialog Box 3. The dialog box for selecting the destination folder (Figure 3-3) is displayed. The default installation directory is C:\Program Files(x86)\ESView. Click “Browse” to change the directory. Click “Install” to continue installation in the selected directory. Figure 3-3: Selection of Installation Directory 4. The dialog box, showing the installation progress (Figure 3-4), is displayed.
NaviCam Small Bowel Capsule Endoscopy System User Manual P a g e | 19 Figure 3-4: Installation Progress Dialog Box 5. After ESView software is successfully installed, the “Setup Completed!” dialog box (Figure 3-5) appears. Click “Finish” to complete installation. A shortcut to the ESView program is created on the desktop. Figure 3-5: Successful Installation Dialog Box ANKON Technologies Co., Ltd.
NaviCam Small Bowel Capsule Endoscopy System User Manual P a g e | 20 3.2 Uninstallation 1. To uninstall the ESView software, from the Windows Start menu, select “Programs” “ESView ” “Uninstall ESView”. The uninstallation dialog box (Figure 3-6) appears. Click “Uninstall” to begin the uninstallation. Figure 3-6: Uninstallation Dialog Box 2. After ESView software is successfully uninstalled, the “Uninstall Success!” dialog box (Figure 3-7) appears. Click “Finish” to complete uninstallation.
NaviCam Small Bowel Capsule Endoscopy System User Manual P a g e | 21 Figure 3-7: Successful Uninstallation Dialog Box 3.3 Basic Software Operation 1. Connect the data recorder to the PC installed with the ESView software, open the ESView and create a new case, and enter and save the basic information of the patient in the data recorder. 2. After confirming the patient information, turn on the capsule, and the images the capsule is capturing and displayed on the Rtdisplay interface.
NaviCam Small Bowel Capsule Endoscopy System User Manual P a g e | 22 Figure 3-8: NaviCam SB System Workflow 3.4 Software Startup ESView software can be launched by double clicking the ESView shortcut icon on the desktop. The ESView software launch screen (Figure 3-9) will appear. Figure 3-9: ESView Software Launch Screen 3.4.1 First-time Startup When ESView software is launched for the first time on the computer it is installed on, the user ANKON Technologies Co., Ltd.
NaviCam Small Bowel Capsule Endoscopy System P a g e | 23 User Manual needs to complete a registration step, using the unique license code received from ANKON, and set up a software password. 1. At first-time launch of ESView software, the registration interface (Figure 3-10) is displayed. The serial number in the top box automatically appears and the user has to enter the license code received from ANKON into the blank box to register the software.
NaviCam Small Bowel Capsule Endoscopy System User Manual P a g e | 24 Figure 3-11: Login 2. If Microsoft Word 2003 or later version is not installed on the computer, ESView will display a dialog box to alert the user that report generation in Word format will not be supported (Figure 3-12). Figure 3-12: Dialog Box Alerting that Word Format Report Is Not Supported Note: All other functions of ESView software will not be affected. ANKON Technologies Co., Ltd.
NaviCam Small Bowel Capsule Endoscopy System User Manual P a g e | 25 CHAPTER 4: ESVIEW SOFTWARE OPERATION INSTRUCTIONS The main ESView software interface, where the user can browse and annotate images, is shown in Figure 4-1. The user can also use the menu or buttons to access interfaces for patient check-in, data export, medical record management, and report generation, etc. 4.
NaviCam Small Bowel Capsule Endoscopy System User Manual P a g e | 26 Figure 4-2: Patient Check-in Interface The patient information already stored in the data recorder can be retrieved and displayed in the information entry area by clicking the “Read record” button. The “Clear” button can be used to clear patient information in the entry area.
NaviCam Small Bowel Capsule Endoscopy System User Manual P a g e | 27 Figure 4-3: Rtdisplay Interface 2. In the Rtdisplay interface, images captured by the capsule endoscope inside the digestive tract can be real-time displayed and its running status can be adjusted. The Data Recorder should be connected to your computer via USB for Rtdisplay.
NaviCam Small Bowel Capsule Endoscopy System User Manual P a g e | 28 4.2.3 Rtdisplay Image Zoom-in and Out 1. Image zoom-in and out can be realized by mouse scrolling, then scaled to x% will be displayed in upper right corner of the image to represent current scaling factor, as shown in Figure 4-4. Figure 4-4: Zoom Function 2. To restore original size of the displayed image without any zoom in or out, double click the image display area. 4.2.4 Data Recorder Status Indicator 1.
NaviCam Small Bowel Capsule Endoscopy System User Manual P a g e | 29 endoscope has been received. b) Green LED does not light, red LED lights – indicates no signal from capsule endoscope has been received. c) Green LED does not light, red LED flashes – indicates capsule endoscope signal has been received, but no image data has been received. 4.3 Data Export 1.
NaviCam Small Bowel Capsule Endoscopy System User Manual P a g e | 30 “Start export”, then select a RAW file in the raw data file selection interface (Figure 4-6) and generate the video file. Figure 4-6: RAW Data File Selection Interface 5. The data recorder should be connected to the computer via USB when exporting data, otherwise, an alert will appear on the data export interface to remind the user to connect the data recorder to the computer (Figure 4-7).
NaviCam Small Bowel Capsule Endoscopy System User Manual P a g e | 31 4.4 Image Browsing, Processing, and Editing, ProScan mode 4.4.1 Open Video 1. In the main software interface, select “File”“Open video” to access the patient data file selection interface (Figure 4-8). The default path is the data export path. Figure 4-8: Patient Data File Selection Interface 2. Select a patient folder and open the *.acpi file under the folder.
NaviCam Small Bowel Capsule Endoscopy System User Manual P a g e | 32 4.4.2 Video Playback Function 1. In the main software interface, click the forward or backward playback button (Figure 4-10) to play the loaded video in forward or backward direction. Figure 4-10: Video Playback Buttons 2. To stop video playback, click the pause button (Figure 4-11). Figure 4-11: Pause Playback Button 4.4.3 Image Browsing 1. Click the , , ANKON Technologies Co., Ltd.
NaviCam Small Bowel Capsule Endoscopy System User Manual P a g e | 33 display mode, transverse four-image display mode, array four-image display mode, and multi-image display mode, respectively, as shown in Figures 4-12 to 4-16. The display mode can also be switched by selecting a display mode in the “Display” menu. Figure 4-12: Single-Image Display Mode Figure 4-13: Two-Image Display Mode ANKON Technologies Co., Ltd.
NaviCam Small Bowel Capsule Endoscopy System P a g e | 34 User Manual Figure 4-14: Transverse Four-Image Display Mode Figure 4-15: Array Four-Image Display Mode ANKON Technologies Co., Ltd.
NaviCam Small Bowel Capsule Endoscopy System User Manual P a g e | 35 Figure 4-16: Multi-Image Display Mode 2. Use the playback speed slider to adjust the video playback speed. Click to play video in forward direction. Click Click to display the next image frame. Click to display the previous image frame. Click to display the last image frame. Click to display the first image frame. 3. In single-image and two-image display mode, click to play video in backward direction.
NaviCam Small Bowel Capsule Endoscopy System User Manual P a g e | 36 Figure 4-17: Single-Image Enlargement Mode Figure 4-18: Two-Image Enlargement Mode 4. Click to access the image processing control panel, as shown in Figure 4-19. Drag the corresponding sliders to adjust definition, brightness, and color. Checking the “Saturation” box and then drag the sliders below to adjust saturation.
NaviCam Small Bowel Capsule Endoscopy System P a g e | 37 User Manual processed by the corresponding algorithm. Click to undo all the image processing. Figure 4-19: Image Processing Control Panel 5. When the icon of the button next to the time window shows as , the time window and the thumbnail time display show image absolute time. Click , the button icon will change to Click , and the time window and the thumbnail time display will show image relative time.
NaviCam Small Bowel Capsule Endoscopy System User Manual P a g e | 38 Figure 4-20: Image Tagging 2. In addition to tagging an image, the user can also capture an image. Move the mouse over the image to be captured and right click on the image, then select “Capture image” in the pop-up menu to capture the image (Figure 4-21). An alternative way to capture an image is to double click on the image. The captured image will also appear in the bottom thumbnail area.
NaviCam Small Bowel Capsule Endoscopy System P a g e | 39 User Manual right click on the image then select "Cancel select" in the pop-up menu (Figure 4-22). The image will be removed from the thumbnail area and the colors in the progress bar will be updated accordingly. Figure 4-22: Cancel Image Tagging or Capture 4.4.5 Image Remark 1. Move the mouse over the image you want to add a remark to and right click on the image.
NaviCam Small Bowel Capsule Endoscopy System P a g e | 40 User Manual Figure 4-23: Add Remark Through Pop-Up Menu Figure 4-24: Add Remark Interface 2. In the add remark interface, click to add arrow markings. When the icon changes to , the user can add an arrow on the image by left clicking to set the start point and holding the left mouse button and dragging to set the endpoint. Click When the icon changes to ANKON Technologies Co., Ltd. to add circular markings.
NaviCam Small Bowel Capsule Endoscopy System P a g e | 41 User Manual the center and holding the left mouse button and dragging to change its size (Figure 4-25). Click to undo the previous marking and click will be reflected on the images in the thumbnail area. to undo all markings. The markings Figure 4-25: Add Markings 3.
NaviCam Small Bowel Capsule Endoscopy System Button P a g e | 42 User Manual Function Description Set remark color Remove the previous remark Remove all remarks Display the first selected image Display the previous selected image Display the next selected image Display the last selected image Image Setting Add text notes 4. Click to access the add comment interface (Figure 4-26).
NaviCam Small Bowel Capsule Endoscopy System User Manual P a g e | 43 Figure 4-26: Add Remark Interface 5. As previously described, clicking brings up the image processing control panel (Figure 4-27). The sliders and checkboxes function the same as those in the image processing control panel described previously. Figure 4-27: Image Processing Control Panel 6. Click to exit the add remark interface. 4.4.6 Thumbnails 1.
NaviCam Small Bowel Capsule Endoscopy System User Manual P a g e | 44 Figure 4-28: Thumbnail Display Area 2. In the thumbnail display area, move the mouse over the image to add remark to and right click on the image, then select “Add remark” in the pop-up menu (Figure 4-29) to add remark to the corresponding image using the add remark interface shown in Figure 4-26. Figure 4-29: Add Remark to Thumbnail 3.
NaviCam Small Bowel Capsule Endoscopy System User Manual P a g e | 45 pop-up menu. Figure 4-30: Thumbnail “Cancel Mark” 4. To go to a specific landmark and display the image in the main display area, in the thumbnail display area right click on a thumbnail and select “Jump to the first esophagus image”, “Jump to the first stomach image”, “Jump to the first small intestine image”, “Jump to the first large intestine image”, or “Jump to the last digestive tract image” in the pop-up menu.
NaviCam Small Bowel Capsule Endoscopy System User Manual P a g e | 46 Figure 4-31: Image Processing Control Panel 2. ESView software is equipped with image denoise algorithm. Check the “Image denoise” box and the effect as shown in Figure 4-32. To undo the denoising, uncheck the “Image denoise” box. Figure 4-32: Image Denoise 3. Check the “Distortion Correction” box to correct image distortion (Figure 4-33). ANKON Technologies Co., Ltd.
NaviCam Small Bowel Capsule Endoscopy System User Manual P a g e | 47 Figure 4-33: Distortion Correction 4. Check the “Enhance - ICCI” box to achieve the post-processing effect (Figure 4-34). Figure 4-34: Image Enhancement - ICCI 5. Check the “Enhance - RGB” box to achieve the post-processing effect (Figure 4-35). ANKON Technologies Co., Ltd.
NaviCam Small Bowel Capsule Endoscopy System User Manual P a g e | 48 Figure 4-35: Image Enhancement - RGB 6. Use the saturation adjustment sliders to adjust image saturation (Figure 4-36). Figure 4-36: Image Saturation Adjustment 7. Use the definition and brightness sliders to adjust the definition and brightness of the image (Figure 4-37). ANKON Technologies Co., Ltd.
NaviCam Small Bowel Capsule Endoscopy System P a g e | 49 User Manual Figure 4-37: Definition and Brightness Adjustment 4.4.8 Browsing Mode 1. Click , when the button icon changes to , the similarity browsing mode will be activated (Figure 4-38). In this mode, the software displays only one image for all the adjacent similar images, reducing number of images to be browsed. Experiments show that the number of images is reduced by approximately 50%.