APP User Guide The user guide is for reference only Screen shots displayed in this user's guide of the "UBOX" app may appear differently than those currently featured in your app as frequent updates and improvements.
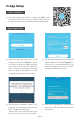
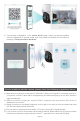
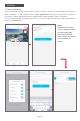
In-App Setup App Installation (1). Scan the following QR codes or search for "UBox" from the App Store(for iOS devices) or Google Play Store (for Android smart phones) to download and install the app. UBox App Registration (1). Open the app then input your E-mail address then press "Register". Check and select to agree the agreement then your E-mail box will get an verification mail. ( For better user's experience, please allow to open all permissions to avoid missing any notifications from the app.
Set up the installed location Click "Add family" and then input your desired family name, click "next step" and then input required information, and then click "finished" to save it. please pay attention to choose your right "Country/Region" so that you can connect the camera smoothly later and get proper notifications from your correct region server. Pairing the camera using the Ubox App (1). Press "Add a device" to add a smart device (2).
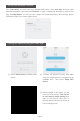
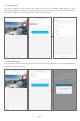
(4). If the device blue LEDs are not blinking, please press the RESET button until the blue indicator to light up and then release. The device will reboot and enter the pairing state. (5). Set the device name and select the device location before setup. (you have to choose one or you cannot connect the camera to the app). QR code configuration (6). The app will input the Wi-Fi name automatically, and please input the correct Wi-Fi Password.
②. Sound wave configuration: In the "search device" page, adjust your phone's speaker volume to Maximum to optimal output, and once paired successfully you will hear the message: "Pairing Information Received". If you're unable to pair the camera, please check the following suggestions below: (1.) Make sure your phone is connected to 2.4GHz Wi-Fi. When your 2.4g Wi-Fi connected correctly to your phone, your Wi-Fi name will be recognized by the camera and pop-up on the Wi-Fi selection page automatically.
(6.) Switch on your router's DHCP option and set your router to dynamic IP addressing to avoid conflict with your other wireless devices for one static IP address. (7.) Reboot your router to reallocate your IP address and refresh your network. (8.) Please press and hold on the reset button for 4-5 seconds to reset the device.Once you hear "system reset" you can release the button and see the blue lights is coming on. System Reset Button Detailed App Instructions "Device" Page ①.
Settings: ①. Share Permissions: Once the camera is functioning properly, you can choose to share your camera with your friends or family members. To start sharing, select "share permissions" and input the account you want to share with. Choose a permissions from Administrator, family member, Visitor, Customize. You can Customize the permissions and turn on or off every permission as you wish by clicking the blue icon "permissions".
②. Cloud storage The motion detection video clips will be saved in the Cloud. The default video length is 10-30 seconds and will be stored free for 30 days from date of account activation. After 30 days trial period, your account will require subscription for continued cloud services. ③. Delete the device For your privacy, please do not forget to disconnect the security camera from your mobile App when you plan to return the camera.
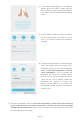
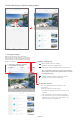
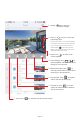
Click the Device,you could live viewing videos ①. Wifi signal strength Tips: To ensure fluid live view streaming, please make sure your camera is connected to high speed wifi with strong signal (If necessary, a wifi extender is recommended to be installed beside the camera). ②. Click here to select the resolution to HD(1080P) OR SD(720P). ③. Battery charging sign When camera exposed to sunlight, the battery will keep charging in green. During night or fully charged,the battery will stay white.
①. Setting: Tap to enter into device settings. ②. This icon " " is to turn on the spot light during night. The spot light will turn on to record a starlight color video clip when there's motion detected by the camera. You can click it to switch to infrared LEDS " " night vision mode to disable spot light.Camera will record motion in black and white video mode. ③. Tap the icon " " to switch to full screen playback. ④.
Click the Device Settings ①. SD Card Setting Please turn on the cloud storage so that you can sync the camera time with your phone. ②. Image flip You can choose Normal Rotate,Mirror or Mirror and rotate depends on.
③. Scene mode You can choose to set it as Normal, back light compensation, night IR, High light compensation or Dynamic according to your actual light environment of installation place. ④. PIR Detection Sensitivity You can set the PIR sensitivity as Disabled, Low, Medium and High. *Disabled: disabled PIR detection. *Low: delay 7 seconds once PIR detects movement. *Medium: delay 5 seconds once PIR detects movement. *High: delay 1 second once PIR detects movement.
Notes about PIR detection: 1). When you set the PIR as Disabled, you will not record and receive any motion triggered events. 2). To capture as much footage as possible once motion is detected, we recommend setting the PIR detection sensitivity to high. 3). Try to capture more the beginning of the triggered event,please adjust your camera angle a bit closer to your aimed spot 4). We recommend to set sensitivity at "Low" to reduce false alerts and save the battery power in noisy environments. ⑤.
⑦. Power frequency Please choose 60Hz or 5OHz according to your local frequency. It's defaulted to 60Hz for united states users. ⑧. Device Name You can set a desired name for your camera. "Cloud video" Page Click the "Calendar" icon on the right top corner , then choose the date to playback the videos from cloud storage Click the "Select" icon on the left top corner , then you can choose "Select all / Download / Delete" to the videos from cloud storage.
"Me" ① ② ③ ④ ⑤ ①.
②. Check and subscribe to Cloud storage; Each Device will be connected with one cloud Service and has one-month for free trial.(But not in account base). ③. Check and see my friends list and permission ④. Common settings: 1). Mute when viewing device: Switch to mute sound when live view camera as default. 2). Mute when playback: Switch to mute sound when playback recorded videos as default. 3). Default resolution: Click to change from SD to HD resolution as default. 4).
5). Alarm Ring: Switch to enable Ring or not when notifications comes in. 6). Talk voice change: Enable to change your voice to the camera end to scare off any intruders in case. Note: You can turn on or off the notification alarm vibrate,alarm ring and talk voice change for any Android devices,these functions are not compatible with iOS platform owing to the iOS system restriction. ⑤.
Shenzhen Ankway Technology Co.,Ltd www.ankway.com support@ankway.