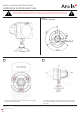
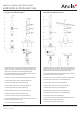
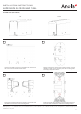
INSTALLATION INSTRUCTIONS ARCSOURCE OUTDOOR 4MC PIXEL Fixture must be installed by a qualified electrican in accordance with all national and local electrical and construction codes and regulations. This device falls under class one and must be grounded! STEP 1 FIXTURE'S HOUSING 1 2 Three holes of diameter 4.3mm in the base serve for mounting on the non-flammable surface. The luminaire head can be adjusted in range of 120°. Loosen a locking screw M5x12, tilt it to desired position and tighten the screw.
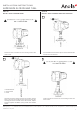
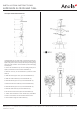
INSTALLATION INSTRUCTIONS ARCSOURCE OUTDOOR 4MC PIXEL STEP 2A INSTALL WITH STANDARD BASE STEP 2B INSTALL WITH STANDARD BASE AND ADAPTOR 1 Fasten the base of luminaire into the mounting surface with three screws. 2 Unscrew M5x14 from the bottom part of base and disassemble the base from the luminaire. 3 1. standard washer 2. spring washer 3. screw Assemble the 31mm adaptor between the luminaire and the base. Locking pin of the adaptor has to placed correctly into matching part of the luminaire.
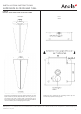
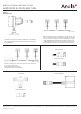
INSTALLATION INSTRUCTIONS ARCSOURCE OUTDOOR 4MC PIXEL STEP 2C INSTALLATION OF 100MM ADAPTOR STAND AND MOUNTING 1 2 1. standard washer 2. spring washer 3. screw Unscrew M5x14 from the bottom part of base and disassemble the base from the luminaire. Screw the 100mm adaptor into luminaire by bolt on adaptor. Fasten the base to the adaptor with original M5x14 screw and washers. 3 Fasten the base of luminaire into the mounting surface with three screws. ROBE lighting s. r. o.
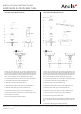
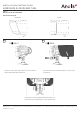
INSTALLATION INSTRUCTIONS ARCSOURCE OUTDOOR 4MC PIXEL STEP 2D INSTALL WITH LAND SPIKE OR FLOOR STAND Land Spike Floor Stand Insert the Land Spike into ground. Underground part of Land Spike should be placed perpendicularly into the ground. (if you need to use tools to insert spike in the ground, use of some protective layer, and applying pressure in the middle is recommended to prevent damaging of land spike) Fasten the Floor stand into the mounting surface by four screws and prepared mounting holes.
INSTALLATION INSTRUCTIONS ARCSOURCE OUTDOOR 4MC PIXEL Land spike 1 ASO 4 MC Pixel 100 mm Land spike 2 ASO 4 MC Pixel 100 mm 1.Insert the Land Spike into the ground. Underground part of Land spike (1) should be placed perpendicularly into the ground. (if you need to use tools to insert spike in the ground, use of some protective layer and applying pressure in the middle is recommended to prevent damaging of land spike). 1.Insert the Land Spike into the ground.
INSTALLATION INSTRUCTIONS ARCSOURCE OUTDOOR 4MC PIXEL Land spike 1 ASO 4 MC Pixel 500 mm Land spike 2 ASO 4 MC Pixel 500 mm 1.Underground part of Land spike (1) should be placed perpendicularly into the ground. (if you need to use tools to insert spike in the ground, use of some protective layer and applying pressure in the middle is recommended to prevent damaging of land spike) 1.Underground part of Land spike (1) should be placed perpendicularly into the ground.
INSTALLATION INSTRUCTIONS ARCSOURCE OUTDOOR 4MC PIXEL Land spike 3 ASO 4 MC Pixel 500 mm 1.Underground part of Land spike (1) should be placed perpendicularly into the ground. (if you need to use tools to insert spike in the ground, use of some protective layer and applying pressure in the middle is recommended to prevent damaging of land spike) 2. Screw the threaded bar (2) onto the underground part of spike (1) and fasten it with the socket head M5x5 (3). 3.
INSTALLATION INSTRUCTIONS ARCSOURCE OUTDOOR 4MC PIXEL STEP 3 CONNECTION Connection of ArcSource Outdoor 4MC Pixel is provided by 50cm long cable with male connector. (variety of cable adaptors is available) Before ASO 4MC Pixel are connected to power source, you have to connect the Active Terminator on the last luminaire in the row. That is necessary for correct identification of every single ASO 4MC Pixel and this has to be done for setup of every ASO 4MC Pixel row.
INSTALLATION INSTRUCTIONS ARCSOURCE OUTDOOR 4MC PIXEL STEP 4 INSTALLATION ACCESSORIES Half Top Hat and Top Hat Half Top Hat Top Hat 1 2 Unscrew the Allen head screw M5x12 from the ArcSource Outdoor 4MC Pixel housing and its base. Screw the half top hat to luminaire body as is shown at the picture above. The accessories must be tighted between two washer. Correct position of the spring washer is in touch with bolt head. ROBE lighting s. r. o.
INSTALLATION INSTRUCTIONS ARCSOURCE OUTDOOR 4MC PIXEL Twin Wall Cover (Flat / Round) Flat 1 Round 2 Unscrew four M3x6 screws from Twin Wall Cover and remove the cover from the luminaires base holder. 3 Prepare openings for cables in the mounting surface, minimal diameter of 21mm, and if necessary also two mounting holes according to disposition above. 4 Fasten the luminaires (without their bases) to the holder with two M5x12 screws via two outer mounting holes.
INSTALLATION INSTRUCTIONS ARCSOURCE OUTDOOR 4MC PIXEL Twin Wall Cover (Flat / Round) 5 6 Slide the cover on the luminaires holder mounted on the surface. Fasten the cover to the holder by four M3x6 screws. Pipe Clamp diameter 19 1 2 Unscrew M5x14 from the bottom of luminaire and remove its base. 3 Fasten the Pipe Clamp to the luminaire with M5x14 as illustrated. 4 Place the Pipe Clamp on a construction rod of 19mm in diameter.
INSTALLATION INSTRUCTIONS ARCSOURCE OUTDOOR 4MC PIXEL Optical Demo Set 1 Holder with spring clips and Optical foil Put the Optical Foil on the luminaire's optic. 2 Press the springs of the Holder together, place the Holder on top of the Optical Foil and secure it on the luminaire by releasing the springs. ArcSource Outdoor 4MC Pixel with Optical Demo Set installed. Holder secures the Optical Foil on the luminaire firmly. ROBE lighting s. r. o.