
Instruction Manual


INSTALLATION INSTRUCTIONS
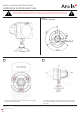
ARCSOURCE OUTDOOR 4MC PIXEL
ROBE lighting s. r. o. | Palackeho 416 | 757 01 Valasske Mezirici | Czech Republic | Tel.: +420 571 751 500 | E-mail: info@anolis.eu | www.anolislighting.com
VERSION 2.0 / 02_2022
5
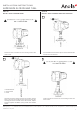
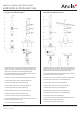
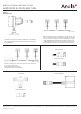
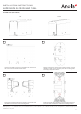
1.Insert the Land Spike into the ground. Underground part
of Land spike (1) should be placed perpendicularly into the
ground. (if you need to use tools to insert spike in the ground,
use of some protective layer and applying pressure in the mid-
dle is recommended to prevent damaging of land spike).
2. Screw the threaded bar (2) into the top of underground part
(1) and fasten it with the socket head M5x5 (3).
3. Slide the cover (4) on the treaded bar (2).
4. Slide the 36.5mm pipe cover (5) on the threaded bar (2).
5. Slide the cable holder (6) on the threaded bar (2).
6. Screw the nut with mount (7) on the threaded bar (2).
7. Fasten the luminaire on the mount (7) with one M5x14 screw
from the bottom of luminaire.
8. Pass cable through the cable holder (6).
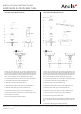
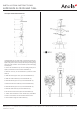
1.Insert the Land Spike into the ground. Underground part
of Land spike (1) should be placed perpendicularly into the
ground. (if you need to use tools to insert spike in the ground,
use of some protective layer and applying pressure in the mid-
dle is recommended to prevent damaging of land spike).
2. Screw the threaded bar (2) into the top of underground part
(1) and fasten it with the socket head M5x5 (3).
3. Slide the cover (4) on the treaded bar (2).
4. Slide the 36.5mm pipe cover (5) on the threaded bar (2).
5. Slide the cable holder (6) on the threaded bar (2).
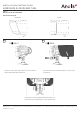
6. Slide the 36.5mm pipe cover (5) on the threaded bar (2).
7. Slide the ArcSources holder (8) on the threaded bar.
8. Screw the nut (9) on the treaded bar.
9. Fasten both luminaires to the holder (8) with M5x14 screws
from the bottom of each luminaire and its mount on the hol-
der.
10. Pass the cable through the cable holder (6).
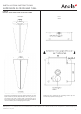
Land spike 1 ASO 4 MC Pixel 100 mm Land spike 2 ASO 4 MC Pixel 100 mm