
Instructions for Use


13 B A C K U P V I D E O R E C O R D I N G S A N D C L I P S
Back up recorded video clips to ensure important video is not lost or destroyed.
Choose Recorded Video Clips To Back Up
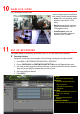
1. Connect a USB flash drive, HDD, or DVD writer to an available USB port (this step is mandatory).
2. Go to MENU > PLAYBACK.
3. Select cameras for playback.
4. Select the date and beginning time of the incident.
5. Click START CLIPPING button.
6. Select the ending time of the incident.
7. Click END CLIPPING button (same button as START CLIPPING). Clip will be marked.
8. Repeat steps 1-6 as many times as required.
9. Click FILE MANAGEMENT button to display a new window containing all marked clips.
10. Select the desired clips.
11. Click EXPORT to save files to the inserted USB device.
Lock Video Clips
1. Click on the images of the clips you want to lock.
2. Press the LOCK button to prevent the file from being erased.
Back Up Video Clips
3. Connect a USB flash drive, HDD, or DVD writer to an available USB port.
4. Click on the File Management button to display the File Management window.
5. In the File Management window, choose video clip(s) to back up and click Export button.
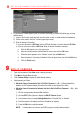
CAMERA LIST
Select cameras to view
CALENDAR
Select dates to view
PLAY/STOP
Toggles between Play and Stop
START/STOP CLIPPING
Toggles between Start Clipping
and Stop Clipping
LOCK
Locks selected video clips to
prevent them from being deleted
FILE MANAGEMENT
Displays list of saved clips, export
clips from this window