
User's Manual


7
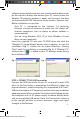
After you have nished setting up one or more locations, the only
other setup step is to set your preferred units (English or Metric)
for temperature, wind speed, and time. Click “Settings” at the top
of the screen (just right of the Weather FXi logo), and the General
Settings window will replace the main weather data screen
(Fig. 5). Use the “Time oset” drop down if necessary (due to
changes in start/end dates for daylight savings time, time zone
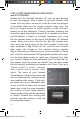
boundaries, etc). Then select your preferences for how other
types of data will be displayed using the remaining drop downs
for temperature units, etc. When nished, click “Save” to store
these settings and return to the main screen (Fig. 6). The Weather
FXi application is now setup and ready to use.
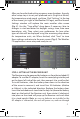
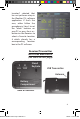
STEP 4: SETTING UP THE RECEIVER UNIT
The Receiver may be powered by batteries or from the included AC
adapter. To use the AC adapter, insert the round plug into the jack
on the lower left side of the unit, then connect it to a wall outlet.
To install batteries, slide the battery door down in the direction
of the arrow to remove it, and insert four AA batteries (alkaline
or lithium) in the indicated direction. Replace the battery door.
Insert the included easel stand into the key slot (above the battery
door) on the back of the Receiver unit, then rotate it (clockwise)
into place so the stand will prop up the Receiver unit and allow
it to stand upright. Note: as soon as batteries are installed or the
AC adapter is connected, the unit will power on, and run through
Fig. 5
Fig. 6
960900C Weather FXi 7-Day 1LIM.indd 7 2/6/09 11:01:44 AM