
User's Manual


INTITIAL SETUP
BATTERY & ADAPTER INSTALLATION
Photo Frame
:
Main Power Source: Plug in the 5.0V adapter into the adapter socket on the right for basic operation
IR Remote Control
Battery (CR2025) is included in the IR remote control. For initial setup, pull out the battery insulation sheet from the bottom of
the IR remote control.
To replace the battery, follow the instruction on the back of the IR remote control to pull out the battery door. Follow the battery
polarity and replace a new CR2025 battery. Close the battery door.
Installation
The weather station operates at 915MHz and does not require wire installation among the component parts. To ensure
successful installation and the best performance, we recommend you follow the installation instructions in the order they
appear in this manual.
1. Selecting a location for the anemometer
Select a mounting location for the anemometer that is:
- Outdoors, not blocked on top or sides, so wind can freely reach the anemometer
- Within 75 meter open area from the monitor. Reduce distance if obstacles is between the anemometer & the monitor
The best location for the anemometer is usually mounted on a mast in an open area where wind is not blocked on top or sides,
or above roof level on the building where the monitor is located.
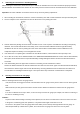
2. Mounting the anemometer
Important: Before mounting, be sure the monitor & anemometer are within the effective transmission range.
Note: To mount the anemometer, you need a mast (not supplied) about 1 – 1.25 inches (2.54 – 3.1 cm) in diameter, and the
hardware necessary to fasten it to the mounting location. If you previously installed such a mast (for mounting antenna, for
example), you can mount the anemometer on that mast.
1. If necessary, mount and ground a mast as directed in the instructions provided by the mast.
2. Place the supplied U-shape metal plates around the mast. Insert 4 pieces of the supplied Hex screws through the holes
of the U-shape plates and the holes on the anemometer’s mounting bracket.
(The wind vane is above the wind cup and the metal bar of the anemometer is in horizontal level)
3. Tighten the supplied Hex nut onto both ends of each screw