
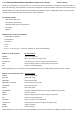
User's Manual


4. Calibrating the anemometer & installing batteries
After mounting the anemometer, follow these steps to calibrate the wind direction so that the anemometer properly measures
the wind direction and transmit to the monitor. Be sure battery has been removed from the anemometer before the calibration.
Important: The same calibration is needed for the first set up and every battery replacement.
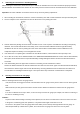
1. After mounting the anemometer, loosen the screws on the battery door with a small screwdriver and open the battery door.
2. Use the compass on the anemometer and turn the wind vane so it is pointing due north.
3. Hold the wind vane pointing due north and do not allow it to turn. Insert 2 pieces of AA batteries according to the polarity
indicated. The red LED indicator above the battery cover of the anemometer will flash few times right after battery
installation. Be sure the vane is pointing due north at the moment when red LED flashes and the calibration is now
completed. Replace the battery cover and tighten the screws.
4. If the wind vane is not pointing due north when the red LED first flashes, remove batteries and repeat step 2 & 3.
5. Go to “SET UP” mode, select “SEARCH NOW” in the “WIRELESS SENSOR RECEPTION” section and exit. Wind direction,
wind speed, wind chill & channel-1 temperature/humidity readings will appear within 2 minutes if the RF transmission is
successful.
6. If the wind reading does not appear after 2 minutes of searching, the RF transmission is failed.
Shorten the distance between the monitor & wind meter and search for the sensor again. If the RF transmission still failed,
then shorten the distance again and reset the wind meter by removing all batteries from the wind meter and wait for 10
seconds before re-installing the batteries again. Then repeat above step until the RF communication is completed.
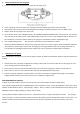
5. Selecting a location for the rain gauge
Select a mounting location for the rain gauge that is:
- a flat, level surface and suggest to look for a location where the rain gauge can be placed 1 meter or more above ground
level.
- within 40 meter (131 feet) open area from the monitor. Reduce distance if obstacles is between the rain gauge & the
monitor
- in an area not blocked on the top or sides, so rain can freely reach the rain gauge (for example, not under an overhang or
too close to a building or fence)
Cautions:
- To prevent false rainfall readings caused by water splashes, do not choose a location that is not level or that is too close
to the ground, a swimming pool, lawn sprinklers, or anywhere water might accumulate or run off
- The screen in the cylinder of the rain gauge filters most debris (such as leaves) that might fall into the rain gauge. To
avoid frequent build-up of debris in the cylinder, do not mount the rain gauge too close to the trees or plants