
User's Manual


6. Battery Installation for the rain gauge
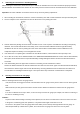
1. Press the tabs back as indicated below to unlock the rain gauge cover
2. Lift the rain gauge cover off its base. Then carefully remove the packing tape from the bucket assembly
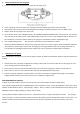
3. Open battery cover and insert 2 pieces of AA batteries according to the polarity indicated. Close the battery cover
4. Replace & lock the rain gauge cover on the base
5. Go to “SETUP” mode, select “SEARCH NOW” in the “WIRELESS SENSOR RECEPTION” section and exit. The monitor is
now searching for all remote sensors. Total rainfall reading (in this case “0” mm or inch) will appear within 2 minutes if the
RF transmission is successful and the monitor & rain gauge are now within the effective transmission range.
6. If the rainfall reading remain “- - -“ after 2 minutes of searching, the RF transmission is failed.
Shorten the distance between the monitor & rain gauge and search for the sensor again. If the RF transmission still failed,
then shorten the distance again and reset the rain gauge by removing all batteries from the rain gauge and wait for 10
seconds before re-installing the batteries again. Repeat step 5 (& 6) until the RF communication is completed.
7. Mounting the rain gauge
Before mounting the rain gauge, be sure the rain gauge & monitor are within the transmission effective range and batteries are
installed.
1. Hold the base of the rain gauge flat against the mounting surface then use a level to make sure the rain gauge (as it rest
on the mounting surface) is horizontally level.
2. Use a pencil to trace the inside of the mounting holes on the base of the rain gauge to mark the screw locations.
3. Drill a hole in the center of each marked location and insert the supplied plastic screw plugs
4. Hold the rain gauge against the mounting surface so the holes on the base are aligned with the plugs, then thread the
supplied washer head screws into each hole and use a screwdriver to tighten them.
WEATHER FORECAST SETTING
To obtain an accurate weather forecast, you need to input your current weather condition as initial setting.
Go to “SETUP” display mode and use [UP]/[DOWN] to select “Weather Forecast”. Press [LEFT]/[RIGHT] to select your current
weather condition between “Sunny”, “Partly Cloudy”, “Cloudy”, “Rainy” or “Stormy” as the initial weather forecast setting. Press
[ENTER] to confirm setting and [EXIT] to exit the “SETUP” mode.
The unit predicts weather condition of the next 12 – 24 hours based on the change of atmospheric pressure. The coverage
area is around 30 – 50 km. The weather forecast is based on atmospheric pressure change and is about 70-75% correct. As
weather conditions cannot be 100% correctly forecasted, we cannot be responsible for any loss caused by an incorrect
forecast.