W4 Wireless Security Camera System Quick Start Guide Thanks for your purchase at ZOSI. This quick start guide will guide you thr stalla and related se to following this guide, please visit ps and detailed (h ps://zositech.com/) for more installa informa If you have any problems about our products, please visit our online support center (support.zositech.com) or contact us before returning. Pr a Wireless IP Camera Model: ZG1883M Manufacture Name: Ansjer Electronics Co.,Ltd ZOSI Technology Co., Ltd.
Contents What's in the Box 02 Gallery & Specs 03 How the System Works 04 How to Connect the System 04 Camera Installation Steps 05 Installation Tips 06 Hard Drive Installation 06 Remote View Settings (App) 07 Remote View Settings (AVSS Client) 10 New Camera Pairing 15 Warranty and Customer Service 16 This device contains licence-exempt transmitter(s)/receiver(s) that comply with Innovation, Science and Economic Development Canada’s licence-exempt RSS(s).
01 What's in the Box 1*NVR 4*Camera 1*12V/2A NVR Power Adapter 4*12V/1A Camera Power Adapter 1*1m Ethernet Cable 4*Mounting Template 4*Warning Sticker 1*HDMI Cable 4*Mounting Screw Bag Quick Start Guide 1*Quick Start Guide 1*Mouse 1*Waterproof Lid NOTE: there are 4pcs cameras kit and 8pcs cameras kit. The amount of cameras, 12V/1A camera power adapters, mounting templates, mounting screw bags and warning stickers will be the same as the camera kit you purchase.
02 Gallery & Specs 2.
03 How the System Works The wireless NVR system consists of two parts. One is the NVR connected to the monitor, and the other is the IP cameras installed. Both NVR and IPC need independent power supply to work. Users can watch the real-time video captured by each IPC on the monitor. These images will also be saved in NVR for later playback at any time.
Backup USB port Monitor Router 05 Camera Installation Steps 1. Screw the antenna onto the camera. Please keep the antenna vertical for best reception. Note: fold the camera bracket before installing the antenna so you can easily install the antenna as shown in the picture. 2. Drill a hole on the wall according to mounting template, and insert wall plugs into the hole. 3. Align the mounting hole of the camera with the wall plugs, and then tighten screws into the wall plugs. 4.
06 Installation Tips Please refer to the picture down below for the ideal installation. It is recommended to place the camera at least 7 feet (2.1m) above the ground and tilted slightly downward towards the monitoring area, excluding any hightraffic areas. (E.g.sidewalks or roadways). 1. Ensure that the camera’s view is open and free of obstructions. 2. Place the camera at no more than 20 feet (6.1m) to ensure that the area you want to monitor is within the field of view. 3.
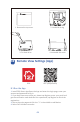
1. Remove the top cover 2. Hard disk wiring 3. Fix Hard drive 4. Assemble the cover 08 Remote View Settings (App) ZOSI APP (IOS/Android) 8.1 Run the App 1. Install ZOSI Smart App.Open the App and enter the login page, enter your account and password to log in. 2. If you don't have an account yet, please tap Register, enter your email and get the verification code.And then set a password, tap Register to finish the registration. 3. Get to the main page and click the "+" in the middle to add device. 4.
Login Register Add device icon 5. Scan the QR code or manually enter the ID number to add device.
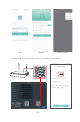
Register Add device icon 8.2 Two-way Audio Enter the channel, long press the audio icon to start voice intercom.
09 Remote View Settings (AVSS Client) AVSS PC client can be applied to DVR/NVR/IPC monitoring, with functions such as live view, device management, and remote video playback etc.. Make sure that the device has completed the network configuration before adding device on PC client. Download and install the AVSS client, follow the steps below to start setup. Official Download: www.nsst.com/www.zositech.com. 9.1 Login Install and open AVSS PC client, select the language and click Login.
9.3 Device Management 9.3.1 Click Add Device below the device list to add device information Select device type: NVR/DVR/IPC, etc., enter the device name, device ID or instant identifier ID (Drag the device QR code or sharing codeinto the QR Code Identification Zone), user name, device password and channel amount, and then click Confirm to save the setup.
9.3.3 Device Configuration Get to the device configuration. 1. Modify the login password of the device 2.
3. Date and time 4. Mirror mode and recording mode. Click Submit to apply after modifications. 9.3.4 Search Device The device and AVSS client are connected to the same LAN, and the AVSS client can search out the information of the device.
9.4 Live View Select channel to watch live streaming. 9.5 Video Playback Click Playback, select device, channel, date, time, click the play icon to start replaying recorded footage.
10 New Camera Pairing The cameras have been paired before leaving the factory, NVR will automatically display video after powering on the camera system. It is recommended that users conduct a power-on test before installation to ensure that each camera can work normally. If it fails, please contact our customer service. If you want to add a new camera or reset the camera, please follow the following steps. Take out the camera, install the antenna, connect NVR and camera with a network cable.
NOTE: If all eight IPC channels have been connected and you need to connect other cameras, then you will need to delete one or more channels to add other cameras. 11 Warranty & Customer Service Please kindly note that product failures caused by the following conditions are not covered by the warranty: 1. Product failure due to accident, negligence, disaster, improper operation or misoperation. 2.