GB Operating instructions Caution: Before starting, please read and note the operating and safety instructions! Operating and safety instructions for trailers: Brand: ANSSEMS Type: AMT Fabrikant – Hersteller – Manufacturer – Fabrikant: ANSSEMS AANHANGWAGENS B.V. www.anssems.
Table of contents Pagina 2 1. Introduction 2. Safety Precautions, Operation, Servecing and Cleaning (general) 2.1 Trailer (generel) 2.2 Coupling Head 2.3 Overrun Assembly 2.4 Axles 2.5 Electrical connection of the lighting system 2.6 Wheel and tyre 2.7 Jockey Wheel 2.7.1 Jockey Wheel 2.7.2 Tipping the jockey wheel 2.8 Winch 2.9 Wheel wedge 2.10 Ramps (i.c.m. supports) 2.11 Charging the trailer 2 2 3 4 6 7 8 8 8 9 10 11 11 14 3. Mounting the mudgards 14 4. Mounting the Wheel and Tyre (option) 15 5.
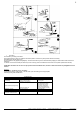
2.2 Coupling Head Safety Precautions: • Always ensure that the coupling head is properly connected to the towing vehiclis towball every time you couple up. If not coupled up correctly the trailer may become detachted from the towing vehicle and cause an accident! • Maximum possible articulation of the coupling head must not exceed +/- 25° vertically and +/- 20° horizontally. If exceeded, components will be overloaded and the operation of the assembly adversely affected.
Pictures paragraphe: 2.2 Coupling 2.3 Overrun Assembly Safety Precautions: • When parking your vehicule and trailer on site you must applly the trailer parking brake. If the trailer is parked and then diconnected from the towing vehicle it is recommended that each wheel is chocked using suitable wheel chocks. Caution: Please note when parking the trailer that the wheelbrake auto-reverse mechanism will allow the trailer to travel backwards for approximately 25 cm.
• Uncoupling Secure trailer by chocking both wheels. Apply hand-brake fully. There are 4 different hand-brake systems. With all four systems please observe the following: Hand-Brake lever with gas strut (Fig 3) Enure handbrake is fully applied (as highlighted). This will ensure that the gas strut will automatically reapply the wheel brakes if trailer starts to roll backwards.
2.4 Axles Safety Precautions: • No welding is permitted on AL-KO axles. • It is most important that the wheel and hub/brake drum are dimensionally compatible. This means that the P.C.D., wheel bolts and inset must all be compatible with both the hub/brake drum and the wheel rim. Particular attention must be paid to the recommended torque figures for the wheels bolts.
Troubleshooting Default Cause Solution Poor braking Linings are not fully bedded in. Linings are damaged/dirty Friction losses too high, overrun device shaft corroded. Reversing heavy or blocked Only occurs when the braking system is set too thightly. Auto-reverse lever is stuck. Brakes overheating when driving Incorrect setting. Braking system not fully released during forward travel. Overrun lever stuck Wheel brake dirty. Cable or Bowden cable kinked. Release springs defective or broken.
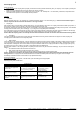
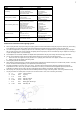
2.6 Wheel and Tyre • Ensure that the tyres are at the correct tyre pressure and have an adequate tyre tread (as regards safety and uniformity of wear-and-tear). The tyre pressure should be applied in the "cold" condition with the vehicle in an unloaded condition. Tyre Tyre Pressure [bar] 175/70 R13 185/70 R13 145 R13 145/80 R13 155 R13 155/80 R13 165 R13 195/50 R13 185/60 R12 2.5 2.5 4.5 6.5 6.5 ATTENTION: You cannot ensure that your tyres have a minimum pressure of 6.25 bars in all places.
2.7.2. Tipping the jockey wheel You can tip the jockey wheel when you wish to make room for the vehicle. You do not need to uncouple the trailer for loading or unloading the vehicle. Tipping from vertical/up to horizontal/down Turn the handle to the left (1). The position of the handle can be removed and so you can put it in the position which is the most conviened for you. Turn the handle so far that the breast of the handle comes free from the base plate.
2.8 Winch The winch is installed on an adjustable console. This console is to be placed at two different locations in the breadth direction in the front cross bar and in three different positions in the longitudinal direction. When the winch is not used it is possible to put the hook of the winch trough the tie eye on the front beam. You put the winch a little bit under pressure. With this there is no tolerance between the console and the frame.
Check the wire cables regularly for wear. Removal criteria as per DIN 15020: E.g. crushing, breakes in the individual wires. Should these cables be damaged, they must be replaced immediately. The winch has already been lubricated in the works. It is recommended however that the drive shaft bearing bushes and the drum hub be olied regularly. Grease the toothed wheel rim regularly.
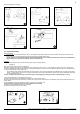
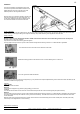
- whether the ramps are at right angles with respect to the rear of the trailer. If not, the proper positioning cannot be guaranteed. - Check whether the ramp is fully on the front tip. If not, the ramp may be lifted out of its location when vehicles drive up the ramp. This will lead to a hazardous situation. - Check whether the hook is touching the vertical edge on the back of the trailer. Dirt in the channel may lead to an incorrect ramp placement.
WRONG!! Hook comes loose. Detail Fabrikant – Hersteller – Manufacturer – Fabrikant: ANSSEMS AANHANGWAGENS B.V. www.anssems.
2.11 Charging the trailer • • • • • • The cargo should be properly secured in place. This is to prevent loss and shifting of the cargo during motion. The shifting of the cargo may lead to a sudden change in the handling characteristics of the vehicles. Furthermore, while loading the vehicle on public roads, follow all the applicable regulations (among others, the visibility of the lighting and maximum length of projecting cargo). Check whether it is permissible to drive with the trailer.
4. Mounting the wheel & tyre Fixation under the floor with seperate support. Fabrikant – Hersteller – Manufacturer – Fabrikant: ANSSEMS AANHANGWAGENS B.V. www.anssems.
When you buy a spare wheel and support a description is delivered also. When you buy a sparewheel including a separate support a mounting description is attached. With this description you can mount the spare wheel and support under the floor of the trailer. Materials for fixation needed and detail for fixation off the spare wheel on the support. Mounting the bolts of the spare wheel on the support for 4-holes rim (145/80 R13 / 145 R13) (AMT 1500-...
You can mount the support under the floor as follows: (4 holes (pattern of the "square" holes) to bore first, to mount after) : 5. Mounting the shock absorber Your trailer can be equipped with shock absorbers. AMT 1500-... The mounting plate at the side, the supports for shock absorbers (2 x – stitch version per axle) to the schwingarm and the shock absorbers has to be mounted as below. (See pictures) AMT 2000-..., AMT 2500-... en AMT 3000-...
The mounting plate at the side, the supports for shock absorbers (2 x – stitch version per axle) to the schwingarm and the shock absorbers has to be mounted as below. (See pictures) Detail ATTENTION: Bolt heads should always point in the direction of the tyre. (See pictures) After installation, check that the tyres have sufficient play (min. 16 mm). 6. Using accessoiries 6.1 Front-/Tailgate Your trailer can be equipped with a front-or/and tailgate.
6.2 Wheel stop Your trailer can be equipped with a wheel stop. The wheel stop may be used to fix a vehicle in position. The use of the wheel stop does not require any modifications to the trailer. If a particular type of vehicle is transported more often, one may determine the proper place for the vehicle in order to obtain an optimum coupling pressure. Attention: In addition to placing wheel stops (or a set of two units), secure the vehicle being transported in place with a little extra firmness.